Monday, 31 August 2015

Frosty The Snowman Hat from Stampin' Up! UK Demonstrator Sarah Poulton

Good morning crafters and a happy wet and grey Bank Holiday Monday to you from a very rainy Isle of Wight. What better excuse to stay in and craft than wet weather? I am in the middle of a series of cross stitch Christmas gifts so might put on a good film with the girls and have a bit of a stitchy day.

I have another festive project to share with you today. This was inspired by a Connie Stewart video I happened upon on Youtube. I love the simplicity of creating the hat simply with strips of card and the Circles Collection Framelits.

A couple of tips for you if you want to have a go. It is definitely worth having a tin of beans or bottle of water to hand to help loosen the fibres in the main body of the hat as you curl it round. And also, I found that if you don't have the spiral border punch (now discontinued) you can simply cut little notches up to your score line to make little tabs to glue to the circular base.


To create this hat gift box you simply need Basic Black and a contrasting strip in either silver or grey (or any colour/pattern of your fancy). 

For decoration I used the Flower Shop Bundle to create this layered flower. I stamped and punched two main red flowers and then punched the centre from Hello Honey to create a contrasting middle. I curled the petals to give a little dimension and secured it all to the hat with several glue dots.


I filled my gift box hat with a sachet of festive mocha and a little packet of mini marshmallows. A perfect little place setting or neighbour gift.

Thank you for popping by today. Please let me know if you have any questions about Stampin' Up! or our products. I would love to help. All items can be purchased online via my shop or get in touch directly and I can order them for you to be delivered direct to your door. I'd also love to Demo for you and your friends at a crafty party. As the hostess you earn lots of lovely freebies and you all get to make a fun crafty project too (no crafting experience necessary!)

 -XXX-
Built for Free Using: My Stampin Blog

Friday, 28 August 2015

A Berry Merry Christmas from Stampin' Up! UK Demonstrator Sarah Poulton

Good morning crafters. I am super excited that we are only 4 days from the launch of the new Stampin'  Up! Autumn Winter catalogue. So many ideas and lovely stamps and accessories contained within its pages.

I have another little sneak peek for you today. This card was inspired by one I saw on the live stream of the US Stampin' Up! convention. It uses a new stamp set called Berry Merry which contains two larger fancy sentiments and then lots of little elements (fir cones, bows, holly, berries, leaves and flowers) to embellish your design. 

It is such a versatile and fun stamp to create with. This is another one of my 'love of stamping' sets. These are stamp sets that I love to make with purely for the enjoyment of stamping and having fun with the process. 

,

I matched the Berry Merry stamp set with the matching Boughs and Berries Textured Impressions Embossing Folder (available together as a great value bundle costing £18.50).


To create this card I heat embossed the Joy with gold embossing powder then created elements with Garden Green and Cherry Cobbler inks. I layered Whisper White over Champagne Glimmer Paper and attached to a Cherry Cobbler card base. 

Thank you for popping by today. I will be back next week with lots more festive fun to celebrate the launch of the new Autumn. Winter catalogue. Please let me know if you have any questions about Stampin' Up! or our products. I would love to help. All items can be purchased online via my shop or get in touch directly and I can order them for you to be delivered direct to your door. I'd also love to Demo for you and your friends at a crafty party. As the hostess you earn lots of lovely freebies and you all get to make a fun crafty project too (no crafting experience necessary!)

 -XXX-


Built for Free Using: My Stampin Blog

Wednesday, 26 August 2015

An Among the Branches Sneak Peek from Stampin' Up! UK Demonstrator Sarah Poulton

Good morning and a happy wet and rainy Wednesday to you all. To celebrate the weather and the changing of the seasons (although I haven't quite given up on summer just yet!) I created this card using some of my lovely sneak peek Autumn Winter products.


This card was made using a fantastic upcoming bundle; the Among the Branches stamp set coupled with the Woodland Textured Impressions Embossing Folder. Such a great bundle at £19.25. Available from September 1st.

To anyone that knows me, they'll know how much I love owls. So this set was a must for me. I loved being able to add the owl silhouette to my embossed forest.

To create the contrast I embossed the trees and then used Soft Suede ink and a dauber to darken the tree trunks.

I added linen thread and a gold heat embossed sentiment (this is taken from the Among the Branches stamp set). The added embellishments are new Into the Woods Elements (£6.00).


I am absolutely loving all the new products. I would love to share the new catalogue with you. So if you would like a copy on your door mat please drop me a line on poulton_sarah@yahoo.co.uk with your address and I'll happily pop one out in the post to you.

As it is Wednesday that means new Weekly Deals. Click below to see the new products on offer this week.


Thank you for popping by today. I will be back Friday with some more festive sneak peeks from the new Autumn Winter catalogue. Please let me know if you have any questions about Stampin' Up! or our products. I would love to help. All items can be purchased online via my shop or get in touch directly and I can order them for you to be delivered direct to your door. I'd also love to Demo for you and your friends at a crafty party. As the hostess you earn lots of lovely freebies and you all get to make a fun crafty project too (no crafting experience necessary!)

 -XXX-

Monday, 24 August 2015

An English Garden Twisted Box from Stampin' Up! UK Demonstrator Sarah Poulton

Good morning crafters. I thought I would give you a little break from Christmas this morning (although I have lots of lovely festive projects all ready to share with you. I have gone a bit Christmas crafting crazy recently!).

I was surfing the crafty blogosphere on Friday and came across this fantastic tutorial to create these twisted gift boxes. I was looking for inspiration for my card class 3D project and thought this would be perfect. So I set about recreating it.

I used a Mint Macaron based and scored/cut according to Kat's instructions. I realised the tutorial needed to be slightly adapted to fit UK A4 (I simply scored the short edge at 2", 4", 6" and 8" leaving a slightly thinner tab for holding the box together).


I used off cuts of English Garden Designer Series Paper to decorate my box and wrapped a length of Pear Pizzazz Cotton Ribbon all the way around my box to keep it all together.

I created the tag with my Note Tag Punch and stamped the flower from Garden in Bloom with Old Olive and Pear Pizzazz inks. I finished with a Metal Rimmed Pearl.


This is a lovely little project to use a table favour or place setting. It would fit small amounts of sweeties or treats in perfectly. I love that this has the two compartments for fitting treats in to. You could also use it for jewellery or small gifts. 

Thank you for popping by today. I will be back Wednesday with some more festive sneak peeks from the new Autumn Winter catalogue. Please let me know if you have any questions about Stampin' Up! or our products. I would love to help. All items can be purchased online via my shop or get in touch directly and I can order them for you to be delivered direct to your door. I'd also love to Demo for you and your friends at a crafty party. As the hostess you earn lots of lovely freebies and you all get to make a fun crafty project too (no crafting experience necessary!)

 -XXX-

Built for Free Using: My Stampin Blog

Friday, 21 August 2015

A Festive Fireplace Easel Card Sneak Peek from Stampin' Up! UK Demonstrator Sarah Poulton

Good morning crafters and welcome to another Christmas-y Autumn Winter Catalogue Sneak Peek. This time I am sharing a project I came up with using the upcoming Autumn Winter Festive Fireplace stamp set and Fireside Framelit bundle.

As soon as I saw this stamp I knew it would be PERFECT for a vellum and battery tealight easel card creation. I am a big fan of using battery tealights for my special Christmas cards. They become a decoration in themselves and its nice to sometimes give an extra special card. So this is what I came up with.


 I found packs of battery tealights in my local pound shop and as a bonus they were the flickering ones giving the fire an extra realistic light effect. I deliberately photographed this card as it was getting dark to give you an idea of how lovely and warm the card felt with the glowing fireplace.

For this card I used a 10.5cm x 29.7cm (half A4 cut at 10.5cm). I scored the card at 14.8 and again at 7.4 (this formed the folded over easel part of the card).  This is a standard easel card in format. However, I had to cut the window through three layers of card using a craft knife to give the tealight the chance to glow through the fireplace. I started by cutting the middle of the fireplace out and using the middle rectangle as a template to cut the next two layers (I then carefully lined them up to adhere them together).  I stamped the fire on to a small piece of Vellum cardstock (slightly larger than the hole in the middle of the fireplace) and turned over to color the image with Stampin' Write markers. I sandwiched the Vellum between the layers before adhering the fireplace to the main card.


I used a Cherry Cobbler based layered with Crumb Cake and Very Vanilla. I stamped the fireplace on to Very Vanilla and coloured with Blender Pens and Cajun Craze ink. The Merry Christmas sentiment is from another new stamp set called Cozy Christmas. To help the easel stand up I used Candy Dots and jewels. It gives just enough height to help the card stand up.

Finally here is a view of the card from the side to show how I positioned the tealight to make the fire glow.


I think I have earned a cuppa and a sit down today. It is 11.37am as I type this and the girls had me up at 5am. By 7am we were out walking and enjoying the warm morning (I thought as the weather is so changeable at the moment it would be best to take advantage of the sunshine early). We walked up over the hill to Carisbrooke Castle and the girls enjoyed the sights and meeting lots of early morning dog walkers. We then came home and baked a cake, a quiche, painted Summer's nails and I finally found time to publish this blog. A cuppa is definitely now in order. Phew......

Thank you for popping by today. Please let me know if you have any questions about Stampin' Up! or our products. I would love to help. All items can be purchased online via my shop or get in touch directly and I can order them for you to be delivered direct to your door. I'd also love to Demo for you and your friends at a crafty party. As the hostess you earn lots of lovely freebies and you all get to make a fun crafty project too (no crafting experience necessary!)

 -XXX-

Built for Free Using: My Stampin Blog

Thursday, 20 August 2015

Altered Christmas Domino Decorations from Stampin' Up! UK Demonstrator Sarah Poulton

Today I am sharing my favourite project from my Christmas Craft Days this year, altered stamped dominoes.  I love the simplicity of stamping on to dominoes to create either a personalised piece of jewellery or a hanging Christmas decoration.

I searched Amazon for the ideal dominoes. I searched all the local shops and Charity shops and only found black dominoes. So I used these white dominoes. They worked well although I bought several packets and some were more yellow than white. But I discovered you could whiten them with White Staz On and then stamp over the top once dried (as with the middle domino below).


I covered the reverse of each domino in a small section of patterned paper (for these I used Merry Moment DSP) and then adhered a flat back jewellery bail (I used these from Ebay) so that my class attendees could either thread a ribbon or chain to make it in to a decoration or necklace.

My ladies were then free to stamp their domino with whichever stamps they wanted. Most ladies chose to use the three above as their inspiration. I created this trio of festive animals using the White Christmas stamp set. I stamped the images in Black Staz On. Once dried you can use a permanent marker such as a Sharpie to colour the image (I used a Stampin' Up! Chalk Marker for the polar bear). It has to be colour fast as once you glaze the domino any non permanent colours will run.

Once coloured I covered the dominoes with Crystal Effects glaze and sprinkled a little Dazzling Diamonds in to the glaze to give a little festive sparkle.

I have to share a few more of the samples I made (I got a bit carried away and made about 20 sample dominoes). The 'fa la la' one was my absolute favourite and it uses a sadly retired stamp set from many years ago. To this day Season of Joy is still my favourite Stampin' Up! set and I was super happy to give it another outing. I don't think I could ever be parted with my Season of Joy.


To finish each domino I coated the edges with gold foiling pen (non SU) and left to dry. This gives it a nice festive finish. So simple and so fun to make. My ladies came up with so many different variations. It was lovely to see so much creativity.

Thank you for popping by today. I'll have another new Christmasy project for you tomorrow. Please let me know if you have any questions about Stampin' Up! or our products. I would love to help. All items can be purchased online via my shop or get in touch directly and I can order them for you to be delivered direct to your door. I'd also love to Demo for you and your friends at a crafty party. As the hostess you earn lots of lovely freebies and you all get to make a fun crafty project too (no crafting experience necessary!)

 -XXX-
Built for Free Using: My Stampin Blog

Wednesday, 19 August 2015

A Cozy Christmas Sneak Peek from Stampin' Up! UK Demonstrator Sarah Poulton

Happy Weekly Deals Wednesday.  This week's deals feature sequins, a punch, embossing and ribbon. A great stash expanding series of discounts.

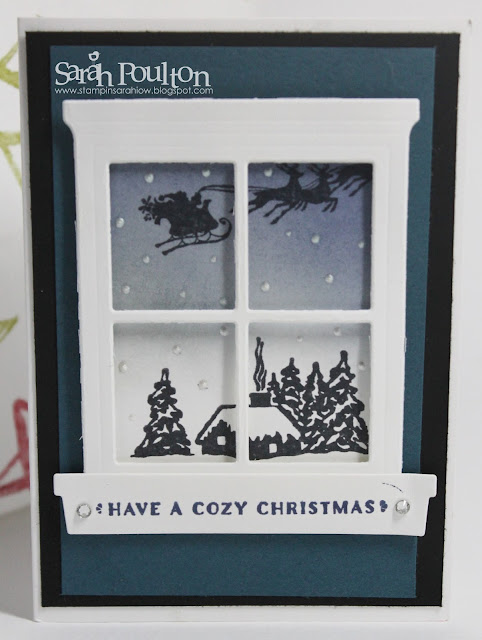
And now for some crafty sneak peekiness. As a Demonstrator I have the benefit of being able to pre-order from the new Autumn Winter catalogue a month before it is released. My box of festive loveliness arrived last week and I've loved getting started with some new Christmas craftiness.  Here is a card I created using some lovely new products from the Autumn Winter catalogue (*inspired by this card from For the Love of Stamping*). This card uses the lovely traditional stamp set, Cozy Christmas, paired with the new Hearth & Home Thinlits Dies.


I used Night of Navy to sponge the night sky background. I added pearls for snowflakes and jewels to embellish the sentiment. I absolutely adore this window framelit and the possibilities are endless for scenes to create outside the frame.


I cannot praise this catalogue highly enough. There are so many lovely creations and stamps. Would you like a copy posting to you? I would love to pop a copy over to you so you can browse in your own time (and having your hands on the physical copy is so satisfying to see everything in real size). Please drop me a line with your details and I'll get one straight out to you (poulton_sarah@yahoo.co.uk).


Thank you for popping by today. I hope you'll join me for the rest of my Christmas crafting projects that I'll be sharing throughout the week. I'll have a new project for you tomorrow. Please let me know if you have any questions about Stampin' Up! or our products. I would love to help. All items can be purchased online via my shop or get in touch directly and I can order them for you to be delivered direct to your door. I'd also love to Demo for you and your friends at a crafty party. As the hostess you earn lots of lovely freebies and you all get to make a fun crafty project too (no crafting experience necessary!)

 -XXX-

Monday, 17 August 2015

Merry Moments Christmas Lantern Lights from Stampin' Up! UK Demonstrator Sarah Poulton

Good morning and Merry Christmas! It is Christmas Crafting Week here at Stampin' Sarah. To celebrate my Christmas Craft Days this weekend and the upcoming Autumn Winter catalogue (available to order from on September 1st) I have decided to share a week of Christmas themed projects. And there will also be a few new catalogue sneak peeks along the way too.

My first share is this Merry Moments Paper Lantern string of Christmas lights. I purchased a bulk lot of blank LED light strings from Ebay (see here) for all the attendees of my Christmas Days. I then cut stacks of Merry Moments Designer Series Paper in 6" squares.


This is a bit of a mind bender to begin with. I had a few attempts at making these lanterns before I got the knack. But once you get the idea they are super simple. It has been a while since I have attempted origami. But I loved the effect once they were completed.


Here are the instructions I used. I found them on Pinterest via an origami website. However, I wasnt able to find the original source for credit. Just an extra tip. I found it easier to fold across the diagonals before starting. This just made step 4 a little easier to fold.


***the original instructions I followed seem to be having some problems with my blog post. I found these alternative instructions on a lovely wedding website. Click below for the link***


I made 10 of these lanterns and then simply popped them over the LED lights. Here are the lanterns lit up (I took this last night once it had gotten a bit darker at home). I love how the lights make the lanterns glow and show off the lovely Christmasy paper designs.


The tree is made from an old pallet. This was another Pinterest inspired design made by my Dad. Mum lent me the tree for display purposes. This usually stands in front of Mum and Dads fireplace.

Thank you for popping by today. I hope you'll join me for the rest of my Christmas crafting projects that I'll be sharing throughout the week. I'll have a new project for you on Wednesday. Please let me know if you have any questions about Stampin' Up! or our products. I would love to help. All items can be purchased online via my shop or get in touch directly and I can order them for you to be delivered direct to your door. I'd also love to Demo for you and your friends at a crafty party. As the hostess you earn lots of lovely freebies and you all get to make a fun crafty project too (no crafting experience necessary!)

 -XXX-

Friday, 14 August 2015

A Merry Moments Christmas Scrapbook Page from Stampin' Up! Demonstrator Sarah Poulton

Happy Friday! It is nearly the weekend *hooray* And in celebration of the fact that tomorrow is my first Christmas Craft Day 2015 (and the official start of Christmas crafting season at Stampin' Sarah HQ) I have a Christmas scrapbook page to share with you today.

As I was working on the projects for my Christmas Day I ended up with lots of little bits of beautiful Merry Moments Designer Series Paper left over. They were the perfect size to create the background for my photo for this page. I then themed the rest of the pages colours around the DSP (and as with all Stampin' Up! papers the colours are all listed on the reverse of the paper pack as well as in the catalogue too).


Behind the picture I slipped two of Stampin' Up!'s lovely new Foil Doilies. I love the festive fanciness of adding these to a project.

To create my chain of decorations I used lots of mixed embellishments (sadly some of these are now retired). I can give you a little bit of insider info, there are some seriously lovely embellishments in the new Autumn Winter catalogue that would be PERFECT for this page. But any buttons and sparklies you have in your stash would work well.

I hand drew the string on to my 12"x12" Cherry Cobbler cardbase and then adhered my mix of embellishments. I created baubles with circle punches and the Lots of Joy stamp set, I added a punched star and various buttons and pearls to give a mix of textures and sizes.


I do have a confession, the beautiful glimmery 'Wishes' is from a retired kit from last years Autumn Winter catalogue (do you remember the gorgeous star box kit?). But I can assure you that there are lots more lovely kits and embellishments coming on September 1st. If you'd like a catalogue posting out to you now (so you can get a head start on all that Christmas loveliness) please drop me a line on poulton_sarah@yahoo.co.uk and I'll pop one in an envelope for you.


The final finishing touch was the 'Christmas' that I stamped with Staz On ink and my rotary stamp and stamped directly on to the photo.

Thank you for popping by today. Please let me know if you have any questions about Stampin' Up! or our products. I would love to help. All items can be purchased online via my shop or get in touch directly and I can order them for you to be delivered direct to your door. I'd also love to Demo for you and your friends at a crafty party. As the hostess you earn lots of lovely freebies and you all get to make a fun crafty project too (no crafting experience necessary!)

 -XXX-
Built for Free Using: My Stampin Blog

Wednesday, 12 August 2015

A Garden in Bloom Summer Scrapbook page from Stampin' Up! UK Demonstrator Sarah Poulton

Happy Weekly Deals Wednesday! All new special deals are live today for the next week. Great products included this week including In Color Blossom Accents and my favourite Scallop Tag Topper Punch.

Today's crafty share is another of my week of scrapbook pages. This uses the Garden in Bloom stamp set with a variety of colours including Blushing Bride & Melon Mambo, Old Olive & Mint Macaron, Hello Honey & So Saffron. I thought this garden inspired set would be a perfect partner for my photos from one of the Isle of Wight's fantastic summer shows. The girls and I had a fantastic time pretending to drive the tractors at the Chale Show.


I created the banners with the English Garden Designer Series Paper (and I punched the pennant end with my Triple Banner Punch- so handy for getting a perfect punched end every time).

I love how simple this stamp set is to stamp and line up. The set comes in photopolymer and matches up perfectly with the assistance of a little tab at the top of each stamp which helps you to match up each layer of the flowers each time you stamp. It is so easy to get this lovely watercoloured effect.


I finished the page with this stamped and cut out flower embellished with a Metal Rimmed Pearl. I stamped my title with my Alphabet Rotary Stamp.


Pop over to my online store to see this weeks fantastic new Weekly Deals. 


Thank you for popping by today. Please let me know if you have any questions about Stampin' Up! or our products. I would love to help. All items can be purchased online via my shop or get in touch directly and I can order them for you to be delivered direct to your door. I'd also love to Demo for you and your friends at a crafty party. As the hostess you earn lots of lovely freebies and you all get to make a fun crafty project too (no crafting experience necessary!)

 -XXX-

Built for Free Using: My Stampin Blog

Monday, 10 August 2015

An Awesomely Artistic Scrapbook Page from Stampin' Up! UK Demonstrator Sarah Poulton

Good morning crafters.

Welcome to a new crafty week here at Stampin' Sarah HQ. It has been another busy weekend here on the Isle of Wight. I've been working hard getting the final projects prepped for next week's Christmas Craft Days as well as taking a break from cutting and sticking and sneaking off to Cowes yesterday for a few hours of Cowes Week boating fun (we indulged in a CBeebies show and an ice cream!).

I thought I would kick off a week of scrapbooking today. I have a whole series of Stampin' Up! inspired pages that I have been saving to share with you all.

Today's project is a great page to use with any size of photo. I know we all have oversized pictures lurking in our crafting stash. Whether it is professional pics from events or school pictures or just those oddly sized pictures we don't quite know what to do with. This sort of page is perfect as you can adapt the stamped frame to any size. Just stick your picture first and stamp second.


For this page I used a Very Vanilla card base. I layered my photo with Brushed Gold and Cherry Cobbler cardstock and glued this centrally.

I then used the Awesomely Artistic stamp set with Garden Green, Cherry Cobber, Crumb Cake and Encore Gold ink. I created these corner frames by layering the images over one another. I love the ink splat stamp as when I try to create actual splats I always get in a mess.

To finish I stamped flowers from the Petite Petals stamp set and punched with the matching punch. I stamped a gold dragonfly on to Vellum and embellished with Basic Pearls. I then added a bit of glitz and sparkle with Brights Sequins and Basic Pearls.


I have loved getting my scrapbooking head back on. I forget how much I enjoy traditional 12"x12" scrapping. Pop back on Wednesday for another scrappy share.

Thank you for popping by today. Please let me know if you have any questions about Stampin' Up! or our products. I would love to help. All items can be purchased online via my shop or get in touch directly and I can order them for you to be delivered direct to your door. I'd also love to Demo for you and your friends at a crafty party. As the hostess you earn lots of lovely freebies and you all get to make a fun crafty project too (no crafting experience necessary!)

 -XXX-
Built for Free Using: My Stampin Blog

Wednesday, 5 August 2015

More fun with Layered Letters from Stampin' Up! UK Demonstrator Sarah Poulton

Happy Wednesday. How has your week been so far? I've got the week off work so have been enjoying family fun. Yesterday we went to a new farm that has opened locally with a fantastic playbarn with a huge bounce pillow. It was exhausting. But I slept well after all that trampolining and chasing Summer about.  

I've been having fun creating with the Layered Letters stamp set. I created these for a recent crafty party for the ladies to have a go at. I gave them the examples and left them to create their own greetings.

I chose  the ink pad colours to match the Cherry On Top Designer Washi Tape: Cucumber Crush, Delightful Dijon and Watermelon Wonder.


I used the Whisper White notecards with matching envelopes for my card base. Once I had decided on my word/greeting I then stamped and matched with matching sentiments from the Endless Birthday wishes stamp set.


Today's new Weekly Deals are live so hop on over to see what lovelies you can pick up for bargain prices. I especially love the gold ribbon which is perfect for the upcoming festive season.

Thank you for popping by today. Please let me know if you have any questions about Stampin' Up! or our products. I would love to help. All items can be purchased online via my shop or get in touch directly and I can order them for you to be delivered direct to your door. I'd also love to Demo for you and your friends at a crafty party. As the hostess you earn lots of lovely freebies and you all get to make a fun crafty project too (no crafting experience necessary!)

 -XXX-

Built for Free Using: My Stampin Blog

Monday, 3 August 2015

A bits and bobs box for my Hostess Club from Stampin' Up! UK Demonstrator Sarah Poulton

I was indulging in one of my favourite pastimes over the  weekend- stationery shopping, when I came across these tiny little Really Useful Boxes. What crafter doesn't love a little crafty storage for embellishments and all those little 'bits and bobs'? Which gave me the inspiration for this months Hostess Club gift.

I bought a selection of coloured boxes and knew that the brightly coloured Project Life cards and accessory packs would be perfect for creating these little toppers.


I chose a selection of colourful patterned Project Life cards and cut them to 2"x1.5" to fit the flat lid area. I then used my Alphabet Rotary Stamp to create the 'Bits and Bobs' which I then punched and attached with Dimensionals.

I used the various Project Life Accessory Packs I have accumulated to create the little banners and embellishments and finished with Brights Candy Dots. 


This is such a perfect way to create a little storage for your craft desk as well as use up all those bits of embellishments in your Project Life stash.


I filled each little box with various crafty embellishments I had in my craft room. Mostly retired Stampin' Up! embellishments. But I did sneak a few jewels and pretties from my stash too. I love making these little packages for my Hostess Club ladies. And I know I would love to receive a little package of sparkly goodies like this. So I hope they all like their gift for the month.

If you'd like to find out more about my monthly Hostess Club or maybe even join and receive your own handmade gift each month, you can find out more by clicking on the Virtual Clubs tab above or drop me a line on poulton_sarah@yahoo.co.uk.

Thank you for popping by today. Please let me know if you have any questions about Stampin' Up! or our products. I would love to help. All items can be purchased online via my shop or get in touch directly and I can order them for you to be delivered direct to your door. I'd also love to Demo for you and your friends at a crafty party. As the hostess you earn lots of lovely freebies and you all get to make a fun crafty project too (no crafting experience necessary!)

 -XXX-

Built for Free Using: My Stampin Blog