Showing posts with label fancy fold. Show all posts

Monday, 7 November 2016

A Christmas Magic Diamond Fold Christmas Card from Stampin' Up! UK Demonstrator Sarah Poulton

Good morning crafters. How was your weekend? Mine was spent dealing with a series of moving related mini crisis (including a blocked drain and a smoking washing machine!). But I did buy my very first car. At the grand age of 35 I am now officially on the road with my bright yellow Hyundai, happily named the Sunny Sunflower by Summer.

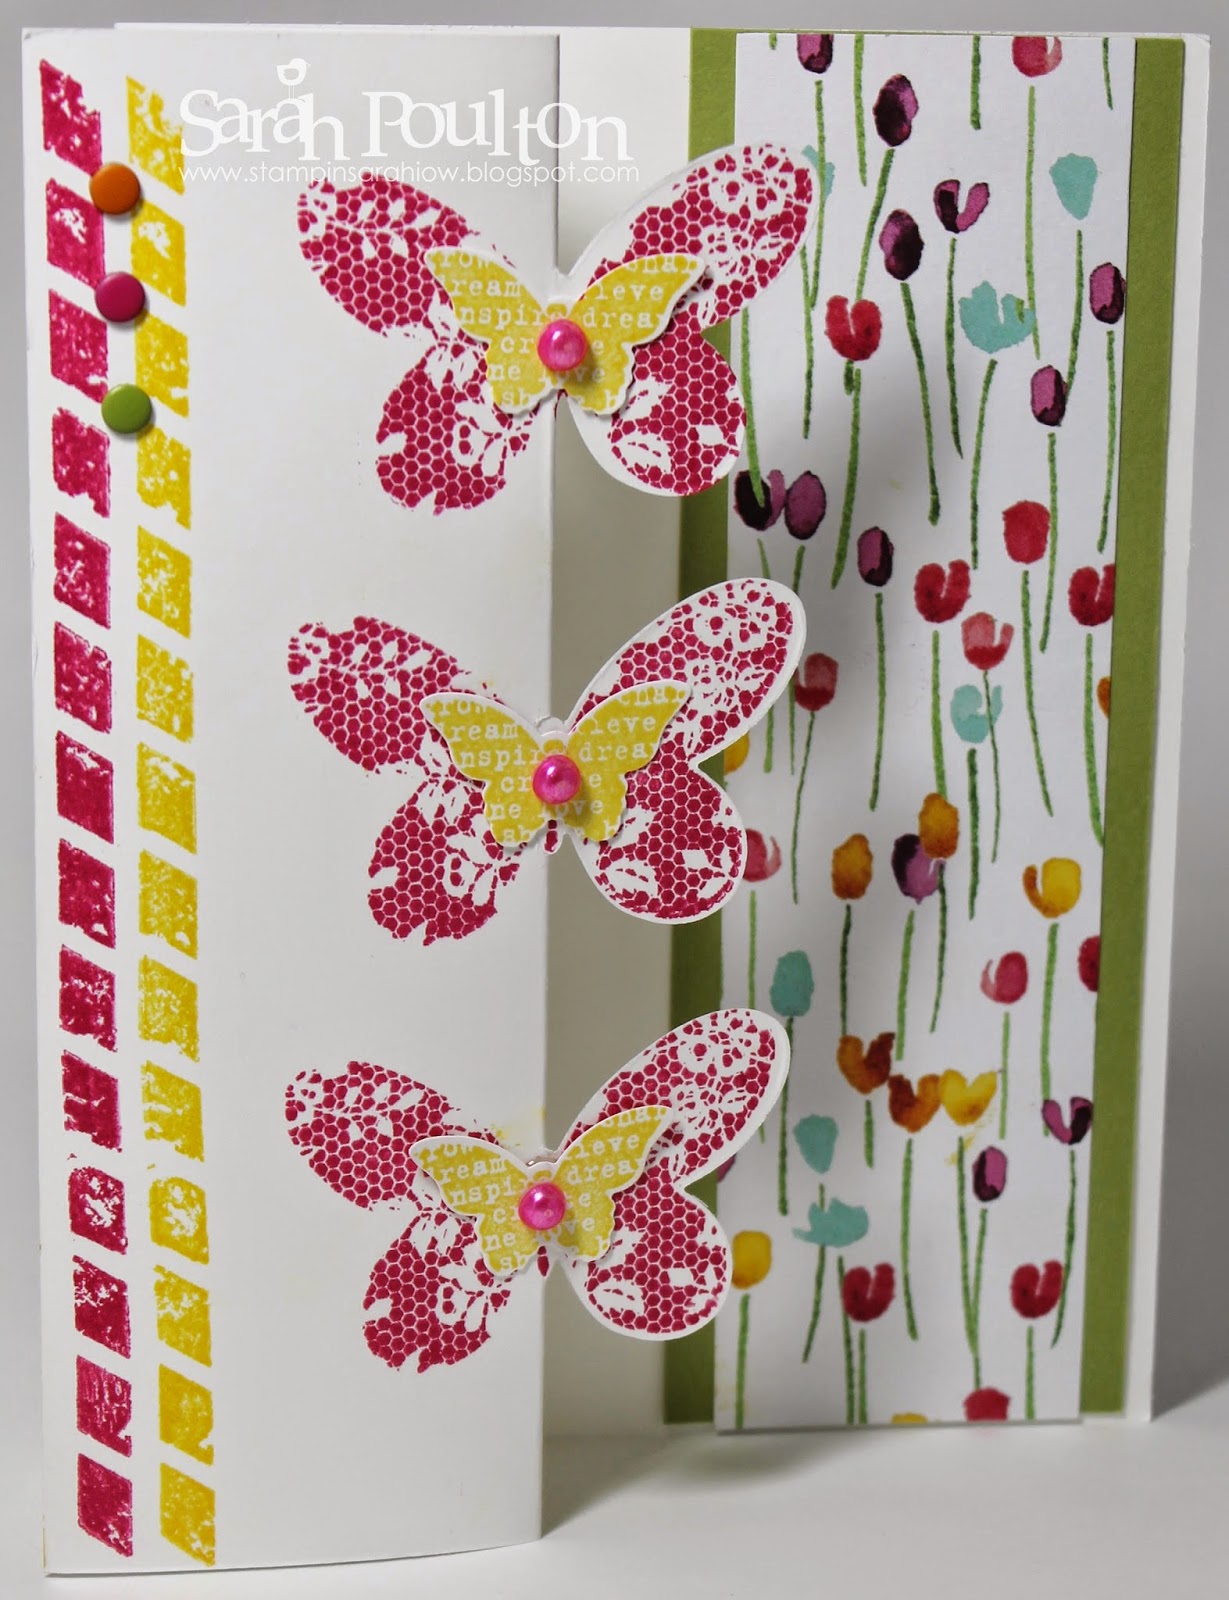
The card I have to share today was one of the projects for my October card class. I do love a good fancy fold card and I'd seen a few of these on Pinterest and thought they'd make a perfect Christmas card as the shape of the card itself looks a bit like a Christmas cracker.

For the Cherry Cobbler card base I used the fab Splitcoast Stampers tutorial. I then added my Garden Green panels and stamped my images on to the Whisper White layers.


The pictures don't quite capture the sparkle of the card which I added with my Wink of Stella brushes. I stamped in Memento Black and coloured with my Stampin' Write Markers.

And the beauty of this Fancy Fold is that it folds down in to a compact 4" square envelope.


Please let me know if you have any questions about Stampin' Up! and their products. I would be happy to help. All items can be purchased online via my shop or get in touch directly and I can order them for you to be delivered direct to your door. I'd also love an opportunity to Demo for you and your friends at a crafty party.  As the hostess you earns exclusive free products and all guests get to create a fun crafty project to take home too! Get in touch if you'd like any further information.

-xxx-


Product List

Friday, 16 October 2015

Cheerful Season Flip & Fold Card from Stampin' Up! UK Demonstrator Sarah Poulton

Good morning crafters. 

How was your week been? It has been a little hectic here what with getting back in to routines and tackling the washing mountain after our holiday.

I have a make from my September card class to share with you today. This is a Flip & Fold fancy fold card. I'd seen one on Pinterest and thought it would look perfect in the bold  Cheerful Season Designer Series Paper.  I used this fantastic Youtube tutorial from Beth Beard to get the basic template for my card correct. I love how you use the triangle you cut from the top to form the reverse pattern flipped bit at the bottom. I love any design that is economical with the Designer Series Paper.


I created a belly band from contrasting DSP from the same set and then added the floral centre piece. I simply picked a flower from the DSP and punched a circle which I then layered over a scallop circle cut from Silver Glimmer Paper.

This is the sentiment I created for inside my card using the Berry Merry stamp set.


I created two samples for my class in two different paper designs. I absolutely adore the bauble papers.


I just love the contrast and bold design of this card in these papers. And I've just noticed in the pic above one of the cards is upside down. Oops. You get the idea ;0)


Thank you for popping by today. Please let me know if you have any questions about Stampin' Up! or our products. I would love to help. All items can be purchased online via my shop or get in touch directly and I can order them for you to be delivered direct to your door. I'd also love to Demo for you and your friends at your own crafty party. As the hostess you earn lots of lovely freebies and you all get to make a fun crafty project like this one too (no crafting experience necessary!). And until November 3rd Hostesses earn an extra 3% in freebies on parties over £200 in sales!!! A perfect time to get your hands on some lovely Christmas crafting stash and earn free product at the same time.

 -XXX-
Built for Free Using: My Stampin Blog

Friday, 4 September 2015

A White Christmas Star Album Card from Stampin' Up! UK Demonstrator Sarah Poulton

Happy Friday! Do you have anything exciting (and crafty) lined up for your weekend? I have my Autumn Winter catalogue Open House tomorrow between 10.30am and 2.30pm. If you would are on the Isle of Wight and would like to find out more about Stampin' Up! and have a go at a lovely festive make and take, please pop along. I'd love to see you.

Today I have another of my Christmas Craft Day makes to share with you. We all created one of these star album/cards. To create my sample I used this tutorial I found via Pinterest. The tutorial shows how to make a star shaped mini album. However, by adapting the tutorial and by cutting a rectangular window in the smallest layer, I was able to create a multi-scene card instead.


This project would have to be for extra special recipients though as it is fairly cardstock/DSP heavy. To create the whole star I needed 6 sheets of A4 coloured cardstock (I used Whisper White and Garden Green) and 2 complete sheets of Designer Series Paper (I used Merry Moments).


Within each section of the star I created a little Christmasy scene. I used the White Christmas stamp set for ease. I stamped each piece of Whisper White with the trees and then used different elements for each window scene.


I used my ink pads and blender pens to colour each scene. I love the subtle, almost watercoloured, effect of colouring with the blenders. It isn't as bold as colouring directly with markers. I embellished various scenes with glitter and/or sequins depending on the picture I was creating. 

Each star section frame was embellished with Metallics Sequins and other stickers from my retired Stampin' Up! stash.


The whole project folds flat and can be decorated as a traditional card. The reindeer clip is to hold the star open when fully folded for decorative purposes. I love that is a special card or gift that can also become a festive decoration too.


Thank you for popping by today. Please let me know if you have any questions about Stampin' Up! or our products. I would love to help. All items can be purchased online via my shop or get in touch directly and I can order them for you to be delivered direct to your door. I'd also love to Demo for you and your friends at a crafty party. As the hostess you earn lots of lovely freebies and you all get to make a fun crafty project too (no crafting experience necessary!)

 -XXX-
Built for Free Using: My Stampin Blog

Monday, 24 August 2015

An English Garden Twisted Box from Stampin' Up! UK Demonstrator Sarah Poulton

Good morning crafters. I thought I would give you a little break from Christmas this morning (although I have lots of lovely festive projects all ready to share with you. I have gone a bit Christmas crafting crazy recently!).

I was surfing the crafty blogosphere on Friday and came across this fantastic tutorial to create these twisted gift boxes. I was looking for inspiration for my card class 3D project and thought this would be perfect. So I set about recreating it.

I used a Mint Macaron based and scored/cut according to Kat's instructions. I realised the tutorial needed to be slightly adapted to fit UK A4 (I simply scored the short edge at 2", 4", 6" and 8" leaving a slightly thinner tab for holding the box together).


I used off cuts of English Garden Designer Series Paper to decorate my box and wrapped a length of Pear Pizzazz Cotton Ribbon all the way around my box to keep it all together.

I created the tag with my Note Tag Punch and stamped the flower from Garden in Bloom with Old Olive and Pear Pizzazz inks. I finished with a Metal Rimmed Pearl.


This is a lovely little project to use a table favour or place setting. It would fit small amounts of sweeties or treats in perfectly. I love that this has the two compartments for fitting treats in to. You could also use it for jewellery or small gifts. 

Thank you for popping by today. I will be back Wednesday with some more festive sneak peeks from the new Autumn Winter catalogue. Please let me know if you have any questions about Stampin' Up! or our products. I would love to help. All items can be purchased online via my shop or get in touch directly and I can order them for you to be delivered direct to your door. I'd also love to Demo for you and your friends at a crafty party. As the hostess you earn lots of lovely freebies and you all get to make a fun crafty project too (no crafting experience necessary!)

 -XXX-

Built for Free Using: My Stampin Blog

Thursday, 5 March 2015

Butterfly Basics meets Painted Blooms from Stampin' Up! UK Demonstrator Sarah Poulton

Good morning crafters.

Happy Thursday to you. How is your crafty week going? I had my lovely Hostess Club ladies round last night for a bit of craftiness and a cuppa. We had a lovely catch up over a card. I run my Hostess Club evenings every other month. I would love to welcome you to the Hostess Club, either locally or virtually (I can provide project kits if you are unable to attend), you can find out more here or by dropping me a line on poulton_sarah@yahoo.co.uk. And don't forget you'll benefit from sharing in regular Stampin' Up! promotions, a handmade gift from me each month and one month of hostess freebies.


Today's crafty share is inspired by this Jennifer McGuire tutorial I found on partial die cutting. I loved the simplicity of creating a dimensional fancy fold with my Butterflies Thinlits Dies.  Although after prepping 8 of these card bases I did begin to wonder what had inspired this creative fancifulness (each card required 3 times through the Big Shot).

I used the Butterfly Basics stamp set to create the Melon Mambo and Daffodil Delight butterflies. Both the Thinlits and Stamps are available as part of a fantastically priced bundle  (only £36.25 for the photopolymer bundle).


I layered a strip of Painted Blooms Designer Series Paper over Old Olive cardstock and secured this to my base layer (so the butterflies overlapped). I then finished with a Melon Mambo coloured pearl (I used my Blendabilities markers to colour my pearl) and three Brights Candy Dots.

Thank you for popping by today. You can find out more about the new Spring Summer Catalogue and Sale-A-Bration promotion by clicking here or by using the navigation menu on the left. This really is the most exciting time of the year to shop. New products and fantastic freebie rewards too. 

Please let me know if you have any questions about Stampin' Up! or our products. I would love to help. All items can be purchased online via my shop (click on the links below to find out more about specific products) or get in touch directly and I  can order them for you to be delivered direct to your door. 

-X-
Built for Free Using: My Stampin Blog