Thursday 31 January 2013

Make It Thursday: Stampin' Up! Fabric

Good morning and welcome to this weeks Make it Thursday embellishment idea.

I am feeling so inspired by all the new loveliness in the Spring Summer Catalogue that I am trying all sorts of new crafty techniques. I recently participated in a product share with my fellow team mates (another great bonus of being a Demonstrator!) and received a sample of the new Stampin' Up! pag fabrics. I had seen on Page 13 of the new Spring Summer Catalogue some lovely puffed and stuffed fabric hearts made with the More Amore Designer Fabric. I thought these would be a perfect embellishment to create.
 
Here are the tools I used for my puffed hearts (I also used thread- I had some Primrose Petals thread leftover from my Sweet Threads Simply Sent samples which I used). I used the heart framelit from the new Hearts a Flutter set of dies to cut two heart shapes with lovely scalloped edges. I then sew roughly around the edges with a backstitch to sew the two shapes together leaving a small gap to insert the stuffing. Once stuffed I then closed the hole and finished my complete puffed heart.
Here is the finished product. A puffy heart embellishment perfect for a card or scrapbook layout. A lovely added bit of dimension for any crafty project. 

If you pop back tomorrow I will be sharing with you the finished card I made using three of these puffed hearts and the beautiful More Amore Designer Series Paper. I am taking part in a Blog Hop to celebrate the launch of the new catalogue tomorrow so pop back for plenty of inspiration ;0)

And don't forget to check out
Sale-A-Bration and all the lovely freebies you can receive if you place a £45 order or host a Stampin' Up! party ;0) I am holding my Spring Summer Open House on Saturday between 10am and 3.30pm please pop by to find out more about Stampin' Up! and all the lovely new products (and pop back to hear about my BIG prize I am offering for all qualifying Stampin' Up! orders placed during Sale-A-Bration!).
 
Happy Crafting ;0)
-X-


Tuesday 29 January 2013

Try It Tuesday: Love Layout


Welcome to another Try It Tuesday scrapbooking page. Scrapbooking can be so rewarding for capturing all the details of life and remembering special times. I love to scrapbook small details as well as the more important but todays page is a big one. I was looking through my huge pile of scrappable photos and came across this one from Summer's Christening day.

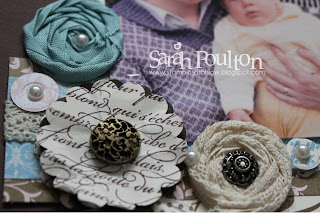
I knew it would be perfect to pair up with the beautiful new More Amore Speciality Designer Series Paper and the Artisan Embellishments Kit from the Spring Summer Catalogue.
 
Once I'd picked my photo and papers I just needed a spot of layout inspiration so I turned to Page Maps. If you are new to scrapbooking or just a bit mojo challenged I find this site inspiring for getting my creativity flowing. Using Stampin' Up! papers and embellishments for a scrapbook page often makes the choosing part easy (every is already matching!) but it helps to get an idea of how to lay those elements out on the page.

Here is the sketch I chose to help me lay out my page elements:

I used up most of the leftover items from my Artisan Embellishments Kit on this page which meant I had one of the ribbon cardboard reels spare. I decided to use this as my hidden journalling tag. The brown heart card on the right that is tucked behind the photo is actually hiding my writing about the day. I have tried to include all the little details of the day that made me smile (such as Summer distracting the Vicar during the service and making her laugh!)- things that will be important for Summer to read when she is older. I think there is always a lot of emphasis placed on journalling in scrapbooking. I always try and include a little bit and not get hung up on my own handwriting. But I also think some photos can speak for themselves, so I try not to be prescriptive with every page I create.
 
I have some exciting news to share with you today. Starting next week I am beginning cardmaking classes at the Sew N So Craft Centre in Ryde (first class Thursday February 7th 1-3pm, £8.50). Spaces are limited so get in touch with the shop to book your space. I am so excited about beginning technique classes in a new venue and hope to see you there very soon.
 
Here is a little sneak peak of what we will be making:
Thanks for popping by today and please get in touch if you'd like any info on Stampin' Up!, Sale-A-Bration or the new Spring Summer Catalogue (poulton_sarah@yahoo.co.uk or 01983 609249).
 
Happy Scrapping ;0)
-X-


Sunday 27 January 2013

Happy Birthday Mum


I know I promised you card class cards over the weekend. But I decided to share with you my Mum's birthday cards today instead. Wishing my lovely Mum a very Happy Birthday today ;0)

I used lots of sneak peak Spring Summer Catalogue items to make these cards.

The first card uses a stamped floral image from Elements of Style coloured with my Watercolour Crayons and blended with a blender pen. I then used some of the gorgeous new 3.2cm Two Tone Ribbon (Pink Pirouette/Rose Red) to create a banner which I then layered with Happy Birthday stamped with the Notable Alphabet.  I then finished with Basic Pears and beautiful flowers cut from a length of the gorgeous new Vanilla Flower Trim (by far my new favourite product from the new Spring Summer catalogue!).
 My second card is a mini page layout using a standard 6" x 4" print. This is a 4 generation family pic with my  Nanny, Mum, Sisters and Summer taken at Christmas. The base card is from the Natural Composition Speciality DSP. I then embellished with highlights cut from the Tea for Two Designer Series Paper and accessories from the beautiful Artisan Embellishment Kit (the resin heart and flower, the scalloped lace).
I cannot tell you how many beautiful things there are to get your hands on in the new Spring Summer catalogue. I am just overwhelmed with all the fabulous embellishments and accessories for cardmaking and scrapbooking. As previously posted I am holding an Open House next Saturday between 10am and 3.30pm at my home in Newport, please click here for more info.

Happy Birthday to my Mum and happy weekend scrapping 
-XXX-

Thursday 24 January 2013

Make it Thursday Layered Motifs


When I sat down to create a layout for today's Make it Thursday I was drawn to these beautiful papers in the current Autumn Winter Catalogue, the Orchard Harvest Designer Series Papers. These are only available to order until January 31st and I wanted to make the most of them while they are still current. I paired these papers with a set of Regals Designer Buttons to create the photo frame.

However, the focus is not on the page itself, but on the embellishments and how you can create your own page details without breaking the bank investing in ready made embellishments.

Today I am focusing on a triple detailed focal motif. Over recent months a great number of my pages have used this layered punch motif to create a perfectly matching series of embellishments (using your crafty punches means you can economically use up scraps of matching papers to always have a perfectly matching theme). For this page I layered a punched heart on to a circle and finished with a clear Bitty Heart Button to give a bit of added texture.

 Another recent page I created for a pre-Christmas scrapbooking class used this same triple embellishment motif with images punched with the Merry Minis punches.

 I also created a similar motif with miniature stamped Christmas images. I used this banner to embellish a section within a divided scrapbook page.

These are all simple examples of creating layered motifs for your pages. They are good for creating continuity throughout an album if you have a particular theme or colour within your album. They are also quick, simple and easy to match with the details of your page (by using complimentary papers you are guaranteed to have an instant matching embellishment). You can create this with any shape of punch and you can layer as many details as you like. I've had a sneak peak of the upcoming Spring Summer catalogue and there is a beautiful new butterfly punch which would work perfectly for this technique.

As you gain more confidence and practice more with scrapbooking you can experiment with your layers and textures. Covering chipboard with matching papers is another way of adding definition and texture to your page.

I hope this has given you a few embellishment ideas to try on your next scrapbook page. Thank you for stopping by today and I will be back over the weekend with some cards we made at our January card class.

Happy scrapping ;0)

=XXX=

Tuesday 22 January 2013

A Summer-y Scrapbook Page


Welcome to my first scrapbooking Try It Tuesday ;0)

This week I picked a fab sketch from Shimelle's blog to get started with my scrapbook page (a fab blog for scrapbook inspiration a-plenty). I can honestly say that this is one of my favourite pages I have ever created. It is one of those moments where I feel like I did justice to the pictures I wanted to scrapbook. The papers and embellishments all came together to create a page I am 100% happy with ;0) Now if only I had remembered to turn off my flash when I took the pictures to blog!!

This page features some fab sneak peak items from the upcoming Stampin' Up! Spring Summer catalogue. The papers are the beautifully summer-y Sunshine and Sprinkles DSP. The whale embellishment is cut using the new Happy Whale Clearlits Die to match the paper design (it also cuts the mini anchor, heart & star). And one of my favourite new items from the catalogue are the new Soda Pop Tops and matching Itty Bitties stamp set (56 mini images that can be stamped to fit within the Soda Pop Top embellishments) which I used to create the little embellishment with baby feet. 

If you'd like to receive a complimentary copy of the new Spring Summer catalogue I am holding an Open House event on February 2nd at my home in Newport, feel free to pop by between 10am-3.30pm to try some of the new products and be entered in to a prize draw to win some lovely Stampin' Up! goodies ;0) Alternatively, please drop me a line on poulton_sarah@yahoo.co.uk to find out more about the new catalogue.

Here is a close up of the page title. I stamped the 'Beach' using my new Notable Alphabet stampset (stamped in Island Indigo) and the rest of the lettering is completed using bits and pieces from my stash.
 Here is a close up of the whale and Soda Pop Top.
 And here is another fab product to look forward to, the Sizzlets S Pinwheel Die. I'd never quite mastered making these Pinwheels by hand. This makes life so much easier ;0)

 I find using a sketch to get me started with my pages is sometimes the perfect inspiration to make life a little easier. Some of my favourite scrappy layouts have been inspired by a sketch and I find them a lifesaver when my mojo goes on holiday from time to time ;0)

Thank you for stopping by today. Please get in touch on poulton_sarah@yahoo.co.uk or 01983 609249 to find out more about Stampin' Up! and their products, to place an order or book a party at home to try some of the new catalogue products (and earn fab hostess freebie products in the process).

Happy Scrapping ;0)
-X-

Friday 18 January 2013

Make It Thursday (a day late!)

Welcome to my first Make It Thursday (on a Friday!). I will be sharing techniques and ideas to make your own scrapbooking embellishments from Stampin' Up!'s fab products. Today's embellishment is a simple ribbon rose made from our crochet trim.

To start I used my Circles #2 Originals die (114526 £13.95) to cut a small circle from my double sided sticky sheet. For slightly larger embellishments Stampin' Up! have the perfect solution, ready cut Jumbo Sticky Rounds (127852- £4.50. These are pictured on the left and also perfect for making these exact embellishments). I also cut a length of the lovely Victoria Crochet Trim (118481- £6.25) which is perfect for making vintage style embellishments for vintage layouts or cards.
 I peeled back the top layer of sticky and created a point with my crochet trim which I stuck in the centre of the sticky circle.
 You can then begin creating your rose by twisting and sticking the ribbon around this central point. If you twist the ribbon as you go you get a nice textured and neat rose as you go.
 You continue to twist until you have the desired size ribbon rose (you can continue to the edge of your sticky circle, or trim the remaining sticky base once you have the size you want).
I continued right to the edge of my sticky circle and just snipped the remaining ribbon with my scissors and then tucked the end of the ribbon in to the side of the rose (ensure this is securely stuck to the sticky base or use a glue dot to make sure this doesn't come loose).
 To finish I used my Paper Piercing Tool (126189 - £3.50) to create a hole in the centre and pushed through an Antique Brad ( 117273 - £5.50)
 It is as simple as that and the beauty of using the Jumbo Sticky Rounds is that your embellishment can be peeled off and stuck straight to your desired project.

Here are two of these ribbon roses on a layout we completed in a recently scrapbooking class.


 And the finished page.

`
If you'd like any further information on our products or to order any of the mentioned products used please get in touch on poulton_sarah@yahoo.co.uk or 01983 609249. I place orders throughout the month or can place an order specifically for you for the postage cost of £4.95 (delivered direct to your door). Happy to help in any way I can.

If you would like to learn more about scrapbooking, I am holding my monthly class on Monday night (21st January) at 7pm. Get in touch for more info or to book your place.

Happy Scrappin'
-x-

Thursday 17 January 2013

Quick apology

Just a quick apology lovely crafters.

Due to technical difficulties and a teething baby my first scrappy embellishment feature Make It Thursday will be making an appearance tomorrow ;0)

Sorry for the day delay.

Happy Crafting ;0)
-X-

Tuesday 15 January 2013

A whole new bloggy outlook

Hello and good afternoon to all my crafty readers.

So here we are. The first day of my new blog. A new look and a new outlook. Just in time for all the exciting upcoming promotions with Stampin' Up! (I cannot wait for Sale-A-Bration to start next week! Woo hoo!)


After some careful thought and consideration I have decided to change the Stampin' Up! crafty focus of my blog to focus on scrapbooking with my family. I love all things papercrafty, but my heart belongs to scrapbooking. And especially scrapbooking my lovely little one, Summer. And with a pile of photos that I'm almost too afraid to admit to waiting to be scrapbooked I decided to rebrand Stampin' Sarah with a focus on layouts, embellishments and family photos.

I am often asked about scrapbooking and how to get started. A lot of people I speak to are often daunted by a 12"x12" blank page so in the following weeks and months I am going to share different ways to plan a page and create a beautiful layout, whether that be a colour combination starting point, a sketch challenge or doing justice to your extra special photos. Each Tuesday I will be sharing a layout I have created using Stampin' Up! papers, embellishments, stamps, die-cuts, ribbons (just about anything I can lay my hands on!). And each Thursday I will be sharing a technique for creating your own handmade embellishments for decorating your pages and giving step by step instructions. And in between whiles there will still be odd cardmaking and papercrafting tidbits from my papercrafting world.

I have had a sneak preview of the new Spring Summer catalogue and it is JAM PACKED full of beautiful embellishments and accessories for scrapbooking. Now is the perfect time to start your scrapbooking journey with Stampin' Up! and I would be more than happy to help you get started. I am offering a Monthly Scrapbooking Virtual Club to create special monthly pages (£15 per month + £2.50 postage to include everything you need to create 2 x 12"x12" layouts plus a few extras AND you will receive a free Stampin' Up! album in month 10 to store all your layouts in). I am also offering scrapbook specific workshops throughout the year, so if you book a party with me feel free to request a scrapbooking theme and I will give you and your friends an introduction to scrapbooking and creatively recording your memories.


But enough of the talking and small print. I will be posting more about those changes as and when it comes to it (although should you wish to sign up to my virtual club or book a scrapbooking party, please get in touch directly and we can chat some more on poulton_sarah@yahoo.co.uk or 01983 609249). Lets get on with some Tuesday inspiration scrapbooking.

At this time of year we all have Christmas-y photos on our cameras waiting to be printed. And what better excuse to get them printed than to get started with your scrapbooking journey. I usually use an online print company such as Photobox or Snapfish to print mine, or if I am in a rush to scrapbook something I pop to the instant print Kodak machine in Boots (these are brilliant as you can edit and crop the picture onscreen).

For my first Scrappy Try It Tuesday I decided to use one of the fabulous Simply Scrapping Kits from the Autumn Winter catalogue, Snowflake Season (£8.95 126921 Snowflake Season Simply Scrappin' Layout Kit). As an absolute beginner to scrapbooking these kits are perfect for getting you started as they contain 12"x12" cardstock, plus embellishments, and photos to follow to recreate the layouts. For a more experienced scrapbooker they are also a quick and easy way to scrap pictures with additional embellishments to allow your to change and personalise your pages.

Here is how the layout guidelines look:

And here is my take on the pages:

I used the basic page layout and changed the placement of embellishments to suit the orientation of my photos. I just love the miniature pegs to hang my photo to the ribbon clothesline. These kits contain exclusive papers, die cuts and embellishments, created especially for these scrapbooking pages. So you won't always see these extras included in the main catalogue. They are created with your special pictures in mind.

This kit is only available from the Autumn Winter catalogue until the end of January (last orders are to be placed by 1pm on January 31st) so get in touch asap if you'd like to order one for your Christmas photos.

Pop back on Thursday for the first of my Make It Thursday features and I hope you've enjoyed my new style blog today.

Happy Scrappin' 
-X-

Wednesday 9 January 2013

Welcome to 2013

Well what a lot of lovely new offers and products from Stampin' Up! The 25th year anniversary is already shaping up to be a great one. Lots more news to come in the upcoming weeks but in the mean time get in touch to make the most of the fantastic Valentines promotion I outlined in my last post (more info here).

Now for a bit of New Year crafting. Over the festive period there were a grand total of 4 babies born in and around my circle of friends (with a further few due in January!)- Christmas Eve, Boxing Day, New Years Eve and New Years Day. So I have been busy making Congratulatory New Baby cards. The first of which below is for my downline Lorraine (check out her blog here) whose little boy I cannot wait to meet. Due to time restrictions over the festive period I had a quick look on Splitcoast Stampers for a little inspiration and found this fabulous card by Amanda Mertz in the USA. I knew I wanted to stamp with the perfect Two By Two A La Carte stamp from the Annual Catalogue. This was the first stamp I purchased on the release of the new catalogue as it stood out as just so lovely.

I decided to stamp a series of the main image on to Whisper White and make several similar cards. I coloured the image with my Watercolour Pencils and blended with a blender pen and then cut each image using my Window Framelits.

 The Soft Suede card base is embossed with the Woodgrain folder and the strips of DSP are from the Orchard Harvest & Howlstooth and Scaringbone collections.
This second card was a larger square version without the embossing and with wider DSP strips. This is to celebrate my friends Natalie and Will's new arrival on New Years Day. He is a special little boy due to sharing his birthday with me. All the best babies are born on New Years Day ;0)

Thanks for popping by today and changes are still afoot in the Stampin' Sarah camp. I will be back with all the news soon. Please get in touch with any questions you may have or to order products direct: poulton_sarah@yahoo.co.uk or 01983 609249.

Happy Crafting ;0)
-X-

Thursday 3 January 2013

Great New Year promotions from Stampin' Up!


Stampin' Up! are offering a fantastic freebie promotion until January 21st 2013. When you purchase the exclusive Valentines stamp set, My Little Valentine, you will receive the Sealed With Love Simply Sent Kit absolutely FREE!

This set is perfect for Valentines cards and is adaptable for year round occasions. It is only available until January 21st so be sure to get in touch asap to make the most of this fab promotion.

Stampin' Up! have also launched a fantastic new product today called Talking Tag. 

With Talking Tag, you can send a gift that is uniquely you. Talking Tag is a message label you can attach to cards, invitations, gifts . . . anything! Personalise birthday cards, Christmas gifts or even record quick instructions for a recipe. Now your pictures really can say a thousand words!

How to send a voice message:

  1. Download the FREE TalkingTag™ App on you smartphone from talkingtag.mobi, iTunes® or Google Play™.
  2. Adhere the message tag to your card or gift.
  3. Open TalkingTag™ App and scan the code.
  4. Record your message (recording starts immediately, so make sure you’re ready!).

You will have the opportunity to listen, re-record, cancel, or confirm your message after you’ve completed recording it. Each label allows up to 60 seconds of a greeting, song, or product message. 

To play the message, recipients will need to download the app and scan the code. Messages are saved for two years, so they can listen to it over and over.

How to Buy Talking Tags:

Buy ‘em by the sheet! You get 10 tags for just 9.50 €/£7.25 (item 129723).

Please get in touch if you have any questions about any of the current promotions and products from Stampin' Up! Contact me on poulton_sarah@yahoo.co.uk or 01983 609249.