Showing posts with label tutorial. Show all posts

Wednesday, 15 October 2014

It's Wednesday- Weekly Deals from Stampin' Up!


Happy Wednesday.

One of the most popular projects on my blog of recent times has been the Floral Frame Treat Flower above. I have had numerous emails and comments about the tutorial which you can find here. And the good news is that for one week only you can take advantage of our Weekly Deals and purchase the Floral Frames Framelit Dies for just £17.21. What a bargain! And if you made these in festive Cherry Cobbler and Old Olive with a spritz of Vanilla Shimmer they would make perfect little Christmas gifts or table decorations.


Please hop on over to my Online Store to see all our Weekly Deals or click on the picture below to find out more. The Thinlit Flip Card dies are a real bargain too for making quick and easy fancy fold cards. 


If you have any questions about today's project or the products I have used, please get in touch on poulton_sarah@yahoo.co.uk or 01983 609249. You can order online direct through my store by clicking the product links above or the pictures below. I also have availability in the next few months for your very own crafty party. Click on the Promotions tab above to see the exclusive hostess promotion running until October 31st.

Happy Crafting
-X-

Wednesday, 5 February 2014

Scallop Tag Punch Fancy Fold Card


Good morning crafty friends.

I've had a few enquiries about this card I created a couple of weeks ago and how to create the Scallop Tag Punch closure for this card. I was looking for a project to prep for my Sale-A-Bration parties this week and came across this beautiful card on Pinterest. So I decided to multitask, I have prepped this project for my parties while simultaneously putting a few pictures together to help you to create your own Scallop Tag cards.

Before I get to the tutorial, here are a couple more close up pictures of this Crumb Cake, Very Vanilla, Gold and Crisp Cantaloupe creation.


I am so in love with the Happy Watercolour stamp set and this fab watercolour effect background stamp. I loved adding the gold dot background and the extra shimmer with gold Stampin' Up! glitter (applied with a two way glue pen).


And for extra pizzazz I removed 3 sequins from a length of gold sequin trim and attached with Tombow glue.


To create your own cards with this fancy fold Scallop Tag Punch closure you just need the following instructions:


Start with a standard piece of A4 cardstock and cut in half (standard UK measurement 14.8cm x 21cm). For this card I have started with a Crumb Cake cardbase.

Mark with a pencil on both the 14.8cm sides at the middle point (7.4cm)


Push the edge with the pencil mark face down in to the Tag Topper Punch. By carefully positioning the card you can push over the top of the grooves which are there to guide the normal width of a tag. You then need to line up your pencil mark with the centre of Tag topper and punch. Repeat this for the opposite side and pencil mark.


Line up this punched edge in your paper trimmer. Trim off the excess pieces above and below the Scallop Tag punched shape. You then need to score the Tag Topper piece in line with the edge of the card to allow you to fold the Tag over as part of the closure.


You then need to repeat the trimming for the other side. However do not score this Tag as this forms the foldover decorated section on the front of your card.

You need to score the centre fold of your card by measuring 10.5cm from the scored Tag edge. This will give you a 10.5cm x 14.8cm inner section and the foldover section for the front (ready to be decorated). The picture above is technically upside down as the flap will foldover from the other side.

To decorate and layer I used a Very Vanilla insert measuring 14.5cm x 10cm and for the front layer 14.5cm x 5.8cm.

I hope this all makes sense. Please let me know if I can help with anything further on how to create your own Scallop Tag closure card.

Thank you for stopping by today and get in touch with any Stampin' Up! questions: poulton_sarah@yahoo.co.uk or 01983 609249 / 07830 343830.

Happy Crafting
-XXX-


Friday, 6 December 2013

Stampin' Up! UK Mini Christmas Table Favour Treat Bag Tutorial


Good morning crafters. How is your December going so far? I am up super early this morning for a little bit of a crafty catch up. I have a weeks worth of December scrapbooking to catch up on and a small window of opportunity before Summer wakes up for the day.

I thought I would share this little table favour treat bag today. I created this project for my November Hostess Club get together. I run a regular monthly crafty get together for all the ladies who have a place in my Hostess Club. We create a small crafty project as well as chat over a cuppa and cake. 

I love the simplicity of this little 2"x2" favour bag created from a 6" square piece of Designer Series Paper (I used the Season of Style DSP from Stampin' Up!). This is the bag laid flat to show you the basic template (and show you how I have scored and folded the two edge pieces).


Here are the measurements for scoring the 6" square. It needs to be scored at 2" and 4" along both sides. You can then remove the 4 corner pieces. You then need to measure and mark 1" (the centre) on two opposite sides (these will form the triangle folded sides of your bag). 


 You can then score from the 1" mark to the opposite corner (I have marked in pen on the template below where to score if you look closely. It was very difficult to make the pen show against the patterned papers). The picture above shows on the left hand side the result you are looking to achieve with your scoring. Both sides of the bag will form this triangular shape.

To create the method for closing the bag you will need to punch 4 small holes (two on each opposite piece). You need to punch the holes in the two squares which haven't been scored. You can then fold the bag up and thread fine ribbon or bakers twine through the holes and tie shut. You can then decorate to fit your occasion (I have used the Stampin' Up! Wishing You stamp set for mine paired with my scallop circle and circle punches).


So that's really it. A 6" square scored at 2" and 4" on either side. Remove the 4 corners. Score two opposite sides from the 1" mark on the outside edge to the inner corner to create a triangle. Punch holes in the two remaining squares to form your closure. Fold up in to shape and decorate.

And just before I disappear for my scrapbooky catch up I thought I would share this amazing swap I received at Convention. Over upcoming posts I am going to share a few of the amazing creations I received from fellow Demonstrators. This just stood out for me as I love the Fishin' Around stamp. I have never been brave enough to try this hair gel pocket technique. But I just love the overall effect. This was made by a lovely German Demonstrator called Angela.


Thanks for popping by today. Please say hello and leave a comment. I have set myself a target to find new blogs to read throughout December, so leave me a comment and I'd love to stop by and say hello.

And if you'd like to find out more about any of the Stampin' Up! products used for today's creations please drop me a line on poulton_sarah@yahoo.co.uk or 01983 609249. Or alternatively pop by my online store which you can find here:


Happy Crafting ;0)
-X-

Tuesday, 3 September 2013

My Christmas Planner


Good morning crafters.

As promised, today I will be sharing the inside of my Christmas Planner. Please see yesterdays post for how to create your own base mini album.

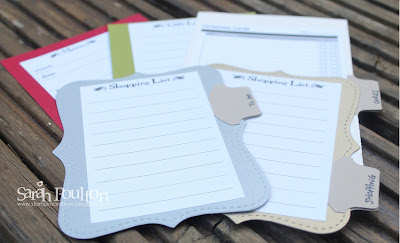
Here are the envelope inserts. Each one has a Christmas-y related theme: Shopping, To Do, Menu & Christmas Cards.


The first two pages feature a calendar and to do list for November and December.


The reverse of the envelope is stamped with the beautiful Calm Christmas stamp from the Autumn Winter catalogue (Page 26). I stamped it in Night of Navy ink.


The next page is stamped with Ornament Keepsakes in Cherry Cobbler & Old Olive. Ornament Keepsakes was featured in last years festive catalogue and is still available to order via the Carry Over List.


I stamped this page using the Evergreen stamp set (also on the Carry Over List) and a snowflake from Snowflake Soiree.


This page is stamped in Cherry Cobbler and Night of Navy using the new Wishing You stamp set (Page 23 of Autumn Winter catalogue).


The final page is stamped in Gold (using the new Metallic Encore Pad, Page 28, AW Catalogue) and Night of Navy using Snowflake Soiree.

Thank you for stopping by to look at my Christmas planner creation today. I'm more than happy to help with any questions about this project. Please get in touch on poulton_sarah@yahoo.co.uk.

Also, if you'd like to have your own copy of the Autumn Winter catalogue, please drop me a line on the above email address and I'll pop one in the post to you.

Happy Crafting ;0)
-X-

Monday, 2 September 2013

Christmas Planner Envelope Mini Album Tutorial


Good morning and welcome to another crafty week here on the Isle of Wight.

Today I am sharing the final Christmas project we created on my Christmas Craft Days last month. This was our 'showstopper' (for those that watch Bake Off) project that was central to the day. I had been planning this for months and searched through lots of different mini album ideas to find the perfect style.

I won't be sharing the completed pages with you today.  I will share those another day this week. Instead today I will be giving you a quick and easy run down on how to create your own lovely mini album (you can modify the papers used or contents for any occasion). This is a quick and affordable planner or memory-keeper and could also make a perfect Christmas pressie too.

For this project you will need:

5 Stampin' Up! C6 envelopes (I used Very Vanilla)
A sheet of A4 cardstock for the cover (I used Cherry Cobbler)
A length of ribbon to hold the album together (I used Cherry Cobbler 3/4" Chevron)
Matching cardstock for inserts
DSP for decoration


The first step is to create your insert pages. I started with 5 C6 Very Vanilla Envelopes.


 I then cut off the envelope flaps as below.


Score the envelopes at 1/2" to create your hinge.


Please note, that while I have shown the envelopes with the scallop shaped edge forward in these photographs (it made it easier to differentiate the steps for the tutorial), these will actually be turned over in the finished product and form the back side of each page (giving you a full rectangle of page to cover and decorate facing forward).

The next step is to create your cover. I cut a piece of Cherry Cobbler cardstock 6 1/2" by 10", scoring at 4 1/4" and 5".


The larger section forms the back of the cover with the hinge making the pages fold easier from the front.

The final stage before decorating and tying together is to punch your holes.

I sandwiched my 5 envelopes and the cover together and measured 2" from either end (marking with a small pen mark). I then punched holes through all layers together using my Crop-A-Dile.


 This is the basis for your mini-album / planner. I would recommend decorating your inserts prior to tying your ribbon for ease of stamping. Once all your layers are decorated you can then just thread your ribbon through and tie in a bow to hold it all together.

To decorate your planner:

I used a stack of DSP in all different Christmas-y colours and patterns. I cut each piece at 3 3/4" by 6 1/4" to stick to the front of each envelope. I then cut pieces slightly bigger for the front and back covers. I also stamped the reverse of each of the envelopes for a bit of a festive flourish.

I also created matching inserts using free printables from this website. I created three rectangular inserts (3 3/4" x 6") and two die cut Top Notes cut from Brushed Gold and Silver cardstock. I created tabs using a shaped punch, you could also use ribbon to create these tabs.


Thanks for popping by today. I'll be sharing my decorated pages tomorrow so hop back then for some Christmas Planner inspiration. Please do get in touch with any questions or to place an order for essential supplies to create your own Christmas Album planner: poulton_sarah@yahoo.co.uk or 01983 609249.

I'd love to see your creations so please leave a comment to direct me to your creations if you have a go. It was fantastic to see all the different versions of this album that my ladies created at our Christmas crafty days.

And don't forget to check out the promotions page above for all the latest fantastic offers from Stampin' Up! Especially the lovely Best Of Christmas stamp set.

Happy Crafting ;0)
-X-

Friday, 19 April 2013

Stamping on tissue technique

Good afternoon all and welcome to the weekend.
 
I shared a project last month that my downline Hayley showed us how to make at our monthly shoebox swap. I fell in love with the stamping on tissue effect so decided to adapt her card for my swaps for an upcoming Stampin' Up! Regional event in Telford (one of the many perks of being a Stampin' Up! Demonstrator- meeting up and swapping ideas with other Demonstrators from around the country. If you fancy coming along too there is till time to sign up as a Demo and book your place on the event. Registration closes on Friday April 26th. Click here to order your Starter Kit and start your Stampin' Up!journey. Drop me a line and I'll happily chat through joining my team and getting started with Stampin' Up, or see the 'Join My Team' tab at the top of my blog).
So for this weeks Thursday technique (on a Friday) I am sharing how to create the crumpled tissue effect. I won't share my completed project just yet as the Telford event isn't for a couple of weeks and I don't want to ruin the surprise for all the Demos I might swap with. The component parts of my project are above.
 
I stamped the larger butterfly from Papillon Pot Pouri in Chocolate Chip on to a small piece of white tissue paper. Once the ink was completely dry I then screwed and crumpled the tissue up into a small ball. You then cover your piece of Newsprint DSP with Anywhere Glue Stick and flatten the tissue onto the DSP. I tried to centre each butterfly and you don't flatten it completely to give a textured and raised effect to your image.
 
Here is the finished tissue paper effect. You get a lovely crinkled faux suede effect. I finished my image with Soft Suede daubered round the image for an aged vintage effect. This image and technique puts me in mind of the old museum displays with mounted insects and butterflies.

I hope you enjoyed todays quick 'how to technique'. Pop back on May 11th and I'll share the completed project with you ;0)

If you would like any further information on Stampin' Up! or joining my expanding team, I would be only too happy to help. Get in touch on 01983 609249 or poulton_sarah@yahoo.co.uk to find out more.

Wishing you all sunshine and a lovely crafty weekend.
-X-

Thursday, 4 April 2013

Thursday Technique: Coloured Flower Trim

If you popped by my blog on Tuesday you will have seen this card which I embellished with coloured flower trim. I am sharing the card above today which I created as my customer thank you notes for March. I again used my favourite flower trim but wanted it to stand out from the Tea for Two Designer Series Paper so daubered the flower in Marina Mist to match the cardbase and sentiment.
 
There are a number of ways you can colour the fabulous Flower Trim (126869 £6.25) depending on how bold you want the colour:
 
1) Lightly dauber with a dauber and an ink pad- this gives the lightly coloured effect above (and you will still see some of the vanilla base colour)
 
2) Colour with your reinkers- this gives a block bolder colour.
 
3) Colour with your Stampin' Write markers- this would give you a more defined colour. You have more control over the amount of colour you transfer (and could lend itself to a multicoloured effect?)
 
4) Direct to ink pad- if you just dip your flower on to your ink pad you will get a coloured effect. Depending on the pressure or how long you leave it you will get a differing boldness.
 
And voila, perfectly matching Flower Trim whatever the papers or design. They are such a beautiful addition to any project, card or scrapbooking page and so versatile colour wise.
 
Thank you for popping by today. Lots of exciting things to share with you very soon. More information to come.

Please get in touch to find out more about hosting a party, attending a class or ordering products direct: poulton_sarah@yahoo.co.uk.
 
-x-


Friday, 18 January 2013

Make It Thursday (a day late!)

Welcome to my first Make It Thursday (on a Friday!). I will be sharing techniques and ideas to make your own scrapbooking embellishments from Stampin' Up!'s fab products. Today's embellishment is a simple ribbon rose made from our crochet trim.

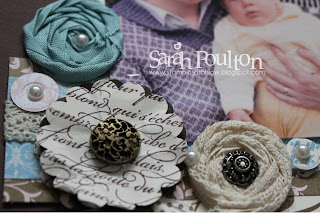
To start I used my Circles #2 Originals die (114526 £13.95) to cut a small circle from my double sided sticky sheet. For slightly larger embellishments Stampin' Up! have the perfect solution, ready cut Jumbo Sticky Rounds (127852- £4.50. These are pictured on the left and also perfect for making these exact embellishments). I also cut a length of the lovely Victoria Crochet Trim (118481- £6.25) which is perfect for making vintage style embellishments for vintage layouts or cards.
 I peeled back the top layer of sticky and created a point with my crochet trim which I stuck in the centre of the sticky circle.
 You can then begin creating your rose by twisting and sticking the ribbon around this central point. If you twist the ribbon as you go you get a nice textured and neat rose as you go.
 You continue to twist until you have the desired size ribbon rose (you can continue to the edge of your sticky circle, or trim the remaining sticky base once you have the size you want).
I continued right to the edge of my sticky circle and just snipped the remaining ribbon with my scissors and then tucked the end of the ribbon in to the side of the rose (ensure this is securely stuck to the sticky base or use a glue dot to make sure this doesn't come loose).
 To finish I used my Paper Piercing Tool (126189 - £3.50) to create a hole in the centre and pushed through an Antique Brad ( 117273 - £5.50)
 It is as simple as that and the beauty of using the Jumbo Sticky Rounds is that your embellishment can be peeled off and stuck straight to your desired project.

Here are two of these ribbon roses on a layout we completed in a recently scrapbooking class.


 And the finished page.

`
If you'd like any further information on our products or to order any of the mentioned products used please get in touch on poulton_sarah@yahoo.co.uk or 01983 609249. I place orders throughout the month or can place an order specifically for you for the postage cost of £4.95 (delivered direct to your door). Happy to help in any way I can.

If you would like to learn more about scrapbooking, I am holding my monthly class on Monday night (21st January) at 7pm. Get in touch for more info or to book your place.

Happy Scrappin'
-x-