Showing posts with label Card Class. Show all posts

Friday, 4 March 2016

A Birthday Blooms Acetate Window Card from Stampin' Up! UK Demonstrator Sarah Poulton

Good morning a very happy Friday.  What a busy morning I've had so far. Running back and forth to preschool and batch cooking several varieties of soup for the week ahead (currently cooking roasted Mediterranean vegetable- thank goodness for my amazing soup making machine!).

Today I have a card to share with you that I absolutely love. I'd seen an acetate window card on Pinterest and absolutely loved the idea. So this is what I came up with using the Birthday Blooms Spring Summer catalogue stamp set.

I used a Very Vanilla card base. I cut the window sheet strip to fit the card base and created the window strip. I stamped the flower image in Memento Black ink inside the card. I then stamped the flower again twice more on a scrap piece of Very Vanilla.


I used my Blender Pens with Rose Red and Mint Macaron ink to colour the flowers. I fussy cut around the flowers and then mounted with Dimensionals. I added the 'thanks' from Cottage greetings in Rose Red with Basic Pearls to embellish.


I am off to catch up with some lovely crafty friends tonight for a Stampin' Up! craft party. I have a lovely project worked out for the ladies which used this same stamp set combined with the fab Wink of Stella glitter brush pens. 

Thank you for popping by today. Please let me know if you have any questions about Stampin' Up!, Sale-A-Bration or any of our new products. I would love to help. All items can be purchased online via my shop or get in touch directly and I can order them for you to be delivered direct to your door. I'd also love to Demo for you and your friends at a crafty party. As the hostess you earn lots of lovely freebies and you all get to make a fun crafty project too (no crafting experience necessary!).

-XXX-

Product List

Monday, 22 February 2016

A Birthday Blooms Celebration with Stampin' Up! UK Demonstrator Sarah Poulton

A belated Happy Monday to my crafty friends.

Well what a weekend it has been. Spent the weekend in London with Sam. We had tickets to a Walking Dead convention at Olympia. We are huge fans of the show so spent the weekend geeking out at the panels and perusing the horror and sci fi stalls. We also indulged in some shopping and eating in central London with a trip to Bubba Gumps (Forrest Gump themed chain restaurant). 

Now that doesn't begin to explain my late posting today though. I lost most of today to a migraine!!! I had the project all lined up to share but spent most of today curled up in the dark. Thankfully I've slept off the worst of it and I am ready to share my craftiness for the day.

This is a project I made for a recent crafty Stampin' Up! party I demonstrated at. The project seemed to go down really well. This stamp set, Birthday Blooms, has proved super popular amongst my regular class attendees. I just love the swirly sentiments.

For this card I used a 10.5x21cm Whisper White card base (scored at 10.5cm). I used a strip of Rose Red cardstock layered with a piece of Love Blossoms Designer Series Paper (from the Spring Summer catalogue).


I positioned my paper strips and then stamped my line of hearts in Rose Red.

Once these layers were adhered I punched my 2" circles from Rose Red cardstock and then layered this with Botanical Gardens Vellum (a Sale-A-Bration freebie item). As you can see I struggled a bit with my glue dot positioning  and should have moved them to hide underneath my flower a bit better. A note to remember for next time.

To finish I stamped my sentiment and stamped the flower in Memento Black ink and used my Blender Pen to colour in Blushing Bride and Wild Wasabi.


Thank you for popping by today. Pop back on Wednesday when I'll be giving you a little sneak peek of this months card class projects. Please let me know if you have any questions about Stampin' Up!, Sale-A-Bration or any of our new products. I would love to help. All items can be purchased online via my shop or get in touch directly and I can order them for you to be delivered direct to your door. I'd also love to Demo for you and your friends at a crafty party. As the hostess you earn lots of lovely freebies and you all get to make a fun crafty project too (no crafting experience necessary!).

-XXX-

Product List

Wednesday, 25 November 2015

A Cozy Christmas Quartet from Stampin' Up! UK Demonstrator Sarah Poulton

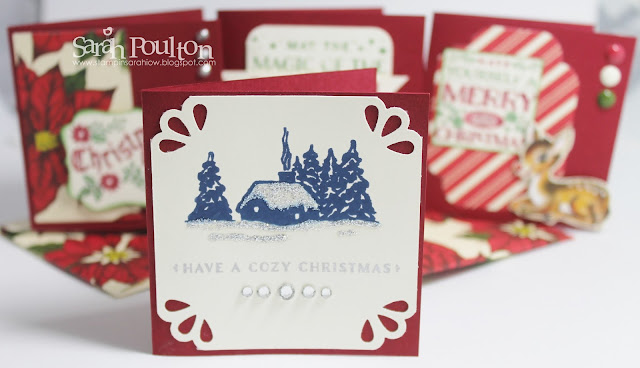
Earlier this month I hosted a Cozy Christmas product based class where I designed a series of projects to showcase this lovely Autumn Winter Catalogue stamp set.

I wanted to create a little set of Christmas notecards and envelopes with a matching box to keep them in. This is what I came up with.


I started by designing the box which I made using my Gift Box Punch Board. I wanted the box to be 3.25" x 3.25"x 1.75" so I used an 8" x 8" square of Cherry Cobbler. I created the 3" square note card bases (uses 3"x6" piece of card scored at 3") with the offcuts of my 12"x12" cardstock used for the box.

I then used small pieces of the Home for Christmas Designer Series Papers and my Stampin' Write Markers (and with an extra little bit of help from my Paper Snip Scissors) to create 4 little differently designed notecards.


I loved using the designs of the paper too embellish my cards. These little deers are just too lovely not to make the focus of a card. For this card I used my Home for Christmas Enamel Dots and Corner Trio Punch.


This is my favourite of this set of cards. I love the little cottage image and with the added Dazzling Details it felt very festive when making it. This is again embellished with the Trio Corner Punch and Rhinestones.


And lastly, here is the box I made to keep the cards and envelopes in (envelopes made with the Envelope Punch Board and Home for Christmas DSP).


Thank you for popping by today. Please let me know if you have any questions about Stampin' Up! or our products. I would love to help. All items can be purchased online via my shop or get in touch directly and I can order them for you to be delivered direct to your door. I'd also love to Demo for you and your friends at a crafty party. As the hostess you earn lots of lovely freebies and you all get to make a fun crafty project too (no crafting experience necessary!)

 -XXX-

Built for Free Using: My Stampin Blog

Thursday, 5 November 2015

A Berry Merry Colourful Christmas Card from Stampin' Up! UK Demonstrator Sarah Poulton

Good morning crafters.

I have a colourful Christmas card to share this morning using the Berry Merry stamp set.  This is one of my 'fun to stamp' sets with lots of little elements to fill your card or image.

I started with the Whisper White banner cut using my framelits. I stamped the 'joy' with Encore Metallic Gold ink and then added the little details in Crushed Curry, Real Red and Pool Party.


To add a little extra texture and dimension I added a smaller banner cut from Champagne Glimmer Paper. I then layered a length of Real Red Pompom Trim over the top (I used my Stampin' Up! stapler to secure the layers together).  Finally I added the Snowflake Element with a Basic Rhinestone for sparkle.


Thank you for popping by today. Please let me know if you have any questions about Stampin' Up! or our products. I would love to help. All items can be purchased online via my shop or get in touch directly and I can order them for you to be delivered direct to your door. I'd also love to Demo for you and your friends at a crafty party. As the hostess you earn lots of lovely freebies and you all get to make a fun crafty project too (no crafting experience necessary!)

 -XXX-
Built for Free Using: My Stampin Blog

Tuesday, 27 October 2015

A Berry Merry Emboss Resist Christmas Card from Stampin' Up! UK Demonstrator Sarah Poulton

Good morning crafters. Hope your weekend was full of craftiness and creative mojo. I have an emboss resist card to share with you this morning. I was browsing Pinterest last week and came across an emboss resist card using green/blue/turquoise colouring. I just fell in love with the colour combo.

So I decided to have a go at my own take on the emboss resist technique. I combined the poinsettia from the Reason for the Season stamp set with all the component parts of the Berry Merry stamp set to create my own clear embossed frame around the 'Merry Christmas' sentiment.

To create this effect you just need to use your embossing buddy to take out any of the static from your cardstock. Then stamp your images with Versamark and emboss with clear embossing powder. Once heated you can then ink over your images to make the embossing pop from the background colour.


I covered my Whisper White layer with sponged Pear Pizzazz and swirled in Tempting Turquoise. I then sponged Island Indigo around the edges of my design. 

To finish I added Pearls in differing sizes and used my Cherry Cobbler Dazzling Details to add an extra dimension of coloured sparkle.


Thank you for popping by today. Please let me know if you have any questions about Stampin' Up! or our products. I would love to help. All items can be purchased online via my shop or get in touch directly and I can order them for you to be delivered direct to your door. I'd also love to Demo for you and your friends at a crafty party. As the hostess you earn lots of lovely freebies and you all get to make a fun crafty project too (no crafting experience necessary!)

 -XXX-

Built for Free Using: My Stampin Blog

Friday, 11 September 2015

Festive Flower Punch Christmas Card from Stampin' Up! UK Demonstrator Sarah Poulton

Good morning and a very Happy Friday. What are your plans for the weekend? I have a Tin of Cards Kit with my name on. I cannot wait to get started on the contents. I'm thinking it would make a perfect Christmas gift for someone. 

I have creation I came up with using the Festive Flower Builder Punch and matching Reason for the Season stamp set (available as a bundle together). I love the effect of the built up festive flower. I punched all the component parts in Cherry Cobbler and Wild Wasabi cardstock. I then used glue dots to layer my flower together. I love that the punch has different sized petals to give you this lovely layered effect. 

I also made sure to fold each petal slightly before adhering to give the flower added dimension.


I added the detailing to the leaves with the matching stamps (designed to fit each sized leaf/petal perfectly). The sentiment is also from the Reason for the Season stamp set.

The corner detailing was added using the Curvy Corner Trio Punch.


Thank you for popping by today. Please let me know if you have any questions about Stampin' Up! or our products. I would love to help. All items can be purchased online via my shop or get in touch directly and I can order them for you to be delivered direct to your door. I'd also love to Demo for you and your friends at a crafty party. As the hostess you earn lots of lovely freebies and you all get to make a fun crafty project too (no crafting experience necessary!)

 -XXX-


Built for Free Using: My Stampin Blog

Friday, 24 July 2015

A Sprinkles of Life Cloud Pop Up Spiral Card from Stampin' Up! UK Demonstrator Sarah Poulton

Happy Friday. What a grey day it is here on the Isle of Wight. We have a weather warning due to heavy rain which may put pay to our lunchtime trip to watch the Red Arrows (Summer absolutely loves all things Red Arrow since we watched them perform at Cowes Week last year from Mum and Dad's garden). So what better way to celebrate a grey day than with an 'Every Cloud has a Silver Lining....' card using the Ronald McDonald House Charity Sprinkles of Life stamp set.

This card was inspired by a project made by a very talented French demonstrator Katia. Such a clever fancy card. You have to open it for the surprise.


It has a clever spiral pop up made from a circle punched with the 2 1/2" Circle Punch. You cut the circle in to a spiral and attach the spiral inside your card with two glue dots (one on the centre of the spiral and one on the alternative outer side of the spiral). If you close the spiral and close your card base you ensure your pop up with sit flat when the card is closed.

Once your spiral is secure you can attach your decorations. I have used clouds stamped in Encore Silver ink and punched with the Tree Builder Punch. But this style of card could be customised for any event or occasion by using pop up flowers, butterflies or any stamped image you fancy.


I punched Dazzling Diamonds Bitty Butterflies and glued them to the clouds for an extra bit of sparkle and texture.


For the front of the card I used Cherry on Top Washi Tape to create a flash of blue for the sky and added Metallic Sequins to represent rain.


Thank you for popping by today. I hope you have a lovely weekend ahead whatever your rainy day plans. Please let me know if you have any questions about Stampin' Up! or our products. I would love to help. All items can be purchased online via my shop or get in touch directly and I can order them for you to be delivered direct to your door. I'd also love to Demo for you and your friends at a crafty party. As the hostess you earn lots of lovely freebies and you all get to make a fun crafty project too (no crafting experience necessary!)

 -XXX-


Built for Free Using: My Stampin Blog

Monday, 6 July 2015

A Trio of Garden in Bloom Cards from Stampin' Up! UK Demonstrator Sarah Poulton

Good morning crafters and a very Happy Monday. What a beautiful weekend of weather we had here on the Isle of Wight. Perfect for another campervan adventure and cycle ride with the girls in their cycle trailer. I also hosted one of my special product based classes on Saturday. The class was themed around the lovely Garden in Bloom stamp set and matching English Garden Designer Series Papers.


The first of the projects we made was this trio of notecards inspired by cards pictured in the Stampin' Up! Annual Catalogue (a wealth of inspiration to be found amongst the pictures in the catalogue- sometimes when I am stuck for a little crafting mojo I turn to the catalogue as the cards and projects are often easy to recreate and spark your creativity).

This first card uses a layer of Vellum Cardstock layered over the gorgeous rose papers from the English Garden DSP pack. We simply stamped the greeting and butterflies in Memento Black and then finished with a little Linen Thread.


This card uses a Mint Macaron cardbase which we stamped with Mint Macaron ink (for the butterflies we stamped the outline of the butterfly by stamping directly to the card. Then the inner colour was stamped off first to give these different shades of Mint). The colours used for the flowers are: Blushing Bride, Soft Sky and Mint Macaron. 


 We added another layer of Vellum for the greeting and finished with Silver Metallic Thread.


The final card was a quick stamping project using the same colours as above with the addition of So Saffron and Wisteria Wonder. We added some sequin sparkles for an added bit of texture.


And here is the page in the catalogue that inspired these cards. The many pictures throughout the catalogue pages are such a great starting point for creating. As you can see I didn't case them exactly. I just used them for inspiration.


I hope you've had a lovely creative weekend. I have lots of crafty things to look forward to this week including my hostess club crafty evening on Wednesday and a fun Stampin' Up! party on Saturday. I look forward to sharing our crafty makes with you later in the week.

Thank you for popping by today. Please let me know if you have any questions about Stampin' Up! or our products. I would love to help. All items can be purchased online via my shop or get in touch directly and I can order them for you to be delivered direct to your door. I'd also love to Demo for you and your friends at a crafty party. As the hostess you earn lots of lovely freebies and you all get to make a fun crafty project too (no crafting experience necessary!)

-XXX- 

Built for Free Using: My Stampin Blog

Wednesday, 1 July 2015

Bonus Weekly Deals and a Clearance Rack Update from Stampin' Up! UK Demonstrator Sarah Poulton

Good morning and welcome to a fantastic morning of bonus Weekly Deals and product discounts.

This morning Stampin' Up! have announced a limited time expansion of the normal Weekly Deals. So for the month of July you can benefit from extra products at fantastic prices.

Starting with this fantastic selection of products including washi tape, punches, cardstock and ribbons. Click on the picture below for more information on the products.These products are available in limited quantities while supplies last.


New items have been added to the Clearance Rack today too. Some great punches, kits, embellishments and stamp sets to be found at prices up to 60% off their original catalogue price.


And before I leave you to explore all the lovely product offerings this morning, I wanted to share a quick Father's Day card I made for my girls to give Sam. I forgot to share this last week. I used the gorgeous Neutrals Designer Series Paper Pack as a background which I distressed and daubered with Soft Suede. I added the Happy using the Simply Serif mini alphabet which I punched and layered on to Island Indigo stars (punched with the Itty Bitty Accents Punch Pack). I stamped the 'Daddy' using the Layered Letters alphabet (stamped with Memento Black ink). The last detail I added were the shades of blue Candy Dots.


Thank you for popping by today. Please let me know if you have any questions about Stampin' Up! or our products. I would love to help. All items can be purchased online via my shop or get in touch directly and I can order them for you to be delivered direct to your door. I'd also love to Demo for you and your friends at a crafty party. As the hostess you earn lots of lovely freebies and you all get to make a fun crafty project too (no crafting experience necessary!)

 -XXX-


Built for Free Using: My Stampin Blog

Wednesday, 24 June 2015

A Folding Awesomely Artistic Gift Box from Stampin' Up! UK Demonstrator Sarah Poulton


Today's project is this fab little folded gift box decorated with the Awesomely Artistic stamp set from the fab new 2015-2016 catalogue.

To create this gift box you need a piece of cardstock measuring 15 x 22.5cm. To work out the score marks and cutting measurements I used this template. This gift box can so easily be personalised or themed by occasion by using Designer Series Paper or differing stamps.

My favourite detail of this box is the dragonfly on top which I heat embossed in Gold and Clear (over Soft Suede ink) on to Vellum Cardstock. I created two dragonflies which I then fussy cut and mounted one on top of the other (I only cut the body and wings of the second dragonfly). I created the body with Basic Pearls.


My colour scheme for this box: Soft Suede, Crumb Cake, Soft Sky, Pear Pizzazz and Encore Gold (I daubered gold around every edge for a vintage aged look).


Here is how the box opens with a folded ribbon tab.


This is such a perfect little gift box for all occasions. It would make a great teacher gift or table piece.

As it is Wednesday don't forget to check out the new Weekly Deals by clicking below.


Thank you for popping by today. Don't forget to check out this week's Weekly DealsPlease let me know if you have any questions about Stampin' Up! or our products. I would love to help. All items can be purchased online via my shop or get in touch directly and I can order them for you to be delivered direct to your door. I'd also love to Demo for you and your friends at a crafty party. As the hostess you earn lots of lovely freebies and you all get to make a fun crafty project too (no crafting experience necessary!)

 -XXX-
Built for Free Using: My Stampin Blog

Friday, 27 March 2015

Wellie Boot Butterfly Basics Card from Stampin' Up! UK Demonstrator Sarah Poulton

Happy Friday crafters.

What a fantastically busy and crafty week I have had here at Stampin' Sarah! HQ. I've been busy planning a special product class next week using the Painted Petals stamp set and matching papers. I've also been making Hostess Club gifts for my lovely virtual club members (more on that next week once I've taken some pictures). And lastly I have fallen in love with this online crafty project. Going to give it a go (with a lot of help from my Mum no doubt).

I have another of our card class projects to share with you today. This is a project and template I have cased from Stamping T in Australia. I loved the simplicity of the wellie boot template which could be used in endless combinations for all the gardening or outdoor loving people in your life.


For this card I used a Very Vanilla cardstock base and then stamped the flower from Butterfly Basics in black ink. I then layered the fern/leaf image by stamping multiple times from one inking in Wild Wasabi. I coloured the main floral image and then stamped and punched two little butterflies from Papillion Potpourri.


I finished with Candy Dots in tones of purple (taken from the Regals and Subtles Dots) and Basic Pearls to embellish the butterflies.

I absolutely love creating different shaped cards and this one is perfect for the time of year with Spring beginning to show itself in all the beautiful blooms popping up everywhere.

Thank you for popping by today. Don't forget Sale-A-Bration finishes on Tuesday so only a few more days to take advantage of all the lovely freebie products available only while supplies last.

Please let me know if you have any questions about Stampin' Up! or our products. I would love to help. All items can be purchased online via my shop (or click on the links above to find out more about specific products) or get in touch directly and I  can order them for you to be delivered direct to your door. 

-XXX-

Built for Free Using: My Stampin Blog