Showing posts with label vellum. Show all posts

Wednesday, 6 April 2016

A Love Blossoms Mini Gift Box from Stampin' Up! UK Demonstrator Sarah Poulton

Good morning lovelies.

Well what a week it has been. I have launched my new Jamberry Nail Wraps venture. I am super excited about a whole lot of prettiness headed my way in the post. I have been trialling the wraps and they are fab. They are long lasting and durable. They are easy to apply and to remove when you fancy a change. I am just in love with pretty nails without having to wait for them to dry. If you click on the link above you can find out more. Now back to normal crafty service.....

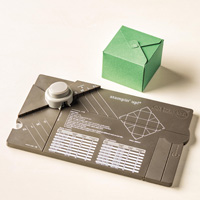
I have this lovely little Love Blossoms Gift Box to share today. I made the basic box using the Gift Box Punch Board and a 6" square piece of Love Blossoms DSP.


Once the basic box was put together I created a wrap around tag with a piece of Vellum and the Scallop Tag Topper Punch. I stamped my Decorative Label with the sentiment from Cottage Greetings in Rose Red. I added the Blushing Bride Glimmer Paper flower and tied the vellum closed with a piece of embroidery thread.


This was a project we made in a pre-Easter class and we all added mini Lindt bunnies to our boxes as a little Easter gift. These would be perfect place settings or favours for a birthday dinner or special event.

Thank you for popping by today. Please let me know if you have any questions about Stampin' Up!, Sale-A-Bration or any of our new products. I would love to help. All items can be purchased online via my shop or get in touch directly and I can order them for you to be delivered direct to your door. I'd also love to Demo for you and your friends at a crafty party. As the hostess you earn lots of lovely freebies and you all get to make a fun crafty project too (no crafting experience necessary!).

-XXX-

Product List

Monday, 25 January 2016

A Bright Balloon Celebration Card from Stampin' Up! UK Demonstrator Sarah Poulton

Hello lovely crafty friends. How was your weekend? I had a lovely time with my card class ladies. I pushed the boat out this month and cooked two fab Waitrose seasonal recipes I'd picked up in store. I baked Orange, Ginger and Date Cookies and a Sweet Potato & Apricot Cake. I don't often have an excuse to bake so really enjoyed making them.

I have a Balloon Celebration card to share today. I absolutely love stamping with this set. It is one of my fun to stamp with favourites. And even better this is one of the great value bundles in the Spring Summer catalogue. The bundle includes the Balloon Punch and matching Balloon Celebration stamp set.

I picked a combination of brights ink pads for my balloons - Melon Mambo, Daffodil Delight, Tangerine Tango & Tempting Turquoise. To bring out the contrast between the two layers (the balloons have two stamps- the main image and then the textured layer you stamp over the top giving the spotted effect) I stamped off first when I stamped the main balloon to give a paler tone. I then stamped the textured layer directly over the top.

I then cut a Vellum layer to fit centrally over the balloons. I used the Botanicals for You Sale-A-Bration set to gold heat emboss the sentiment. I attached my vellum layer with four glue dots (one in each corner). I have found this is the most discreet way to adhere vellum without the glue being too noticeable.


Thank you for popping by today. Pop back on Wednesday for more craftiness. Please let me know if you have any questions about Stampin' Up!, Sale-A-Bration or any of our new products. I would love to help. All items can be purchased online via my shop or get in touch directly and I can order them for you to be delivered direct to your door. I'd also love to Demo for you and your friends at a crafty party. As the hostess you earn lots of lovely freebies and you all get to make a fun crafty project too (no crafting experience necessary!).

-XXX-
Built for Free Using: My Stampin Blog

Monday, 14 September 2015

A Jingle All The Way layered Christmas Card from Stampin' Up! UK Demonstrator Sarah Poulton

Welcome to a new crafty week here at Stampin' Sarah! I have been busy over the weekend preparing for upcoming parties and classes. I've been having fun with my Reason for the Season stamps and the gorgeous Holidays Fancy Foil Designer Vellum (it makes beautiful gift bags and packaging!). And with the weather being so rainy and miserable here on the Isle of Wight I am hoping to sneak a few more minutes in my craft room for more festive crafting fun.

Today's share is a card I came up with to demonstrate the lovely layers of the Jingle All The Way bundle (comprised of the Jingle All The Way stamps and Sleigh Ride Edgelits). This is by far my stand out favourite product in the Autumn Winter catalogue. I adore the different layers and have been oohing and aahing over this style of card on Pinterest for a couple of Christmases. So happy Stampin' Up! have come up with their own version for me to use.


I used three layers of blue toned cardstock- Night of Navy, Island Indigo and Pool Party. The starry sky was a piece of the gorgeous Winter Wonderland Designer Vellum. The embellishment is one of the gorgeous Winter Wonderland snowflakes.

I love the simplicity of the layering and the minimal added detail and embellishment. There are so many possibilities and colour combinations for these Edgelits.


Thank you for popping by today. Please let me know if you have any questions about Stampin' Up! or our products. I would love to help. All items can be purchased online via my shop or get in touch directly and I can order them for you to be delivered direct to your door. I'd also love to Demo for you and your friends at a crafty party. As the hostess you earn lots of lovely freebies and you all get to make a fun crafty project too (no crafting experience necessary!)

 -XXX-
Built for Free Using: My Stampin Blog

Monday, 6 July 2015

A Trio of Garden in Bloom Cards from Stampin' Up! UK Demonstrator Sarah Poulton

Good morning crafters and a very Happy Monday. What a beautiful weekend of weather we had here on the Isle of Wight. Perfect for another campervan adventure and cycle ride with the girls in their cycle trailer. I also hosted one of my special product based classes on Saturday. The class was themed around the lovely Garden in Bloom stamp set and matching English Garden Designer Series Papers.


The first of the projects we made was this trio of notecards inspired by cards pictured in the Stampin' Up! Annual Catalogue (a wealth of inspiration to be found amongst the pictures in the catalogue- sometimes when I am stuck for a little crafting mojo I turn to the catalogue as the cards and projects are often easy to recreate and spark your creativity).

This first card uses a layer of Vellum Cardstock layered over the gorgeous rose papers from the English Garden DSP pack. We simply stamped the greeting and butterflies in Memento Black and then finished with a little Linen Thread.


This card uses a Mint Macaron cardbase which we stamped with Mint Macaron ink (for the butterflies we stamped the outline of the butterfly by stamping directly to the card. Then the inner colour was stamped off first to give these different shades of Mint). The colours used for the flowers are: Blushing Bride, Soft Sky and Mint Macaron. 


 We added another layer of Vellum for the greeting and finished with Silver Metallic Thread.


The final card was a quick stamping project using the same colours as above with the addition of So Saffron and Wisteria Wonder. We added some sequin sparkles for an added bit of texture.


And here is the page in the catalogue that inspired these cards. The many pictures throughout the catalogue pages are such a great starting point for creating. As you can see I didn't case them exactly. I just used them for inspiration.


I hope you've had a lovely creative weekend. I have lots of crafty things to look forward to this week including my hostess club crafty evening on Wednesday and a fun Stampin' Up! party on Saturday. I look forward to sharing our crafty makes with you later in the week.

Thank you for popping by today. Please let me know if you have any questions about Stampin' Up! or our products. I would love to help. All items can be purchased online via my shop or get in touch directly and I can order them for you to be delivered direct to your door. I'd also love to Demo for you and your friends at a crafty party. As the hostess you earn lots of lovely freebies and you all get to make a fun crafty project too (no crafting experience necessary!)

-XXX- 

Built for Free Using: My Stampin Blog

Tuesday, 31 March 2015

A big Sale-A-Bration Send Off from Stampin' Up! UK Demonstrator Sarah Poulton

Good morning crafters.

I was going through my projects to post here last night and realised I had several pictures of Sale-A-Bration projects to share with you.

So today in celebration of the last day of Sale-A-Bration 2015 I thought I would share the last of my projects using all of my favourite SAB freebies.

And don't forget there is still time to earn your own Sale-A-Bration freebie by placing an order today for £45+ in product. You can order any Stampin' Up! products via my online store by clicking here.


The first of my projects is this Thank You note I created for a recent customer order using the fantastic Lotus Blossom freebie stamp set.


I stamped the Lotus Blossom in Hello Honey, Tangelo Twist and Blackberry Bliss. I used a strip of Painted Blooms Designer Series paper. I then created the Thank You by punching a Whisper White Note Tag and stamped the greeting in Blackberry Bliss. I embellished with three Brights Candy Dots.


I had a Stampin' Up! party at the weekend with some lovely ladies. We celebrated the end of Sale-A-Bration (and the special extra Sale-A-Bration products available in March only) with these two cards created using the gorgeous Sheer Perfection Designer Vellum.


We coloured the reverse of the Designer Vellum and mounted on to one of Stampin' Up!'s precut and scored Note Cards. The butterfly is stamped in Blushing Bride and the greeting in Rose Red. The stamps are both from the Butterfly Basics stamp set.


If you'd like to find out more about any of the products I have used please click on the product links below. Don't forget Sale-A-Bration ends today. These additional exclusive products will not be available beyond today.

Thank you for popping by today. Please let me know if you have any questions about Stampin' Up! or our products. I would love to help. All items can be purchased online via my shop (or click on the links above to find out more about specific products) or get in touch directly and I  can order them for you to be delivered direct to your door. 

-XXX-

Built for Free Using: My Stampin Blog

Wednesday, 24 December 2014

Seasonally Scatttered Christmas Greetings from Stampin' Up! UK Demonstrator Sarah Poulton


Happy Christmas Eve to all my lovely friends and crafty readers.

Whatever you have planned over the next few days I hope you have a fantastic time and I hope Santa brings you that perfect crafty item for your stash (I wrote a very nice letter asking for a pyrography kit and some polymer clay *fingers crossed*).

My last festive crafty share is this Christmas card I made using Night of Navy cardstock, Silver Glimmer Paper, Vellum and the Seasonally Scattered stamp set.


I stamped my 'Merry' stamp on to a piece of vellum and heat embossed with White Stampin' Emboss Powder. I then turned the vellum over and daubered Night of Navy ink on to the reverse of my image.
I added the 'Christmas' from the Good Greetings stamp set and finished with Basic Rhinestones for extra festive sparkle.

Thank you so much for popping by today and for sharing in the Christmas Eve festivities. I wish you all a very Merry Christmas and thank you for supporting my blog throughout the year. Please let me know if you have any questions about Stampin' Up! or our products. I would love to help. All items can be purchased online via my shop (links above or click on the pictures below) or get in touch direct and I'll order them for you.

Happy Christmas Crafting 

-XXX-

Monday, 1 September 2014

Cheerful Christmas with a touch of Trim the Tree DSP using Stampin' Up! Autumn Winter Catalogue Products 2014


Good morning crafters.


How are you this fine September 1st? Where is 2014 running away to? It is now officially a downward hill to Christmas and the New Year. I am fairly certain if you pop to the shops today you'll be able to stock up on advent calendars and Quality Street. And while I am sure you'll soon see a full range of Christmas Cards popping up on the high streets, who would want to buy off the shelf when you could be creating from our fantastic new Autumn Winter Seasonal Catalogue? There is so much festive inspiration in those pages it is impossible to not want to have a go at creating your own festive makes.

Today's crafty share is inspired by a card I found on page 14 of the new catalogue.


I absolutely loved this layered embossing over a photo using Vellum. In my version of the card I have run the Filigree Frame Embossing Folder through the Big Shot using a sheet of Vellum cardstock. I then heat embossed the gorgeous 'Christmas Cheer' stamp from the Cheerful Christmas stamp set using White Embossing Powder.  I then layered the Vellum over a piece of DSP taken from the Trim The Tree Designer Series Paper Stack.


This card is made of a full sheet of A4 cardstock (Cherry Cobbler) folded in half. It needs to be a larger card to accommodate the full image created in the Vellum by the Filigree Frame Embossing Powder. I stamped the cardbase with the background image from the Cheerful Christmas stampset using my Versamark inkpad (the one I stamped with had a bit of glimmer added, but to get the tone on tone effect a normal Versamark would work too).


I embellished the hear embossing with Brights Candy Dots and Basic Rhinestones. I then created the mini pennants with scraps of Trim the Tree DSP and layered with Cherry Cobbler Baker's Twine and finished with a Nordic Designer Button.


Please let me know if you have any questions about this project. You can get in touch via email: poulton_sarah@yahoo.co.uk or 01983 609249. I'm more than happy to help. All Stampin' Up! products can be ordered through my online store by clicking the product links above or the pictures below. Or get in touch direct and I'll happily place an order for you.

Happy Crafting
-X-

Monday, 16 December 2013

Stampin' Up! UK Bow Die Angel Card


Good morning and a very Happy December 16th. Christmas is coming around so fast. I cannot believe its only next week now. I hope you had a lovely crafty weekend filled with lots of fun festive things.

This weekend I hosted my final card class for 2013. I had my regular ladies come along as well as welcoming a new face to my special Christmas-y class too. I designed 4 projects for us to make all with a special Christmas theme but would be fun to take away for last minute cards and gifts.

The photo above shows all the projects we made on Saturday but today I am going to focus on my favourite project of the afternoon in more detail, the Gift Bow Die Angel card.


I had seen lots of variations of this Angel on Pinterest and fell in love with the idea of using the Stampin' Up! Gift Bow Biqz L Die to create one of my own. The problem was I had already prepped the Christmas Cracker as our 3D item for the class. So I needed to find a way of making the Angel in to a card. The solution was to use the largest of the Ovals Framelits to create a window in a large card (one piece of A4 folded in half). I used a Very Vanilla cardstock base and then cut a slightly smaller (14.3cm x 20cm) piece of predominantly Cherry Cobbler coloured Season of Style DSP which I stuck to the front before sending through my Big Shot with the Oval Framelit sandwiched in the middle so it only cut through the front of the card).

To create the Angel herself I used: Brushed Gold Cardstock for the wings, Vellum Cardstock for the dress embossed with the Northern Flurry Embossing Folder. All of these elements were cut using the Stampin' Up! Gift Bow Bigz Die and positioned and stuck together to form the basic shape of the Angel. For her face I used a punched circle of Pink Pirouette Cardstock then created a halo using two circle punches and some beautiful sparkly Champagne Glimmer Paper. I finished by drawing eyelashes using a Black Stampin' Write marker and punching a small scallop circle from Glimmer Paper and fixing this to the body using an Antique Brad.

We then used some gold elastic from my stash to create a hanging loop which we attached inside the card using a small length of Season of Style Washi Tape. This allows the Angel to easily be removed to hang on the tree or use as a decoration around the home. I wanted the Angel to be a detachable part of the card so that she has multiple uses (not just as a card feature).

The final element was the greeting which was stamped from More Merry Messages stamp set and layered using the Apothecary Accents Framelits.

Please get in touch if there is any other info I can offer to assist in creating these lovely Angel decorations. I am only too happy to help. I have created links to my online store where you see the products highlighted above. You can link through to my store for further info on each of the products I have used or to purchase these directly for your own festive creations. And remember, today is the last day for guaranteed pre-Christmas delivery of all Stampin' Up! Products.

Any questions, you can contact me on: poulton_sarah@yahoo.co.uk or 01983 609249.

Thanks for stopping by today and happy festive crafting.
-X-