Showing posts with label cardmaking isle of wight. Show all posts

Friday, 16 October 2015

Cheerful Season Flip & Fold Card from Stampin' Up! UK Demonstrator Sarah Poulton

Good morning crafters. 

How was your week been? It has been a little hectic here what with getting back in to routines and tackling the washing mountain after our holiday.

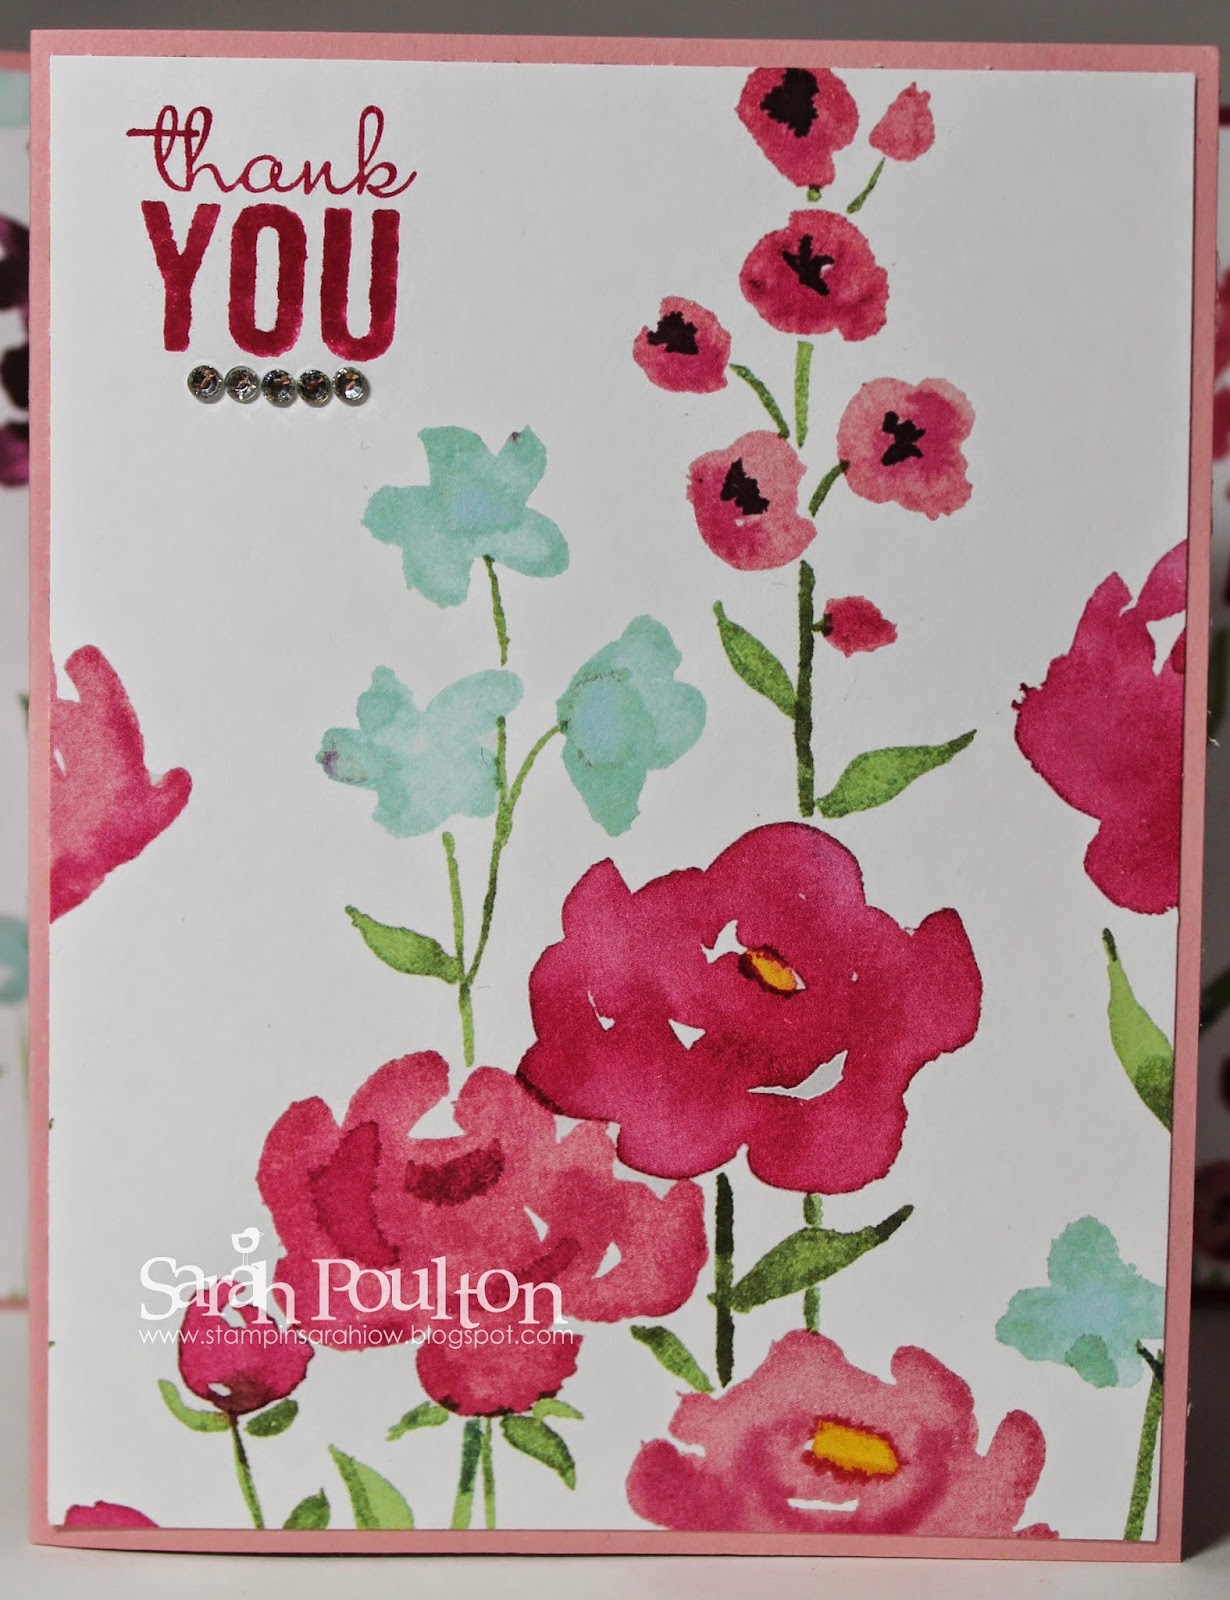
I have a make from my September card class to share with you today. This is a Flip & Fold fancy fold card. I'd seen one on Pinterest and thought it would look perfect in the bold  Cheerful Season Designer Series Paper.  I used this fantastic Youtube tutorial from Beth Beard to get the basic template for my card correct. I love how you use the triangle you cut from the top to form the reverse pattern flipped bit at the bottom. I love any design that is economical with the Designer Series Paper.


I created a belly band from contrasting DSP from the same set and then added the floral centre piece. I simply picked a flower from the DSP and punched a circle which I then layered over a scallop circle cut from Silver Glimmer Paper.

This is the sentiment I created for inside my card using the Berry Merry stamp set.


I created two samples for my class in two different paper designs. I absolutely adore the bauble papers.


I just love the contrast and bold design of this card in these papers. And I've just noticed in the pic above one of the cards is upside down. Oops. You get the idea ;0)


Thank you for popping by today. Please let me know if you have any questions about Stampin' Up! or our products. I would love to help. All items can be purchased online via my shop or get in touch directly and I can order them for you to be delivered direct to your door. I'd also love to Demo for you and your friends at your own crafty party. As the hostess you earn lots of lovely freebies and you all get to make a fun crafty project like this one too (no crafting experience necessary!). And until November 3rd Hostesses earn an extra 3% in freebies on parties over £200 in sales!!! A perfect time to get your hands on some lovely Christmas crafting stash and earn free product at the same time.

 -XXX-
Built for Free Using: My Stampin Blog

Friday, 2 October 2015

Reason for the Season meets Thankful Forest Friends from Stampin' Up! UK Demonstrator Sarah Poulton

Happy Friday crafters.

What will your weekend have in store? I am hoping to put my feet up with a cuppa and get some stitching done. I have a few Christmas cards to finish stitching as well as a couple of practice embroidery kits I got at the Kirsty Alsop show a couple of weeks back. Fingers crossed I get a few minutes to have a go.

Today I have a Thank You card I made by combining Thankful Forest Friends and Reason for the Season stamp sets.

I created the background by layering the outline and leaf/petal stamps in a random pattern over my Whisper White layer. I used a 21cm x 14.9cm card base (scored at 10.5cm). I then created a WW layer 10cm x 14.4cm.


For my sentiment layer I cut the Cherry Cobbler layer at 7cm x 4cm. The Whisper White layer which I punched in the corners with the new Trio Corner Punch was 6.5cm x 3.5cm.

I wanted a simple Thank You sentiment to accompany a Hostess Gift so I used my Stampin' Write markers for some creative colouring. I changed the Thankful Forest Friends 'Thankful for You' stamp in to Thank You simply by selectively colouring my stamp. I used the same direct stamp colouring for the multicoloured finished image (leaves and flourish).

I finished with Regals Candy Dots and mounted my sentiment layer on to Dimensionals.


Thank you for popping by today. Please let me know if you have any questions about Stampin' Up! or our products. I would love to help. All items can be purchased online via my shop or get in touch directly and I can order them for you to be delivered direct to your door. I'd also love to Demo for you and your friends at your own crafty party. As the hostess you earn lots of lovely freebies and you all get to make a fun crafty project like this one too (no crafting experience necessary!)

 -XXX-
Built for Free Using: My Stampin Blog

Friday, 31 July 2015

An Awesomely Artistic Dragonfly Flight from Stampin' Up! UK Demonstrator Sarah Poulton

How are you enjoying the new Stampin' Up! catalogue? It has been live for 2 months and the firm favourite product amongst my customers so far has to be Awesomely Artistic. This stamp set has flown off the shelves and I have loved seeing what my customers have been coming up with. It is such a versatile set and the beautiful dragonfly is so detailed.

So in honour of the fantastic layering stamp set I have CASED this card from the wonderfully creative Michelle Zindorf over in the USA. She uses amazing layering, inking and blending techniques with Stampin' Up! stamps to create incredible effects and cards. Her blog really is worth a look.

For this card I masked the edges with a piece of scrap paper and washi tape. I used the lines of my grid paper to mark precisely where I wanted the lines to be. I then used a Stampin' Sponge and inked Pool Party for the sky and Pear Pizzazz for the grass. I tried to get an ombre style effect by sponging darker towards the outside and lighter towards the middle.


I stamped the floral image across the bottom in Memento Black and coloured with my Blender Pens using Rose Red and Mossy Meadow.

I finished by stamping the dragonflies again in Memento Black. I then added White Gel Pen to the wings to give that extra bit of definition (I then used a non-SU silver sparkle pen over the top for a little glitter).


I am off work now for a week so hoping for lots of crafting and creating. And also lots of fun and games with the girls (*fingers crossed* for some lovely weather so we can get to the beach and splash park). I look forward to sharing my makes with you next week. I hope you all have a great weekend and enjoy whatever you have planned.

Thank you for popping by today. Please let me know if you have any questions about Stampin' Up! or our products. I would love to help. All items can be purchased online via my shop or get in touch directly and I can order them for you to be delivered direct to your door. I'd also love to Demo for you and your friends at a crafty party. As the hostess you earn lots of lovely freebies and you all get to make a fun crafty project too (no crafting experience necessary!)

 -XXX-

Built for Free Using: My Stampin Blog

Wednesday, 24 June 2015

A Folding Awesomely Artistic Gift Box from Stampin' Up! UK Demonstrator Sarah Poulton


Today's project is this fab little folded gift box decorated with the Awesomely Artistic stamp set from the fab new 2015-2016 catalogue.

To create this gift box you need a piece of cardstock measuring 15 x 22.5cm. To work out the score marks and cutting measurements I used this template. This gift box can so easily be personalised or themed by occasion by using Designer Series Paper or differing stamps.

My favourite detail of this box is the dragonfly on top which I heat embossed in Gold and Clear (over Soft Suede ink) on to Vellum Cardstock. I created two dragonflies which I then fussy cut and mounted one on top of the other (I only cut the body and wings of the second dragonfly). I created the body with Basic Pearls.


My colour scheme for this box: Soft Suede, Crumb Cake, Soft Sky, Pear Pizzazz and Encore Gold (I daubered gold around every edge for a vintage aged look).


Here is how the box opens with a folded ribbon tab.


This is such a perfect little gift box for all occasions. It would make a great teacher gift or table piece.

As it is Wednesday don't forget to check out the new Weekly Deals by clicking below.


Thank you for popping by today. Don't forget to check out this week's Weekly DealsPlease let me know if you have any questions about Stampin' Up! or our products. I would love to help. All items can be purchased online via my shop or get in touch directly and I can order them for you to be delivered direct to your door. I'd also love to Demo for you and your friends at a crafty party. As the hostess you earn lots of lovely freebies and you all get to make a fun crafty project too (no crafting experience necessary!)

 -XXX-
Built for Free Using: My Stampin Blog

Monday, 13 April 2015

A collection of Painted Blooms Notecards from Stampin' Up! UK Demonstrator Sarah Poulton

Good morning crafty friends. What have you been up to? Have you had a crafty weekend or simply been enjoying our beautiful weather? I managed a bit of both. But I was mainly overcome with a need to Spring Clean so ended up on a mission to clean the kitchen cupboards. So while I may not have lots of crafty projects to update you on I certainly have a sparkly clean kitchen ;0)


My project today is another of the projects my lovely ladies completed at the Painted Petals class on Easter Saturday. We used the fabulous Patty Bennett's blog post as inspiration for making 6 note cards from one sheet of Painted Blooms Designer Series Paper (the beautiful floral sheet with the large flower images).  I gave my ladies 6 card bases cut from Rose Red, Blackberry Bliss and Blushing Bride and the measurements for cutting the DSP. I also gave them a variety of embellishments from Blackberry Bliss Ribbon to die cut butterflies. I left them to create their own selection of note cards.

Here are the examples I made to display. There were originally 6 but unfortunately one fell foul to a cup of coffee and was ruined.


I used the Note Tag Punch to create little stamped embellishments with different greetings to add a little dimension to my cards.


I love the simplicity of keeping the cards plain and letting the papers take centre stage with just a simple embellishment or stamped sentiment.


Thank you for popping by today. Please let me know if you have any questions about Stampin' Up! or our products. I would love to help. All items can be purchased online via my shop (or click on the links below to find out more about specific products) or get in touch directly and I can order them for you to be delivered direct to your door.

 -XXX-

Built for Free Using: My Stampin Blog

Monday, 26 January 2015

Wetlands Panel Screen Card from Stampin' Up! UK Demonstrator Sarah Poulton


Good morning and a very Happy Monday morning to you all.

How was your weekend? Crafty I hope. I had my monthly card class on Saturday which was a lovely return to crafting with friends. It felt like a long time since our last class at the beginning of December. One of my ladies requested a screen card so I had a browse on Pinterest and came across this amazing creation by Jacqueline. I decided to give it a go.

This was a bit of a labour of love for all my class attendees and we got through several thick wedges of post-it notes creating all the masks and inky layers. But I think everyone was happy with their end result.

To create this card we used: Chocolate Chip, Garden Green, Wild Wasabi, Soft Sky and Lost Lagoon.

 
I still absolutely love the Wetlands stamp set. I love these bird images and the grasses too. For this card I needed to create a mirror image of the goose image. I vaguely remembered someone telling me you could get a mirror image using a brayer. So I had a go and it worked perfectly. You just need to ink up your stamp and lay it ink side up on the table. Carefully run your brayer over the image and then run your brayer over your cardstock. It is as simple as that! This technique is also perfect for creating reflections in water if you are trying to create ponds/lakes.

You can find out more about the new Spring Summer Catalogue and Sale-A-Bration promotion by clicking here or by using the navigation menu on the left. This really is the most exciting time of the year to shop. New products and fantastic freebie rewards too. 

Please let me know if you have any questions about Stampin' Up! or our products. I would love to help. All items can be purchased online via my shop (or click on the links above or pictures below to find out more about specific products) or get in touch directly and I'll order them for you. You can get in touch on poulton_sarah@yahoo.co.uk or 01983 609249.

-XXX-

Monday, 29 December 2014

A Simply Wonderful Saleabration 2015 Sneak Peek from Stampin' Up! UK Demonstrator Sarah Poulton

Good morning and a happy last Monday of 2014 to you.

I hope you had a lovely festive weekend. I am back to work after my maternity leave next week so I am just enjoying my last week at home with my girls before it is back to life as a working mum.

I have another quick Saleabration sneak peek for you this morning. I was lucky enough to win a Prize Patrol at the Basingstoke Regional earlier in the month. This was the stamp set I won, it is a Saleabration freebie stamp set (free with a purchase of £45+ from January 6th onwards) called Simply Wonderful.


This is a card I made for a friend's birthday using a Whisper White Notecard base and Bermuda Bay accents. I used the small flower from the Simply Wonderful stamp set and coloured with my Bermuda Bay and Old Olive Stampin' Write markers and created my own DSP (perfect for making multiple projects from one sheet of stamped card). I think the Stampin' Write marker sets are often overlooked but they are a fantastic and affordable way of getting a whole colour family in one go. And they allow the flexibility to colour your stamps in multiple tones at the same time. A great way to get started with Stampin' Up! and our coordinating colour families.


I layered my stamped banner over Bermuda Bay and Dazzling Diamonds Glimmer Paper. I then completed my card with roses created using my Spiral Flower Originals Die. I added a Basic Pearl for the centre of each flower for an extra bit of glamour.

Are you as excited as I am about Saleabration and the Spring Summer catalogue launching January 6th? I cannot wait. Who doesn't love a free product reward for buying crafty goodies? If you would like your own copy of the catalogues popped in the post please drop me a line with your address and I will get them in the post to you to peruse at your leisure. 

Thank you so much for popping by today. Thank you for supporting my blog throughout the year. Please let me know if you have any questions about Stampin' Up! or our products. I would love to help. All items can be purchased online via my shop (you can click on the pictures below) or get in touch direct and I'll order them for you. You can get in touch on poulton_sarah@yahoo.co.uk or 01983 609249.

Happy Crafting 

-XXX-

Monday, 24 November 2014

Pop Up Angels Box Card from Stampin' Up! UK Demonstrator Sarah Poulton

Good morning and a very Happy Monday to you.

I hope you have had a very crafty and productive weekend. I have been very busy with my monthly card class as well as making some lovely notes and pressies for my customers and virtual club members. I am particularly proud of my virtual club gifts this month. I will be sharing those little lovelies with you later in the  week.

To celebrate the upcoming festive season I have a whole week of lovely craftiness to share with you every morning this week. My first crafty share is this pop up Angel box card.


I am very partial to punch art and creating little characters using my punches. I had seen a few festive box cards across the blogosphere and I'd also seen a few variations of punch art Angels. I decided to have a go at combining the two.

I just love the festiveness of this little card (which folds down flat for easy posting- although with the pearl embellishments I think it'd be a large letter rate).

I started with a standard A4 base of Cherry Cobbler cardstock. I scored along the long side at 7cm, 14cm, 21cm and 28cm. I then turned and scored at 7cm (and then cut at 15cm). This gives you your basic box shape. You use the scrap piece of card to create the little Z shape tabs that stick inside your box for your pop ups to stick to. For more explanation I used this video by the lovely Monica to help put my base together.


For the decorative layers I used Brushed Gold cardstock and the Trim the Tree Designer Series Paper Stack.

My Angels were created using my 1 3/4" and 1 1/4" Circle Punches for the Champagne Glimmer halo (and for the face punched from Very Vanilla). I used the Decorative Label Punch for the body and a retired butterfly die for the Angel wings.

The one bit of stamping on this card was the sentiment taken from The Newborn King stamp set. I used this as the card looked overall like a choir of Angels singing. So I wanted the sentiment to reflect a Christmas carol.


Thank you for popping by today. I hope you enjoyed today's crafty festive project. I'll have projects to share every day this week so please come back to see what else I've been creating.

If you have any questions about today's project or the products I have used, please get in touch on poulton_sarah@yahoo.co.uk or 01983 609249. You can order online direct through my store by clicking the product links above or the pictures below. I also have availability in the next few months for your very own crafty party so drop me a line to find out more and get your date in the diary.

Happy Crafting
-X-

Wednesday, 5 November 2014

Wondrous Wreath Cardmaking Class Make from Stampin' Up! UK Independent Demonstrator Sarah Poulton


Happy Wednesday crafters.

I am so in love with the Wondrous Wreath stamp set. I just love the layered stamping. I find it relaxing. And I love all the different effects you can get simply through layering different colours.

I've seen these floating style cards a lot in crafting magazines and online and thought the wreath would make a perfect centre piece to hold the layers together.

I started with a Garden Green card base and covered my two sections with strips of patterned paper from the Trim The Tree Designer Series Paper Stack.


I created the centre piece by stamping Old Olive, Mossy Meadow and Cherry Cobbler to create the leaves, bow and berries. I then cut the wreath and bow with the Wonderful Wreath Framelits. I used the Framelits again with Champagne Glimmer Paper to cut the 'joy' which I then glued with Tombow on to my wreath.

Have you checked out this weeks Weekly Deals? Pop over to my online store to see all the great offers from Stampin' Up! for this week.


Thanks for stopping by today. If you have any questions about today's project or the products I have used, please get in touch on poulton_sarah@yahoo.co.uk or 01983 609249. You can order online direct through my store by clicking the product links above or the pictures below. I also have availability in the next few months for your very own crafty party. 

Happy Crafting
-X-