Showing posts with label cardmaking classes. Show all posts

Monday, 1 August 2016

A Sunshine Wishes Bouquet Birthday from Stampin' Up! UK Demonstrator Sarah Poulton

Happy Monday Crafters.

Hope you had a lovely crafty weekend. I've had a little sneak peek of the new Autumn Winter catalogue which has kept me entertained with many cups of tea over the weekend. So many lovely seasonal products coming up. I cannot wait to get my hands on them and start creating. If only I could shoehorn some extra hours in to the day.

I have a birthday card to share this morning. I created this for a lovely crafty friend of mine. She celebrated her birthday last week and I wanted to stamp her something special to celebrate.


I created layers of flowers with the Jar of Love stamp set. I used the two step stamping technique to add detail and depth to each flower and then hand cut them to add to my Sunshine Wishes heart die cut. I added sequins from the Brights Sequin collection for added sparkle. The sentiment is from the Tin of Cards stamp set.


Thank you for popping by today. Please let me know if you have any questions about Stampin' Up! or our products. I would love to help. All items can be purchased online via my shop or get in touch directly and I can order them for you to be delivered direct to your door. I'd also love to Demo for you and your friends at a crafty party. As the hostess you earn lots of lovely freebies and you all get to make a fun crafty project too (no crafting experience necessary!)

 -XXX-

Product List

Tuesday, 8 December 2015

An inky Cozy Christmas from Stampin' Up! UK Demonstrator Sarah Poulton

Good morning crafters.

How was your weekend? I hope your festive preparations are going well. I was busy finishing off a few final handmade gifts and working on my Christmas journal. I look forward to sharing some pics later in the week. I have kept things quick and easy this year and I am enjoying my daily note taking and picture printing.

I have a card I designed for a recent Stampin' Up! party to share today. I have really been enjoying getting inky and messy with some masking and sponging recently. 

To create this card I punched a 2" circle from a Post It and positioned where I wanted the moon to go. I then stamped the tree and deer image from the To You & Yours stamp set at the base of the card. Then I sponged a mixture of Pool Party and Island Indigo to create the moody winter sky.


Once the sky was inked I removed the Post It and used a dauber to sponge So Saffron over the moon, I added the sleigh and silver stars. To finish I added the Cozy Christmas sentiment.


I designed this card to fit on a Stampin' Up! Whisper White Note Card. So it was super simple to create a pile of them in one go (with an envelope all ready to go). This is one of my favourite Christmas cards of the year so I have made a few to send to friends and family.

Thank you for popping by today. Please let me know if you have any questions about Stampin' Up! or our products. I would love to help. All items can be purchased online via my shop or get in touch directly and I can order them for you to be delivered direct to your door. I'd also love to Demo for you and your friends at a crafty party. As the hostess you earn lots of lovely freebies and you all get to make a fun crafty project too (no crafting experience necessary!)

 -XXX-
Built for Free Using: My Stampin Blog

Monday, 30 November 2015

A Fry Box Die Gift Bag from Stampin' Up! UK Demonstrator Sarah Poulton

Happy Monday Crafters ;0)

Hope you've had a lovely weekend. Things certainly feel festive here with Christmas lights and music. Shame about the weather though. Our local lights switch on was cancelled due to the crazy wind and rain. Hopefully things'll calm down this week and we can get involved with a few more festive activities. And tomorrow will mark the start of my Christmas journal which I look forward to sharing with you over the next few weeks.

Today's creative share is a project from my November card class and is made with the gorgeous Home for Christmas Designer Series Papers with the Fry Box Bigz Die.


To make this gift box you just have to cut two of the Fry Boxes from your chosen DSP and then cut the sides from one of the boxes and then stick the bottom panels together (one on top of the other).  To create the handles I used my Large Oval Punch on each panel front and back.

To create the label I used the Making Spirits Bright stamp from the Among the Branches stamp set. I stamped using my Gold Encore pad and then punched with my 2" circle punch. I hung this from my gift box with Cherry Cobbler Baker's Twine.


To finish we filled the gift bags with novelty Christmas choccies (not that all of them made it in to the bags). This would make a lovely little table favour or decoration to hang from the Christmas tree.

Thank you for popping by today. Please let me know if you have any questions about Stampin' Up! or our products. I would love to help. All items can be purchased online via my shop or get in touch directly and I can order them for you to be delivered direct to your door. I'd also love to Demo for you and your friends at a crafty party. As the hostess you earn lots of lovely freebies and you all get to make a fun crafty project too (no crafting experience necessary!)

 -XXX-

Built for Free Using: My Stampin Blog

Tuesday, 3 November 2015

Sleigh Ride Bauble Card from Stampin' Up! UK Demonstrator Sarah Poulton

Good morning crafters. How was your weekend? The girls loved Halloween and getting dressed up. We enjoyed a local firework display on Saturday evening. Sylvie wasn't so sure to begin with but once she got used to the noise she was pretty intrigued by it all.

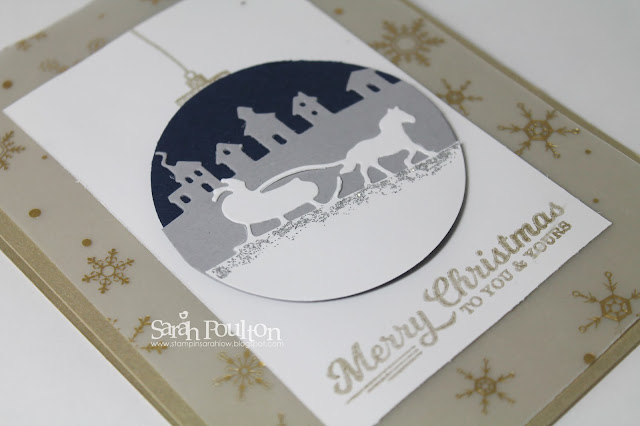
Today I have one of last month's card class makes to share with you. I'd seen similar ideas on Pinterest and loved the idea of creating a Christmas bauble from the Sleigh Ride Edgelits. I used my 2" Circle Punch to create a Night of Navy Base. I then layered the houses and the sleigh and punched again to create the bauble shape.


I added the bauble string & sentiment using the stamp from the To You & Yours stamp set. And to add a little sparkle I added Silver Dazzling Details to create snow. The background is a layer of Winter Wonderland Designer Vellum which I adhered with glue dots in each corner (not visible through the vellum).


Thank you for popping by today. Please let me know if you have any questions about Stampin' Up! or our products. I would love to help. All items can be purchased online via my shop or get in touch directly and I can order them for you to be delivered direct to your door. I'd also love to Demo for you and your friends at a crafty party. As the hostess you earn lots of lovely freebies and you all get to make a fun crafty project too (no crafting experience necessary!)

 -XXX-

Built for Free Using: My Stampin Blog

Wednesday, 2 September 2015

Galaxy Print Effect Jingle All Way Card from Stampin' Up! UK Demonstrator Sarah Poulton

Good morning crafters. How are you enjoying the Autumn Winter catalogue so far? So many lovely things to look at and ideas to get your crafting mojo going.

I have another Autumn Winter inspired creation to share with you today. One of my sisters absolutely loves all things galaxy print. I have seen so many tutorials on Pinterest on how to create this effect for yourself on fabric and using various tie dye methods. So I decided to have a go at creating my own galaxy effect Christmas card.

And it was surprisingly easy to create.

I started by sponging my top layer of Whisper White all over in Tempting Turquoise. I then created contrast by sponging areas with Island Indigo. I then covered all the sponging with Blackberry Bliss being careful to leave some of the other colours showing through. I finished by sponging a small amount of Night of Navy around the edges.


To create the stars and galaxy movement I used an Aqua Painted. I lightly flicked water over my finished sponged layer and left to dry. This gave the effect of the stars in the background. Once dry I used my fine tip glue to add Metallic Sequins.

I cut my sleigh using the Jingle All The Way bundle of products. I cut my layer to size and adhered with Dimensionals over a layer cut from Gold Foil card. 


Thank you for popping by today. I hope you enjoyed this technique today. I love any technique where no two cards will look the same (and you can't really go wrong either!). I will be back on Friday with another festive fun creation. Please let me know if you have any questions about Stampin' Up! or our products. I would love to help. All items can be purchased online via my shop or get in touch directly and I can order them for you to be delivered direct to your door. I'd also love to Demo for you and your friends at a crafty party. As the hostess you earn lots of lovely freebies and you all get to make a fun crafty project too (no crafting experience necessary!)

 -XXX-

Built for Free Using: My Stampin Blog

Monday, 24 August 2015

An English Garden Twisted Box from Stampin' Up! UK Demonstrator Sarah Poulton

Good morning crafters. I thought I would give you a little break from Christmas this morning (although I have lots of lovely festive projects all ready to share with you. I have gone a bit Christmas crafting crazy recently!).

I was surfing the crafty blogosphere on Friday and came across this fantastic tutorial to create these twisted gift boxes. I was looking for inspiration for my card class 3D project and thought this would be perfect. So I set about recreating it.

I used a Mint Macaron based and scored/cut according to Kat's instructions. I realised the tutorial needed to be slightly adapted to fit UK A4 (I simply scored the short edge at 2", 4", 6" and 8" leaving a slightly thinner tab for holding the box together).


I used off cuts of English Garden Designer Series Paper to decorate my box and wrapped a length of Pear Pizzazz Cotton Ribbon all the way around my box to keep it all together.

I created the tag with my Note Tag Punch and stamped the flower from Garden in Bloom with Old Olive and Pear Pizzazz inks. I finished with a Metal Rimmed Pearl.


This is a lovely little project to use a table favour or place setting. It would fit small amounts of sweeties or treats in perfectly. I love that this has the two compartments for fitting treats in to. You could also use it for jewellery or small gifts. 

Thank you for popping by today. I will be back Wednesday with some more festive sneak peeks from the new Autumn Winter catalogue. Please let me know if you have any questions about Stampin' Up! or our products. I would love to help. All items can be purchased online via my shop or get in touch directly and I can order them for you to be delivered direct to your door. I'd also love to Demo for you and your friends at a crafty party. As the hostess you earn lots of lovely freebies and you all get to make a fun crafty project too (no crafting experience necessary!)

 -XXX-

Built for Free Using: My Stampin Blog

Wednesday, 19 August 2015

A Cozy Christmas Sneak Peek from Stampin' Up! UK Demonstrator Sarah Poulton

Happy Weekly Deals Wednesday.  This week's deals feature sequins, a punch, embossing and ribbon. A great stash expanding series of discounts.

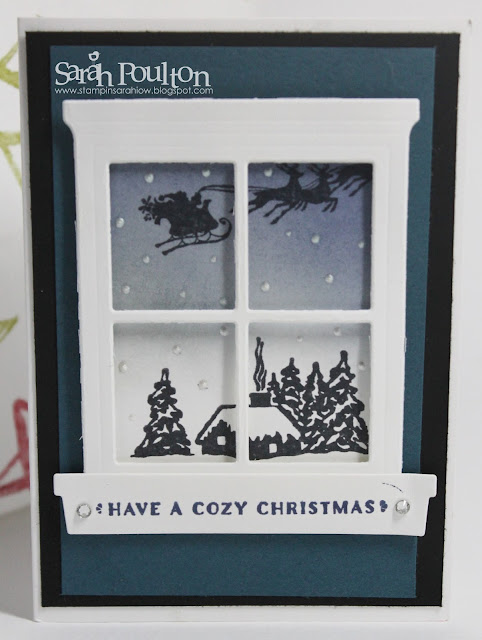
And now for some crafty sneak peekiness. As a Demonstrator I have the benefit of being able to pre-order from the new Autumn Winter catalogue a month before it is released. My box of festive loveliness arrived last week and I've loved getting started with some new Christmas craftiness.  Here is a card I created using some lovely new products from the Autumn Winter catalogue (*inspired by this card from For the Love of Stamping*). This card uses the lovely traditional stamp set, Cozy Christmas, paired with the new Hearth & Home Thinlits Dies.


I used Night of Navy to sponge the night sky background. I added pearls for snowflakes and jewels to embellish the sentiment. I absolutely adore this window framelit and the possibilities are endless for scenes to create outside the frame.


I cannot praise this catalogue highly enough. There are so many lovely creations and stamps. Would you like a copy posting to you? I would love to pop a copy over to you so you can browse in your own time (and having your hands on the physical copy is so satisfying to see everything in real size). Please drop me a line with your details and I'll get one straight out to you (poulton_sarah@yahoo.co.uk).


Thank you for popping by today. I hope you'll join me for the rest of my Christmas crafting projects that I'll be sharing throughout the week. I'll have a new project for you tomorrow. Please let me know if you have any questions about Stampin' Up! or our products. I would love to help. All items can be purchased online via my shop or get in touch directly and I can order them for you to be delivered direct to your door. I'd also love to Demo for you and your friends at a crafty party. As the hostess you earn lots of lovely freebies and you all get to make a fun crafty project too (no crafting experience necessary!)

 -XXX-

Monday, 22 June 2015

A Watercolor Wings Swinging Card from Stampin' Up! UK Demonstrator Sarah Poulton

A very happy new week crafty friends. How was your weekend? I had a full house for my class on Saturday. We had a lovely time and my home baked Slimming World Orange and Raspberry Sponge went down well too.

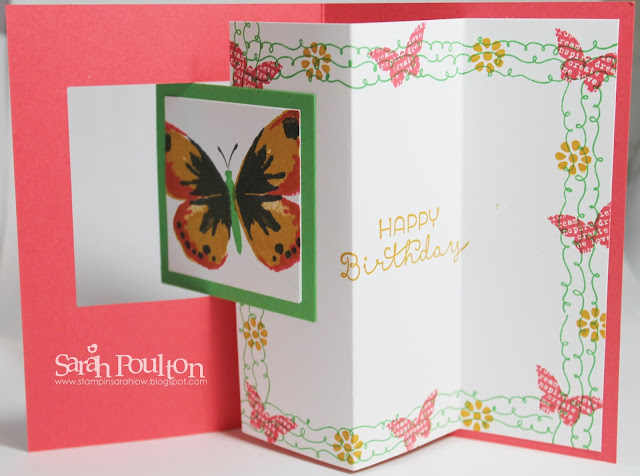
I've got one of our crafty projects from the class to share this evening. I've seen a lot of these pop up swing cards around the blogosphere. I decided to showcase our beautiful new In Colors and create my own version.


For the measurements I used and the inspiration I used this blog post from a fellow Demo in Australia.


I created my card frame using Watermelon Wonder, Cucumber Crush and Whisper White.

I stamped the Watercolor Wings butterfly using Delightful Dijon, Cucumber Crush, Watermelon Wonder and Memento Black ink. I love how easy this is to line up using our fabulous photopolymer stamps.

For the inside of the card I created a frame using the squiggles from the Sweet Stack stamp set. I added the smaller butterflies and flowers from Butterfly Basics to cover the joins in the squiggles. The sentiment is from another new stamp set called Cottage Greetings.


I finished the card with an In Color Blossom. I love these little embellishments. Beautifully textured and coordinated.

Please let me know if you have any questions about Stampin' Up! or our products. I would love to help. All items can be purchased online via my shop or get in touch directly and I can order them for you to be delivered direct to your door. I'd also love to Demo for you and your friends at a crafty party. As the hostess you earn lots of lovely freebies and you all get to make a fun crafty project too (no crafting experience necessary!)

 -XXX-
Built for Free Using: My Stampin Blog

Monday, 25 May 2015

A Life in the Forest Diamond Fancy Fold Card from Stampin' Up! UK Demonstrator Sarah Poulton


A Very Happy Monday Morning to you! How was your weekend? I hope you had a good one. 

I have lots of lovely projects to share with you this week. I will be posting projects made with my favourite retiring products (giving them one last airing before we move on to all the new loveliness of the new catalogue).

I have a  project to share from my May card class today. I had seen a similar project over on Belinda's blog and loved the effect of the combination of the Hardwood background with the Life in the Forest stamp set. I adore these little forest critters and will be putting this on my 'keep for my girls' shelf come June 3rd. This is definitely one I cannot bear to part with.

I used the basic measurements for the Double Diamond fold from Belinda's blog but I changed the width to allow for two cards to be made from one single piece of A4. I used Crumb Cake for my base with Soft Suede layers. The Hardwood was stamped with Chocolate Chip.


To colour the animals I used my Blender Pens and ink pads (I squeezed my closed ink pads to get ink on to the lid of the pad). This is how I managed to get a blended effect with my colouring. I love the vibrancy of the Chalk Marker for the details on the fox.

Thank you for popping by today. Don't forget to check out this week's Weekly DealsPlease let me know if you have any questions about Stampin' Up! or our products. I would love to help. All items can be purchased online via my shop or get in touch directly and I can order them for you to be delivered direct to your door. I'd also love to Demo for you and your friends at a crafty party. As the hostess you earn lots of lovely freebies and you all get to make a fun crafty project too (no crafting experience necessary!)

 -XXX-
Built for Free Using: My Stampin Blog

Friday, 22 May 2015

Fun with the Everyday Occasions Kit from Stampin' Up! UK Demonstrator Sarah Poulton

Evening crafters. Welcome to the weekend. I've had a super busy day getting ready for my new catalogue launch tomorrow (feel free to pop by if you are local on the Isle of Wight and fancy a little craftiness). I have lots of lovely craft items for sale as well as a fun make and take and copies of the catalogue for all attendees.


This week I went along to my monthly craft group with some lovely friends. We usually buy stamps to share amongst with our monthly subs. But this month we did something a little different and purchased the Everyday Occasions Kit from Stampin' Up! We thought as it was a crafty evening we could all share the kit contents and make ourselves some cards all together.


I cannot believe I haven't purchased one of these fab all in one kits before. Everything you need right in one lovely box including all the elements, Dimensionals, embellishments, cards, envelopes, stamps and ink (and there is even an acrylic block in the box too).

Here are the cards I made from the kit contents:


I love this Happy Birthday stamp. It would work really well on its own. So simple and it stamps beautifully:


I love the different styles and sizes of card in the kit. And the stamp set has a mix of sentiments for all occasions. Such a great all in one kit for the new stamper with clear and concise instructions or an easy to transport kit for the crafter on holiday.

Just a reminder, this and many other items are only available to order until June 2nd. After that we will have lots of new loveliness to drool over. But don't miss your chance to purchase your retiring favourites.

Thank you for popping by today. Don't forget to check out this week's Weekly DealsPlease let me know if you have any questions about Stampin' Up! or our products. I would love to help. All items can be purchased online via my shop or get in touch directly and I can order them for you to be delivered direct to your door. I'd also love to Demo for you and your friends at a crafty party. As the hostess you earn lots of lovely freebies and you all get to make a fun crafty project too (no crafting experience necessary!)

 -XXX-


Built for Free Using: My Stampin Blog

Friday, 10 April 2015

A Painted Blooms Mini Scrapbook Page from Stampin' Up! UK Demonstrator Sarah Poulton

Happy Friday.

What are your crafty plans for the weekend. It looks to be a lovely day outside here today so I am packing the girls in to our new bicycle kiddie trailer and going out for a ride to Mums. Hopefully we'll get some gardening done in the lovely weather. Then maybe Mum and I will get to make a start on the beautiful Lily Pond Crochet Blanket I shared with you last week ;0)

I have two 6"x6" scrapbook pages to share with you today. I held the first of my new product classes last weekend. All attendees received the Painted Petals stamp set and three project kits to complete. This was one of the projects they got to make. They could choose to make their project in to a little scrapbook page and add their own pictures at home. Or they could create a card front or picture to frame.

This was my first creation:


I used a 6" square base of Blackberry Bliss and then cut a 5.75" square Whisper White layer to stamp on. I used Blushing Bride and Wild Wasabi ink to stamp the flowers from the Painted Petals set. I then punched three postage stamps from Blackberry Bliss cardstock. I used my 1" Square Punch to cut the little detail pictures to add to my squares.

I finished by stamping the Rose Red dots and the Blackberry Bliss sentiment and added a row of Pearls for added texture and detail.


The alternative version I created used the two step stamping bloom in the stamp set. I stamped the flowers in both Blushing Bride and Rose Red. I added Wild Wasabi leaf detail. Instead of photos I created floral frames instead using all the different floral stamps in the set.


Both pages were embellished with Butterflies punched from the matching Painted Blooms Designer Series Papers. 

If you haven't already hopped on over to the newly updated Clearance Rack it is well worth checking up. There are some real bargains to be had. I have been receiving some great feedback on the bargains some of my lovely customers have been getting. I might have to partake of a stocking up trip to the Rack myself over the weekend.


Thank you for popping by today. Please let me know if you have any questions about Stampin' Up! or our products. I would love to help. All items can be purchased online via my shop (or click on the links below to find out more about specific products) or get in touch directly and I can order them for you to be delivered direct to your door.

 -XXX-
Built for Free Using: My Stampin Blog

Wednesday, 8 April 2015

Updates to the Clearance Rack and a quick Thank You Note from Stampin' Up! UK Demonstrator Sarah Poulton

Good morning crafters. Exciting news to wake up to on a Wednesday morning. The Clearance Rack has been updated. It is well worth a visit as there are some fantastic reductions on lots of lovely stamps, embellishments and accessories.


Wednesday also brings a new set of Weekly Deals. A great variety of products this week. My favourite being the Magnetic Plate for the Big Shot. Perfect for keeping Framelits in place for the bargain reduction price of £26.96. There are also punches, buttons, stamps and papers.


And here is a quick crafty share for a Wednesday. These are my customer thank you notes I made for a recent workshop's orders. I always like to include a handstamped thank you note and I have been favouring the Work of Art stamp set recently.

I created these little notelets with three tones of blue: Soft Sky, Pool Party and Coastal Cabana. 


I used a sentiment from the Another Thank You stamp set for the 'thanks'.


Thank you for popping by today. Please let me know if you have any questions about Stampin' Up! or our products. I would love to help. All items can be purchased online via my shop (or click on the links below to find out more about specific products) or get in touch directly and I  can order them for you to be delivered direct to your door. 

-XXX-

Built for Free Using: My Stampin Blog

Monday, 23 February 2015

Saleabration Big Day Chalkboard Birthday Card from Stampin' Up! UK Demonstrator Sarah Poulton


Good morning and a very Happy Monday to you all.

Did you have a lovely weekend? What terrible weather we had yesterday! It poured down with rain on the Isle of Wight all day. Looks a bit better out there today. Might try and brave a trip to playgroup while its not raining. Although I did hear a mention of thunder snow on the news this morning. I would LOVE to see that ;0)

Today's crafty make was one of our class projects from Saturday. This card was inspired by a creation over on Nancy's blog. I love this multicoloured chalkboard style technique and the use of bright colours for a fun birthday card.

I started with a 10.5cm x 29.6cm base (scored at 14.8cm). I then cut a piece of the fabulous Stampin' Up! Irresistibly Yours Sale-A-Bration Paper sized 14.3cm x 10cm. I used a Stampin' Sponge to cover the paper in Daffodil Delight ink giving these fab bright stripes as a background.


To create the multicoloured chalkboard I wiped my small piece of Basic Black cardstock with my Embossing Buddy. I then heat embossed the sentiment and cake using White Stampin' Emboss powder. Once cooled you simply colour over your white embossing with whichever Blendabilities markers you would like. I used Bermuda Bay, Daffodil Delight and Calypso Coral.

I finished the card with two lengths of ribbon from the Sale-A-Bration Best Year Ever Accessory Pack and a Mini Metallic Clothespin. A lot less complicated than it looks.

Thank you for popping by today. You can find out more about the new Spring Summer Catalogue and Sale-A-Bration promotion by clicking here or by using the navigation menu on the left. This really is the most exciting time of the year to shop. New products and fantastic freebie rewards too. 

Please let me know if you have any questions about Stampin' Up! or our products. I would love to help. All items can be purchased online via my shop (click on the links below to find out more about specific products) or get in touch directly and I  can order them for you to be delivered direct to your door. 

-X-
Built for Free Using: My Stampin Blog

Friday, 13 February 2015

An All Abloom Scrapbook Page from Stampin' Up! UK Demonstrator Sarah Poulton


Happy Friday Crafters.


Today's project proved impossible to photograph. So please be assured this scrapbook page was squared and centred. But in photographing and cropping the layout went a bit awry.


I had seen a page on Pinterest that was laid out in a similar manner and knew it would be perfect for using up little scraps of the gorgeous All Abloom Designer Series Paper Stack from Stampin' Up!.


I chose my two pictures and decided to create a smaller 10"x 8" rectangle within my 12"x12" Very Vanilla base. I trimmed my pictures to the size I wanted (4"x6" and 3.75" x 4") and then created my squares and rectangles from varying floral patterned papers in measurements to create my 10" x 8" rectangle.


I then doodled my dashed line around the edge of my DSP rectangle using a Strawberry Slush marker and a ruler. I then went through my stash and added floral focal points on each of my DSP pieces. Now sadly a lot of these are either retired Stampin' Up! or generic floral embellishment from my scrapping stash. However, the embellishments in the above picture are taken from the gorgeous Spring Summer Catalogue Artisan Embellishment Kit. I used the pink tinted floral trim and the gorgeous deeper pink Crochet Trim too. This is such a gorgeous kit for creating beautiful vintage cards and scrapbook pages.

Thank you for popping by today. You can find out more about the new Spring Summer Catalogue and Sale-A-Bration promotion by clicking here or by using the navigation menu on the left. This really is the most exciting time of the year to shop. New products and fantastic freebie rewards too. 

Please let me know if you have any questions about Stampin' Up! or our products. I would love to help. All items can be purchased online via my shop (or click on the links above to find out more about specific products) or get in touch directly and I  can order them for you to be delivered direct to your door. 

-XXX-

Wednesday, 11 February 2015

A Lotus Blossom Saleabration Thank You from Stampin' Up! UK Demonstrator Sarah Poulton


Good evening all. I hope you've had a lovely and creative week so far. It has been a busy one here on the Isle of Wight as I had some crafty friends round on Monday and did some card class prep. So this belated blog post comes with an apology. Today is the first opportunity I have had to photograph my projects in good light.

My first project of the week is the thank you note I made to enclose with all my recent party orders. I always like to include a little hand stamped note to show my appreciation. And I was recently told by one of my regular hostesses that she keeps all my cards as a little library of ideas and techniques. This made me smile as I can never throw away a handmade card so I loved to hear mine were being kept.

This is a super simple and easy three step stamping card. I made a stack of 18 cards in 15 minutes.

I cut three card bases from one sheet of Naturals Ivory Cardstock (each card base measures 9.9cm x 21cm scored at 10.5cm). I simply stamped the Lotus Blossom image from the Sale-A-Bration exclusive stamp set in Blushing Bride, Calypso Coral and Rose Red.


I then stamped the stem in Old Olive and the coordinating greeting in Rose Red. I finished with 3 Basic Pearls to add a small amount of embellishment.

And don't forget that as it is Wednesday we have a new range of Weekly Deals launching today. There are some great products this week including the Magnetic Big Shot platform and several dies at fantastic prices!

Thank you for popping by today. You can find out more about the new Spring Summer Catalogue and Sale-A-Bration promotion by clicking here or by using the navigation menu on the left. This really is the most exciting time of the year to shop. New products and fantastic freebie rewards too. 

Please let me know if you have any questions about Stampin' Up! or our products. I would love to help. All items can be purchased online via my shop (or click on the links above to find out more about specific products) or get in touch directly and I  can order them for you to be delivered direct to your door. 

-XXX-