Showing posts with label Masking. Show all posts

Monday, 31 July 2017

A masked Beautiful You Birthday Card from Stampin' Up! UK Demonstrator Sarah Poulton

Happy Monday Crafty Friends. How has your weekend been? I've been super busy making samples and prepping for my big Christmas Craft Day in a couple of weeks.  Yesterday I cut 2448 one inch square paper pieces. To see what we will be making with these squares pop back later in the month and I will share all our Christmas in August projects (and I might even have a few sneak peeks of the new Autumn Winter catalogue too!).

Today I have another Beautiful You share. I adore this stamp set and its versatility. This card was inspired by a greetings card I saw on Pinterest. It uses masking (created with a Post-It) to cover the lady and stamp the background sentiment repeatedly down the card with the one contrasting coloured sentiment to highlight the birthday greeting.


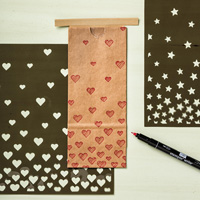
The colour scheme for this card is Rose Red and Basic Grey. I don't often think to stamp with a grey ink pad. But i was super happy with this effect.

To finish the card I added Glitter Enamel Dots and Clear Faceted Gems. I could add these to every project I make as I love an extra bit of sparkle.


Please let me know if you have any questions about Stampin' Up! and their products. I would be happy to help. All items can be purchased online via my shop or get in touch directly and I can order them for you to be delivered direct to your door. I'd also love the opportunity to demonstrate for you and your friends at a crafty party. As the hostess you earn exclusive free products and all guests get to create a fun crafty project to take home too. No crafting experience necessary! Get in touch if you'd like any further information.

-XXX-

Saturday, 22 April 2017

A Jar of Love Silhouette Card from Stampin' Up! UK Demonstrator Sarah Poulton

Happy Saturday crafters.

I have a huge task ahead of me today. I have cleared my schedule and I have the Stampin' Up! Retiring List ready in front of me. I am going to tackle my piles of stamps, embellishments, papers and dies and sort out those that are retiring from those that will be carrying over in to the new Stampin' Up! catalogue (which I've had a peek at and is overflowing with loveliness!). I love this time of year, making way for lots of new crafty fabulousness. If you'd like to have a look at the items that are on the retiring list click on the picture below (only available until May 31st).


Today's crafty share is a card I created using my Jar of Love stamp set. I often overlook this set when I am sitting down to craft but when I had a look at some of the smaller images I realised they'd make a perfect silhouette layered over one another. 


I started by punching a circle from a Post-It to create a mask. I then used So Saffron ink with a sponge dauber to ink the circle in the background. Then I simply layered the Jar of Love elements in Memento Black ink over the top. Adding the greeting last.


Please let me know if you have any questions about Stampin' Up! and their products. I would be happy to help. All items can be purchased online via my shop or get in touch directly and I can order them for you to be delivered direct to your door. I'd also love the opportunity to demonstrate for you and your friends at a crafty party. As the hostess you earn exclusive free products and all guests get to create a fun crafty project to take home too. No crafting experience necessary! Get in touch if you'd like any further information.

-XXX-

If you are placing an order during April (and your order is under £150 as you will qualify for your own rewards if the order goes above this amount) please use the hostess code ZBACWNNR and you will receive a special gift from me in June.

Monday, 23 May 2016

An In the Meadow masked card from Stampin' Up! UK Demonstrator Sarah Poulton

Good morning crafters. How was your crafty weekend? Mine was a super busy one. I held my monthly class with 7 lovely ladies on Saturday where we got to have a play with the new In Colors and some sneak peek products. Then most of yesterday was spent reorganising and sorting out my craft space. I have moved my craft area from one of the spare rooms to my bedroom. So I have been setting up a new space which has meant lots of organising and sorting. I'm not quite there yet. But it is coming along nicely. And I have unearthed lots of lovely things I'd forgotten I had ;0)

I have a simple masking card to share today which uses the In the Meadow stamp set. The colours for this card are Tip Top Taupe and Mint Macaron. I cut my Whisper White banner first and stamped the deers. I then created a mask of the deers with a post it note. I adhered over the top of my Tip Top Taupe stamping. I was then able to stamp my Mint Macaron mountains over the top.


I layered my Whisper White banner over Mint Macaron and Tip Top Taupe DSP banners. I added the 'Dear Friend' from Cottage Greetings and finally embellished with Basic Pearls.


Thank you for popping by today. Please let me know if you have any questions about Stampin' Up!, or any of our products. I would love to help. All items can be purchased online via my shop or get in touch directly and I can order them for you to be delivered direct to your door. I'd also love to Demo for you and your friends at a crafty party. As the hostess you earn lots of lovely freebies and you all get to make a fun crafty project too (no crafting experience necessary!).

-XXX-

Product List

Wednesday, 2 March 2016

A Botanicals For You Sale-A-Bration Butterfly from Stampin' Up! UK Demonstrator Sarah Poulton

Good morning crafty friends. How is your week going? It has been a bright sunny week on the Isle of Wight so far. Hopefully Spring might be just around the corner ;0) I've been inspired to join in with the Global Design Project weekly challenge again this week. This weeks theme is a colour challenge: Daffodil Delight, Basic Gray and Smoky Slate. I love having a challenge or theme to work to. This is what I came up with:


For this card I created a mask with my Bold Butterflies Framelits. I stamped the small flowers from Botanicals For You in all three colours from the challenge to create the butterfly shape. I added definition around the edges of my mask with a sponge dauber and Daffodil Delight ink.

I punched an Elegant Butterfly in Whisper White and stamped my 'happy' from Endless Birthday Wishes across the butterfly. I adhered and added the 'birthday' and smaller itty punched butterflies. To finish I added Candy Dots and Basic Pearls. (I also added a small piece of exclusive Sale-A-Bration silver glitter tape which I daubered with Basic Grey ink to match the colours of the card).


Thank you for popping by today. Please let me know if you have any questions about Stampin' Up!, Sale-A-Bration or any of our new products. I would love to help. All items can be purchased online via my shop or get in touch directly and I can order them for you to be delivered direct to your door. I'd also love to Demo for you and your friends at a crafty party. As the hostess you earn lots of lovely freebies and you all get to make a fun crafty project too (no crafting experience necessary!).

-XXX-

Product List

Wednesday, 6 January 2016

A Party Wishes Celebration from Stampin' Up! UK Demonstrator Sarah Poulton

Good morning crafty friends and welcome to a new Spring Summer catalogue day.

The catalogue and Sale-A-Bration only launched yesterday and I have already welcomed a new team member and placed a little order to get my hands on another of the fantastic Sale-A-Bration freebie stamp sets.

I got a little crafty time last night with both the girls in bed early. Here is a birthday card I created using the Party Wishes stamp set. Would you believe I measured and taped my mask carefully to allow me to stamp the strip and it still ended up wonky! But that is the beauty of crafting. Not everything turns out perfectly. I still loved the overall effect of the card.

I started by masking the strip along the bottom of the card and stamping the cakes, balloons, candles and confetti in Melon Mambo, Old Olive, Rich Razzleberry and Tempting Turquoise. I then used a Sponge Dauber to add Daffodil Delight over the top to define my masked strip a little better.


To finish I added the sentiment in Pumpkin Pie and stamped the balloons (I hand drew the strings with my Pacific Point Stampin' Write Marker). I added three Brights Candy Dots along the bottom.


If you'd like a copy of the new catalogue to peruse at your own leisure, drop me a line with your address on poulton_sarah@yahoo.co.uk and I'll get one in the post to you asap.

Check out all the details of the current Sale-A-Bration promotion by clicking the image below.


I'll be taking part in the Pinkies Team blog hop tomorrow evening so be sure to pop back to join in a fun Spring Summer inspiration hop. Thank you for popping by today. Please let me know if you have any questions about Stampin' Up!, Sale-A-Bration or any of our new products. I would love to help. All items can be purchased online via my shop or get in touch directly and I can order them for you to be delivered direct to your door. I'd also love to Demo for you and your friends at a crafty party. As the hostess you earn lots of lovely freebies and you all get to make a fun crafty project too (no crafting experience necessary!) 

 -XXX-.
Built for Free Using: My Stampin Blog

Tuesday, 8 December 2015

An inky Cozy Christmas from Stampin' Up! UK Demonstrator Sarah Poulton

Good morning crafters.

How was your weekend? I hope your festive preparations are going well. I was busy finishing off a few final handmade gifts and working on my Christmas journal. I look forward to sharing some pics later in the week. I have kept things quick and easy this year and I am enjoying my daily note taking and picture printing.

I have a card I designed for a recent Stampin' Up! party to share today. I have really been enjoying getting inky and messy with some masking and sponging recently. 

To create this card I punched a 2" circle from a Post It and positioned where I wanted the moon to go. I then stamped the tree and deer image from the To You & Yours stamp set at the base of the card. Then I sponged a mixture of Pool Party and Island Indigo to create the moody winter sky.


Once the sky was inked I removed the Post It and used a dauber to sponge So Saffron over the moon, I added the sleigh and silver stars. To finish I added the Cozy Christmas sentiment.


I designed this card to fit on a Stampin' Up! Whisper White Note Card. So it was super simple to create a pile of them in one go (with an envelope all ready to go). This is one of my favourite Christmas cards of the year so I have made a few to send to friends and family.

Thank you for popping by today. Please let me know if you have any questions about Stampin' Up! or our products. I would love to help. All items can be purchased online via my shop or get in touch directly and I can order them for you to be delivered direct to your door. I'd also love to Demo for you and your friends at a crafty party. As the hostess you earn lots of lovely freebies and you all get to make a fun crafty project too (no crafting experience necessary!)

 -XXX-
Built for Free Using: My Stampin Blog

Friday, 31 July 2015

An Awesomely Artistic Dragonfly Flight from Stampin' Up! UK Demonstrator Sarah Poulton

How are you enjoying the new Stampin' Up! catalogue? It has been live for 2 months and the firm favourite product amongst my customers so far has to be Awesomely Artistic. This stamp set has flown off the shelves and I have loved seeing what my customers have been coming up with. It is such a versatile set and the beautiful dragonfly is so detailed.

So in honour of the fantastic layering stamp set I have CASED this card from the wonderfully creative Michelle Zindorf over in the USA. She uses amazing layering, inking and blending techniques with Stampin' Up! stamps to create incredible effects and cards. Her blog really is worth a look.

For this card I masked the edges with a piece of scrap paper and washi tape. I used the lines of my grid paper to mark precisely where I wanted the lines to be. I then used a Stampin' Sponge and inked Pool Party for the sky and Pear Pizzazz for the grass. I tried to get an ombre style effect by sponging darker towards the outside and lighter towards the middle.


I stamped the floral image across the bottom in Memento Black and coloured with my Blender Pens using Rose Red and Mossy Meadow.

I finished by stamping the dragonflies again in Memento Black. I then added White Gel Pen to the wings to give that extra bit of definition (I then used a non-SU silver sparkle pen over the top for a little glitter).


I am off work now for a week so hoping for lots of crafting and creating. And also lots of fun and games with the girls (*fingers crossed* for some lovely weather so we can get to the beach and splash park). I look forward to sharing my makes with you next week. I hope you all have a great weekend and enjoy whatever you have planned.

Thank you for popping by today. Please let me know if you have any questions about Stampin' Up! or our products. I would love to help. All items can be purchased online via my shop or get in touch directly and I can order them for you to be delivered direct to your door. I'd also love to Demo for you and your friends at a crafty party. As the hostess you earn lots of lovely freebies and you all get to make a fun crafty project too (no crafting experience necessary!)

 -XXX-

Built for Free Using: My Stampin Blog

Monday, 27 April 2015

Serene Silhouettes Card Set from Stampin' Up! Demonstrator Sarah Poulton

Good morning crafters.

How was your weekend? Mine was spent with a head cold which resulted in a lot of things being dropped, a fair few silly accidents and bumps, and one very interesting card class where my fuzzy head meant I didn't make a whole lot of sense trying to teach our projects for the month. But we got there in the end.

I have a set of birthday cards inspired by Serene Silhouettes to share today. I had seen this card on Pinterest and knew it would look lovely with a Stampin' Up! twist. So I set about recreating it using the stamps from Serene Silhouettes as my focus.


The colours I picked were So Saffron, Cajun Craze and Calypso Coral . I used a So Saffron base for two of the cards with a layer of Cajun Craze and the stamping layer was on Whisper White.

I created masks with my circle punches in various sizes. I sponged the colours through my masks to create the coloured backgrounds.

For this first card I created two masked circles and I then heat embossed the butterfly circle with gold embossing powder. I added the greeting from Wetlands and then added pearls and circles of gold ink using a sponge dauber.


This second card more closely resembles the Pinterest card.  I used the silhouetted flower heads stamp over the three masked circles. I heat embossed the silhouette in gold.


And the final card was a more simplified version of the butterfly circle card. This time instead of sponge daubering circles I used the rubber on the end of a pencil to stamp smaller gold circles over the card. I added basic pearls as a final embellishment.


Have you checked out the retiring lists yet? Still some great bargains to be had. Don't forget these items are only available while stocks last.


With a new catalogue just around the corner this is a perfect time to pick up a bargain and say goodbye to some old favourites. There are lots of stamps and accessories on these lists that I love and will be sad to see leave. But then I am super excited to see what the new catalogue has in store too.

Thank you for popping by today. Please let me know if you have any questions about Stampin' Up! or our products. I would love to help. All items can be purchased online via my shop or get in touch directly and I can order them for you to be delivered direct to your door. I'd also love to Demo for you and your friends at a crafty party. As the hostess you earn lots of lovely freebies and you all get to make a fun crafty project too (no crafting experience necessary!)

 -XXX-
Built for Free Using: My Stampin Blog

Saturday, 19 July 2014

Welcome to the Isle of Wight for a little craftiness: Pinkies New Catalogue Blog Hop


Thank you for joining us on another Pinkies Blog Hop! We're showcasing lots of gorgeous projects using products from the new Stampin' Up!® Annual Catalogue. Simply use the buttons at the end of each post to keep hopping!

Welcome to the Isle of Wight for my little corner of this fantastic Pinkies new catalogue blog hop. Hello if you have joined me from Lucy's blog. 

When it came to designing a project for today's hop I knew exactly what I wanted to use: my lovely new Epic Alphabet Photopolymer Stamp Set paired with the fantastic Little Moments Project Life Accessory Pack. I had purchased these box frames from a well known Scandinavian home store recently and wanted to created these newborn shadow boxes with little newborn keepsakes for each of my girls. Although I didn't realise just how impossible the glass would be to photograph.


For the first frame I used the Epic Alphabet to stamp 'Summer' and the Skinny Mini Alphabet for 'Rose' and the birthdate. I stamped these completely by eye. The new photopolymer stamps make stamping alphabets so much easier and they are so easy to line up.


I then used my new Hearts Decorative Mask to create the corner feature. I sponge daubered So Saffron ink first and then lightly added Blushing Bride as an accent over the top. I wanted the ink colours to match the colours in the onesie sleeve I included in the box. This was the sleepsuit Summer wore home from the hospital.


For the second frame I again used the Epic Alphabet for 'Sylvie' but this time I used my Little Bundle Accessory Pack for the 'Grace'. I also used the stickers within the pack to create the corner feature with the ducks, elephants and hearts.

To create the little circle embellishment I covered the lid of an empty Designer Button container with sticky strip and then cut round the Tatty Ted image from Sylvie's onesie (this is the same onesie she is wearing in the photo) and stuck it over the lid. I then secured with sticky strip on the inside to create this 3d embellishment.

I also just wanted to point out how beautiful the little 2013-2015 In Color Sequins are. I have used these throughout both frames as they are just so lovely. I can see these will be a favourite feature on all my projects going forward.


Thank you for joining me today. I hope you enjoyed my crafty shares and that you are loving all the new catalogue inspiration today. Please hop on over to Anne Marie's blog to continue our hop.