Showing posts with label Pinkies. Show all posts

Thursday, 8 September 2016

Jar of Cheer Shaker Cards from Stampin' Up! UK Demonstrator Sarah Poulton


Thank you for joining us on another Pinkies Blog Hop! We're showcasing lots of gorgeous projects using products from the new Stampin' Up!® Autumn/Winter Seasonal Catalogue. Simply use the buttons at the end of each post to keep hopping!

Welcome to the Isle of Wight for a little Autumn Winter catalogue inspiration. Thank you for hopping over from Michelle's blog. My cards today were inspired by the Jar of Cheer stamp set which is designed to coordinate with the Everyday Jars Framelits from the Annual Catalogue.

I couldn't make up my mind which image to put inside my mason jar so decided to create two cards featuring the snowman and candle with the new Fancy Frost sequins as the shaker element. 


The sentiment is also from the Jar of Love which I stamped in Cherry Cobbler to march the cardstock card base.


I coloured my image with my Stampin' Write markers. And as a final detail I added the gorgeous Bakers Twine from the Trio Pack.


Thank you for popping by today. Hop on to Nicole's blog for more seasonal loveliness.


Product List

Friday, 12 August 2016

A Fairy Celebration from Stampin' Up! UK Demonstrator Sarah Poulton

Good morning lovelies. How has your week been? I've been enjoying creating with my gorgeous Autumn Winter preorder products. I have some sneak peeks for you next week. As you read this I will be finalising my table and prep for my 2nd Christmas Craft Day today. I have lots of fun in store for my ladies today and having received some great feedback from last Saturday's creating I am sure some beautiful creations will be made today.

My creative share for today was the result of a challenge I set myself to ink a stamp I'd not created anything with yet. The Fairy Celebration stamp set was on my must have list when I saw the new annual catalogue yet I hadn't gotten around to creating with it. I wanted a colourful but simple card to highlight the gorgeous fairy image. This is what I came up with:


I simply stamped the fairy in Memento Black ink and coloured with a selection of ink pads and Blender Pens. I added Dazzling Diamonds to the toadstool and brushed Clear Wink of Stella over my Soft Sky background to add extra sparkle. The final embellishments were the stars taken from the In Color Accents pack and the tiny pearls.


Thank you for popping by today. Please let me know if you have any questions about Stampin' Up! or our products. I would love to help. All items can be purchased online via my shop or get in touch directly and I can order them for you to be delivered direct to your door. I'd also love to Demo for you and your friends at a crafty party. As the hostess you earn lots of lovely freebies and you all get to make a fun crafty project too (no crafting experience necessary!)

 -XXX-

Product List

Thursday, 7 January 2016

Pinkies Spring Summer Catalogue Blog Hop with Stampin' Up! UK Demonstrator Sarah Poulton


Thank you for joining us on another Pinkies Blog Hop! We're showcasing lots of gorgeous projects using products from the new Stampin' Up!® Spring/Summer Catalogue. Simply use the buttons at the end of each post to keep hopping!

Welcome to the Isle of Wight and my little corner of the Pinkies Blog Hop celebrating the lovely new products from our fantastic new catalogue. If you've hopped here from Linda's blog welcome and I hope you've enjoyed the inspiration shared so far.

Today I have a project inspired by a Patty Bennett creation I glanced past on Pinterest to share with you. I loved the simplicity of using the new Birthday Blooms stamp set in a less obvious way. The heart border stamp is so striking and I chose every Stampin' Up! tone of blue to give an ombre style to my birthday card.


I fussy cut the 'Happiest' to give a little dimension and to allow the sentiment to overhang my 2" punched circle. I added Basic Rhinestones along with a length of Silver 1/8" Ribbon to give a little extra texture and sparkle.


Thank you for joining me on the hop today. Pop over to Sue's blog to continue the Spring Summer inspiration.


Built for Free Using: My Stampin Blog

Saturday, 5 September 2015

A Berry Merry Light Up Easel from Stampin' Up! UK Demonstrator Sarah Poulton


Thank you for joining us on another Pinkies Blog Hop! We're showcasing lots of gorgeous projects using products from the new Stampin' Up!® Autumn/Winter Seasonal Catalogue. Simply use the buttons at the end of each post to keep hopping! 

Hello and welcome to the Isle of Wight for my little contribution to today's Autumn Winter creativity. Thank you for joining me from Janneke's blog.

I was at a loss with where to start to create a project for today's hop. I love so much in this catalogue (my all time favourite catalogue in my 5 years with Stampin' Up!). But I settled on the gorgeous Berry Merry (anyone else think Bake Off when they hear this name?). I love all the little elements in this stamp set for embellishing your beautiful swirly script sentiments.

I wanted to make a piece of home decor to display in my home through December so I came up with this festive easel.


I purchased the little canvas and easel from my local Works. I stamped my elements in Cherry Cobbler, Old Olive, Garden Green, Soft Suede and Crumb Cake. I had a few left over light strings from my big Christmas Craft Days so I used one of these to light up my canvas. I simply poked a small hole through my canvas and then secured my LED lights behind each.

When I stamped my main image on to the canvas the stamping was patterned with the bobbles of the canvas. To get this softer watercolour effect for my completed project I used a blender pen over my ink to blend it seamlessly.


Thank you for joining my today. I hope you've enjoyed the hop so far. To continue please click onwards to Catherine's blog to see what she has been making.


Built for Free Using: My Stampin Blog

Saturday, 20 June 2015

Pinkies Annual Catalogue Blog Hop: A From Land to Sea Notecard Trio from Stampin' Up! UK Demonstrator Sarah Poulton


Thank you for joining us on another Pinkies Blog Hop! We're showcasing lots of gorgeous projects using products from the new Stampin' Up!® Annual Catalogue. Simply use the buttons at the end of each post to keep hopping!

Welcome to the Isle of Wight and my little part of today's blog hop. Thank you for joining me from Paula's blog. Such a lot of inspiration!

When I first caught a glimpse of the new Annual Catalogue my heart just melted when I saw the From Land to Sea stamp set. Living on an island I understandably love the sea. But I have been a little obsessed with both jellyfish and turtles since I was young (I even remember writing a very lengthy school project on jellies of the oceans!). I couldn't have imagined a more perfect stamp set.

So today's projects are inspired by this fantastic set. I created a trio of 10.5cm square notecards. 


The first of my notecards was inspired by a make I saw on Pinterest which combined the From Land to Sea lighthouse with the swooshes from Work of Art. I love the versatility of Work of Art and how many different backgrounds you can create. My colours for this card are: Crumb Cake, Lost Lagoon and Soft Sky.


I so love turtles. I have been lucky enough to snorkel with turtles and I just love their gentle grace. I wanted to recreate the beautiful blues and greens of tropical seas. For this notecard I crumpled a 10cm square of Whisper White and then rubbed my ink pads directly on the surface. I then blended the excess ink with my Stampin' Sponge. I was trying to create the light through water effect with the inked cracks. The colours I used for this card: Bermuda Bay, Pear Pizzazz, Daffodil Delight and Tempting Turquoise.


The last of my trio features my absolute favourite stamp, the jellyfish. For this card I stamped the image on to a 10cm square piece of Whisper White. I coloured my jelly with blender pens using Calypso Coral and Daffodil Delight. I stamped the sentiment in Versamark and heat embossed with Clear Embossing Powder. I then stamped the jelly image on to a post-it and created a mask. To finish I sponged Pear Pizzazz, Tempting Turquoise and Bermuda Bay ink to create the background. The last detail was doodled stitching (an extra I love adding to my cards and scrapbook pages).


Thank you for joining me today. I am sure this won't be the last time I share projects using these fantastic images so please pop back again soon. Now to continue the hop please continue to Caroline's blog for more creativity and inspiration.

 Please let me know if you have any questions about Stampin' Up! or our products. I would love to help. All items can be purchased online via my shop or get in touch directly and I can order them for you to be delivered direct to your door. I'd also love to Demo for you and your friends at a crafty party. As the hostess you earn lots of lovely freebies and you all get to make a fun crafty project too (no crafting experience necessary!)

 -XXX-


Built for Free Using: My Stampin Blog

Saturday, 17 January 2015

Pinkies Spring Summer Catalogue Blog Hop- Sheltering Tree Seasons from Stampin' Up! UK Demonstrator Sarah Poulton


Thank you for joining us on another Pinkies Blog Hop! We're showcasing lots of gorgeous projects using products from the new Stampin' Up!® Spring/Summer Catalogue. Simply use the buttons at the end of each post to keep hopping!

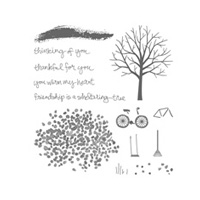
Thanks for hopping over to me on the Isle of Wight from Anne-Marie's blog. I hope you've enjoyed the creative inspiration so far. You've joined me for a little bit of creativity using the new Sheltering Tree stamp set from the Spring Summer Catalogue. I fell in love with this stamp set the moment I saw it in the catalogue and knew it would  make a perfect set of notecards to represent the seasons.

This stamp set comes in photopolymer which makes lining up the layers a dream. Even stamping the little bike in my summer card below was super easy with my clear block and photopolymer stamp.

Summer: Old Olive and Real Red inspired.


Autumn: Crushed Curry & Cajun Craze.


Spring: Wisteria Wonder, Pear Pizzazz and Blushing Bride.


Winter: Lost Lagoon and Pool Party.


I loved creating this little seasonal set showing the different ways you can use this stamp set to create little tree scenes. I loved creating the added details by using my rhinestones, pearls and candy dots to compliment my colour schemes for each card.

Thank you for joining me today and I hope you enjoyed the projects I shared. Hop on to Krista's blog to continue the fun.

Please let me know if you have any questions about Stampin' Up! or our products. I would love to help. All items can be purchased online via my shop (you can click on the pictures below) or get in touch directly and I'll order them for you. You can get in touch on poulton_sarah@yahoo.co.uk or 01983 609249.

-XXX-