Showing posts with label team. Show all posts

Monday, 16 May 2016

A fun VIP day at Stampin' Up! UK HQ

Hello lovelies. Well what a lot I have to share with you today. About a month ago I received a call from the lovely Kelly at Stampin' Up! UK head office to tell me a card I'd entered in to the Coram charity fundraiser for Demonstrators had won me a runners up spot at a special event at Stampin' Up! head office (you can see the card I created here).

This was a VIP event to celebrate the week long Ebay charity auction to support the amazing work of Coram,  Stampin' Up! send packages of craftiness to artists and celebrities and get them to create cards and small pieces of arts. This years fundraiser had cards made by people ranging from Lorraine Kelly to Peter Capaldi to illustrators such as Quentin Blake and Axel Sheffler. All the cards were lovely (we got to see some of them on display at the event) and some sold for prices in the £100s. The event was timed so that we could watch the Ebay auctions coming to an end and celebrate the successes of the day. In the end the fundraiser made an amazing £5184.45 which the representative of Coram told us would support the adoption and care of 5 children. How lovely is that?

I thought you might like a little sneak peek of the fun we had:


It was lovely spending the day with fellow Demonstrators, the UK SU team, the PR team and even the Mayor of High Wycombe popped by too. As you can see we had some silly laughs. We even got to connect via the laptop with the European office and say hello to all the lovely staff over in Frankfurt including the fantastic Chris in Demonstrator Support.


Here is the cheque presentation with the lovely Paula and Kelly at head office.


As well as lovely food and fun and games we even had time for a little crafting. As you can see I was very hard at work. 


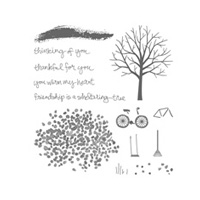
And here is one of the projects the team created. I haven't had a moment to photograph mine yet. And yes, you are getting a little sneaky peek at one of the new stamp sets in the new catalogue.


And what a great day for a selfie too. This is me and the lovely Lynney. I love catching up with fellow teamies and Lynne is a lovely fellow Demo I have known for many years now.

And this is me and Kelly from head office.


All in all it was a lovely day and I am very thankful to have been a part of it and to have Stampin' Up! in my life. A big thank you to Paula and Kelly for organising such a lovely day and well done to all the team for the fantastic amount raised for Coram.

-XXXX-


Saturday, 5 September 2015

A Berry Merry Light Up Easel from Stampin' Up! UK Demonstrator Sarah Poulton


Thank you for joining us on another Pinkies Blog Hop! We're showcasing lots of gorgeous projects using products from the new Stampin' Up!® Autumn/Winter Seasonal Catalogue. Simply use the buttons at the end of each post to keep hopping! 

Hello and welcome to the Isle of Wight for my little contribution to today's Autumn Winter creativity. Thank you for joining me from Janneke's blog.

I was at a loss with where to start to create a project for today's hop. I love so much in this catalogue (my all time favourite catalogue in my 5 years with Stampin' Up!). But I settled on the gorgeous Berry Merry (anyone else think Bake Off when they hear this name?). I love all the little elements in this stamp set for embellishing your beautiful swirly script sentiments.

I wanted to make a piece of home decor to display in my home through December so I came up with this festive easel.


I purchased the little canvas and easel from my local Works. I stamped my elements in Cherry Cobbler, Old Olive, Garden Green, Soft Suede and Crumb Cake. I had a few left over light strings from my big Christmas Craft Days so I used one of these to light up my canvas. I simply poked a small hole through my canvas and then secured my LED lights behind each.

When I stamped my main image on to the canvas the stamping was patterned with the bobbles of the canvas. To get this softer watercolour effect for my completed project I used a blender pen over my ink to blend it seamlessly.


Thank you for joining my today. I hope you've enjoyed the hop so far. To continue please click onwards to Catherine's blog to see what she has been making.


Built for Free Using: My Stampin Blog

Saturday, 20 June 2015

Pinkies Annual Catalogue Blog Hop: A From Land to Sea Notecard Trio from Stampin' Up! UK Demonstrator Sarah Poulton


Thank you for joining us on another Pinkies Blog Hop! We're showcasing lots of gorgeous projects using products from the new Stampin' Up!® Annual Catalogue. Simply use the buttons at the end of each post to keep hopping!

Welcome to the Isle of Wight and my little part of today's blog hop. Thank you for joining me from Paula's blog. Such a lot of inspiration!

When I first caught a glimpse of the new Annual Catalogue my heart just melted when I saw the From Land to Sea stamp set. Living on an island I understandably love the sea. But I have been a little obsessed with both jellyfish and turtles since I was young (I even remember writing a very lengthy school project on jellies of the oceans!). I couldn't have imagined a more perfect stamp set.

So today's projects are inspired by this fantastic set. I created a trio of 10.5cm square notecards. 


The first of my notecards was inspired by a make I saw on Pinterest which combined the From Land to Sea lighthouse with the swooshes from Work of Art. I love the versatility of Work of Art and how many different backgrounds you can create. My colours for this card are: Crumb Cake, Lost Lagoon and Soft Sky.


I so love turtles. I have been lucky enough to snorkel with turtles and I just love their gentle grace. I wanted to recreate the beautiful blues and greens of tropical seas. For this notecard I crumpled a 10cm square of Whisper White and then rubbed my ink pads directly on the surface. I then blended the excess ink with my Stampin' Sponge. I was trying to create the light through water effect with the inked cracks. The colours I used for this card: Bermuda Bay, Pear Pizzazz, Daffodil Delight and Tempting Turquoise.


The last of my trio features my absolute favourite stamp, the jellyfish. For this card I stamped the image on to a 10cm square piece of Whisper White. I coloured my jelly with blender pens using Calypso Coral and Daffodil Delight. I stamped the sentiment in Versamark and heat embossed with Clear Embossing Powder. I then stamped the jelly image on to a post-it and created a mask. To finish I sponged Pear Pizzazz, Tempting Turquoise and Bermuda Bay ink to create the background. The last detail was doodled stitching (an extra I love adding to my cards and scrapbook pages).


Thank you for joining me today. I am sure this won't be the last time I share projects using these fantastic images so please pop back again soon. Now to continue the hop please continue to Caroline's blog for more creativity and inspiration.

 Please let me know if you have any questions about Stampin' Up! or our products. I would love to help. All items can be purchased online via my shop or get in touch directly and I can order them for you to be delivered direct to your door. I'd also love to Demo for you and your friends at a crafty party. As the hostess you earn lots of lovely freebies and you all get to make a fun crafty project too (no crafting experience necessary!)

 -XXX-


Built for Free Using: My Stampin Blog

Saturday, 17 January 2015

Pinkies Spring Summer Catalogue Blog Hop- Sheltering Tree Seasons from Stampin' Up! UK Demonstrator Sarah Poulton


Thank you for joining us on another Pinkies Blog Hop! We're showcasing lots of gorgeous projects using products from the new Stampin' Up!® Spring/Summer Catalogue. Simply use the buttons at the end of each post to keep hopping!

Thanks for hopping over to me on the Isle of Wight from Anne-Marie's blog. I hope you've enjoyed the creative inspiration so far. You've joined me for a little bit of creativity using the new Sheltering Tree stamp set from the Spring Summer Catalogue. I fell in love with this stamp set the moment I saw it in the catalogue and knew it would  make a perfect set of notecards to represent the seasons.

This stamp set comes in photopolymer which makes lining up the layers a dream. Even stamping the little bike in my summer card below was super easy with my clear block and photopolymer stamp.

Summer: Old Olive and Real Red inspired.


Autumn: Crushed Curry & Cajun Craze.


Spring: Wisteria Wonder, Pear Pizzazz and Blushing Bride.


Winter: Lost Lagoon and Pool Party.


I loved creating this little seasonal set showing the different ways you can use this stamp set to create little tree scenes. I loved creating the added details by using my rhinestones, pearls and candy dots to compliment my colour schemes for each card.

Thank you for joining me today and I hope you enjoyed the projects I shared. Hop on to Krista's blog to continue the fun.

Please let me know if you have any questions about Stampin' Up! or our products. I would love to help. All items can be purchased online via my shop (you can click on the pictures below) or get in touch directly and I'll order them for you. You can get in touch on poulton_sarah@yahoo.co.uk or 01983 609249.

-XXX-


Friday, 17 October 2014

Curvy Keepsake Die Halloween Pumpkins using Stampin' Up! Products


I have a super quick and easy seasonal share for you today. I made these little Curvy Keepsake Box Pumpkins for my team get together last week. I thought they were perfectly Autumnal and Halloweeny (and they came with a lovely little chocolatey pumpkin treat too!).

I have seen so many different creations with the Curvy Keepsake Die (just type Stampin' Up! Curvy Keepsake in to Pinterest for so many different ideas from animals to patterns to zombies!) and I wanted to have a go at one myself. I found this tutorial that showed me how to cut the box most economically. I used a card base of Tangerine Tango with the sides cut from a Tangerine Tango patterned paper from the Flower Pot Designer Series Paper pack. I added the label cut from Old Olive (this is part of the Curvy Keepsake Die set of framelit dies) and stamped the 'For You' from a sentiment in the For All Things stamp set.

I tied the label with Linen Thread and finished with three Candy Dots (I lost one along the way somewhere!).


I hope you have lots of lovely crafty plans for the weekend. I have my monthly card class tomorrow. I had a bit of a cake baking disaster trying to prep for tomorrow. It looked so lovely when I found the recipe online. Sadly I changed one element of the Cherry and White Chocolate Loaf and it appears to have been quite vital as the final result was lovely tasting but certainly not something I could present to my lovely crafty ladies tomorrow looks wise (and I have somehow managed to cover my computer in cake mixture too!). Thankfully my Mum has come to the rescue with some homemade mince pies instead *hooray*

If you have any questions about today's project or the products I have used, please get in touch on poulton_sarah@yahoo.co.uk or 01983 609249. You can order online direct through my store by clicking the product links above or the pictures below. I also have availability in the next few months for your very own crafty party. Click on the Promotions tab above to see the exclusive hostess promotion running until October 31st.

Happy Crafting
-X-

Monday, 25 August 2014

Shades of Blue Celebration Cards using Stampin' Up! Bravo and Zoo Babies

Good morning and welcome to a very British soggy Bank Holiday Monday. I had grand plans for walking and car-booting today. Sadly I think the rain has put those plans on hold. Might have to craft instead. What a shame ;0)

What have you been up to this weekend? I have been busy with family and craftiness (it was my monthly card class this weekend- projects to be shared later in the week! I'll give you a little clue, more festive sneak peeks!). But I did also manage to grab a few minutes for a couple of quick celebration cards.

My first celebration was a Congratulations card for a member of my jewellery team who promoted last week. I wanted to send her a little note in the post to say a huge well done as she only joined my team on Monday!


I love the oversized sentiments in the Bravo Photopolymer stamp set from Stampin' Up! and knew they would make a perfect congratulations card. I used an Island Indigo cardstock base layered with Coastal Cabana and Whisper White. I coloured the stamp using my Tempting Turquoise, Island Indigo, Lost Lagoon, Pool Party and Bermuda Bay Stampin' Write Markers.

To create the layered stars I punched using my Itty Bitty Accents Punch Pack star punch and Dazzling Diamonds Glimmer Paper. I layered the sparkly star over Coastal Cabana and Island Indigo stars.


 And while I had my blues out on my craft desk I also created a new baby card for a friend who recently celebrated the arrival of her son. I stamped the animal images from the Zoo Babies stamp set. I masked each animal with a post it note to make sure I layered the animals carefully on top of one another.

My colour scheme for this card was Island Indigo, Tempting Turquoise, Lost Lagoon and Marina Mist.

I created the bunting using the Banner Punch layered with circles stamped with the Simply Serif Mini Alphabet and punched with the 1/2" Circle Punch.


So all in all I had a very shades of blue crafty weekend. I will be back on Wednesday with more Christmas craftiness. I have all the lovely projects from this months card class to share as well as the remaining projects from my Christmas Craft Days too.

Please let me know if you have any questions about this project. You can get in touch via email: poulton_sarah@yahoo.co.uk or 01983 609249. I'm more than happy to help. All Stampin' Up! products can be ordered through my online store by clicking the product links above or the pictures below. Or get in touch and I'll happily place an order for you.

Happy Crafting
-X-