Showing posts with label Stampin' Sarah. Show all posts

Monday, 12 June 2017

Christmas Craft Day August 19th 2017

Yes, you see correctly, I am thinking about Christmas already! It is time to announce details of my annual Christmas Craft Day. A full day of fun, craftiness and seasonal festiveness. What better way to kick start your festive makings for the year.

This year I have a lovely selection of projects lined up for you including festive paper pinecones, a flip frame Advent Calendar, a special gift box for hidden treats as well as a folder to house Christmas cards and matching tags. And all this making runs alongside a fun Stampin' Up! product raffle, giveaways, on the day incentives and the usual fun, chat and festivities.

The day costs £25 which includes £15 of Stampin' Up! papercrafting products. You will just need to bring your own lunch (tea/coffee/squash and cake/biscuits will be provided) and your own adhesives and basic tool kit.

I have limited spaces available and the final day for booking is July 28th.

For more info please get in touch on poulton_sarah@yahoo.co.uk or 07830 343830.

Or book direct using the Paypal button below:


Full instructions will be provided for all projects and all papercrafting abilities are welcome. I'd love for you to join me at the Compass Room, Gurnard Pines to start the fun of Christmas Crafting!

-XXX-

Friday, 22 July 2016

A Fresh Fruit Teacher Thank You from Stampin' Up! UK Demonstrator Sarah Poulton

This week has been an emotional one in the Stampin' Sarah household as my eldest graduated from preschool. Where did those 4 years go already? Which can only mean one thing. In about 6 weeks time I will be sharing an artfully staged picture of Summer in her school uniform on the first day of school.

Her lovely keyworker at preschool will be inheriting my youngest in September but we wanted to make her something special to say thank you for all her support over the past 11 months. So this is what I came up with using the Fresh Fruit stamp set and coordinating Fruit Stand DSP.


To wrap the little apple keychain I got from Paper Panda I used a glassine bag I had in my retired Stampin' Up! stash. I made the little thank you using an offcut of Fruit Stand DSP paired with the sentiment from Fresh Fruit stamp set.


For the main card I used a Whisper White card base layered with Basic Black and Fruit Stand DSP. For my stamped panel I stamped the sentiment from Thankful Thoughts in Basic Black. Adding the flowers from Fresh Fruit. As a final detail I stamped and hand cut the flowers in Flirty Flamingo and Peekaboo Peach.


Thank you for popping by today. Please let me know if you have any questions about Stampin' Up! or our products. I would love to help. All items can be purchased online via my shop or get in touch directly and I can order them for you to be delivered direct to your door. I'd also love to Demo for you and your friends at a crafty party. As the hostess you earn lots of lovely freebies and you all get to make a fun crafty project too (no crafting experience necessary!)

 -XXX-

Product List

Monday, 11 April 2016

An Endless Thanks Notecard from Stampin' Up! UK Demonstrator Sarah Poulton

Hello crafters! How are you? Feels like an age since I've had a crafty catch up with you all. I have been so busy prepping for our big Stampin' Up! On Stage event at the weekend in Telford that I've had no time for creating to share on my blog.

But I have everything made and packed for Telford now so I stole some time this afternoon to make some little thank you notelets for some lovely customers. I pushed myself out of my comfort zone last night and hosted an online launch for my Jamberry business. It was such a fun evening and I wanted some cards to send out with samples and to thank those that made purchases.

I used my Endless Thanks stamp set with Pear Pizzazz, Blushing Bride, Rose Red and Wisteria Wonder to stamp the base Crumb Cake Note Card.


I then stamped the label and added the sentiment and hand cut this from the Very Vanilla card. I mounted this over my base stamping with Dimensionals.

As a final detail I added Rhinestones to give a little sparkle.


Thank you for popping by today. Please let me know if you have any questions about Stampin' Up!, or any of our products. I would love to help. All items can be purchased online via my shop or get in touch directly and I can order them for you to be delivered direct to your door. I'd also love to Demo for you and your friends at a crafty party. As the hostess you earn lots of lovely freebies and you all get to make a fun crafty project too (no crafting experience necessary!).

-XXX-

Product List

Friday, 4 March 2016

A Birthday Blooms Acetate Window Card from Stampin' Up! UK Demonstrator Sarah Poulton

Good morning a very happy Friday.  What a busy morning I've had so far. Running back and forth to preschool and batch cooking several varieties of soup for the week ahead (currently cooking roasted Mediterranean vegetable- thank goodness for my amazing soup making machine!).

Today I have a card to share with you that I absolutely love. I'd seen an acetate window card on Pinterest and absolutely loved the idea. So this is what I came up with using the Birthday Blooms Spring Summer catalogue stamp set.

I used a Very Vanilla card base. I cut the window sheet strip to fit the card base and created the window strip. I stamped the flower image in Memento Black ink inside the card. I then stamped the flower again twice more on a scrap piece of Very Vanilla.


I used my Blender Pens with Rose Red and Mint Macaron ink to colour the flowers. I fussy cut around the flowers and then mounted with Dimensionals. I added the 'thanks' from Cottage greetings in Rose Red with Basic Pearls to embellish.


I am off to catch up with some lovely crafty friends tonight for a Stampin' Up! craft party. I have a lovely project worked out for the ladies which used this same stamp set combined with the fab Wink of Stella glitter brush pens. 

Thank you for popping by today. Please let me know if you have any questions about Stampin' Up!, Sale-A-Bration or any of our new products. I would love to help. All items can be purchased online via my shop or get in touch directly and I can order them for you to be delivered direct to your door. I'd also love to Demo for you and your friends at a crafty party. As the hostess you earn lots of lovely freebies and you all get to make a fun crafty project too (no crafting experience necessary!).

-XXX-

Product List

Friday, 12 February 2016

Doing more with your Tin of Cards with Stampin' Up! UK Demonstrator Sarah Poulton


Happy Friday crafty friends.

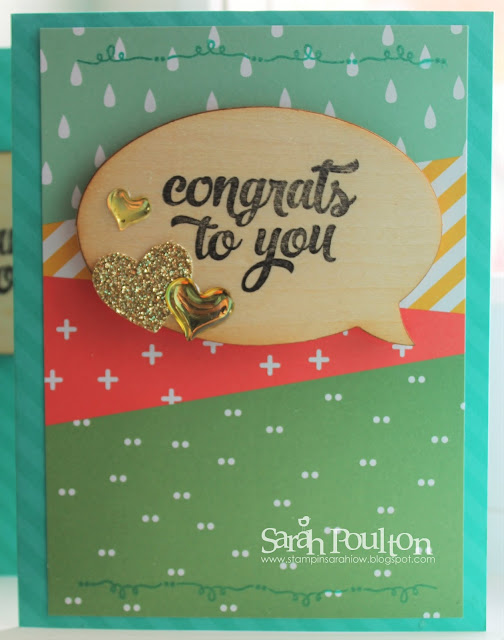
I've had a fun few hours finishing off my Tin of Cards Project Kit this morning. I was amazed at the variety of embellishments and elements in this kit. I completed my 16 cards and had plenty of bits left over to make more cards to fill my tin.

The kit instructions give you 4 card examples (1 for each coloured card base). But when you have so many lovely bits and pieces, why create the same cards 4 times? There is plenty of scope for making lots of different designs. Which is what I did. I decided to add a couple of additional stamp sets in to give me a full range of different cards. Today I am sharing the blue striped cards I made to go in my tin.

I used the coordinating Tin of Cards stamp set to create the additional stamped effects on the wood element and background. I also used my Snail, Tombow and Dimensionals to complete the overall project.


For this card I used the white side of the butterfly elements. I used a dauber to add Bermuda Bay to the smaller butterfly to coordinate with the base.


My favourite embellishments in this set are the gold epoxy hearts. I loved adding these to my cards for texture and dimension. I also mixed up which cards I used DSP on and which I added the elements too.


This final 'blue' card I've included to show you the importance of using the right ink pad for this project. I used my Memento to stamp the sentiment and you can see where it bled in to the wood. I realised after this card that Stazon is a better choice to get a clean stamping effect on the wooden speech elements.


Thank you for popping by today. Pop back tomorrow for more Tin of Cards craftiness. Please let me know if you have any questions about Stampin' Up!, Sale-A-Bration or any of our new products. I would love to help. All items can be purchased online via my shop or get in touch directly and I can order them for you to be delivered direct to your door. I'd also love to Demo for you and your friends at a crafty party. As the hostess you earn lots of lovely freebies and you all get to make a fun crafty project too (no crafting experience necessary!).

-XXX-

Built for Free Using: My Stampin Blog

Wednesday, 11 November 2015

A Cozy Christmas Card from Stampin' Up! UK Demonstrator Sarah Poulton

I have another project to share today from my Cozy Christmas card class at the weekend. I saw a card very similar card on Pinterest and absolutely loved the use of the snowy chalet background paper (from the Home for Christmas DSP). Sometimes Stampin' Up!'s papers are too beautiful not to let be the focus of a project.

I used my Stampin' Write markers (Hello Honey, Real Red, Soft Sky & Garden Green) to colour the sentiment and then layer over Real Red & Pool Party cardstock.


I used a length of Jute Ribbon to wrap around my card and then finished with a Snowflake Element layered with an Iced Rhinestone.


Thank you for popping by today. Please let me know if you have any questions about Stampin' Up! or our products. I would love to help. All items can be purchased online via my shop or get in touch directly and I can order them for you to be delivered direct to your door. I'd also love to Demo for you and your friends at a crafty party. As the hostess you earn lots of lovely freebies and you all get to make a fun crafty project too (no crafting experience necessary!)

 -XXX-

Built for Free Using: My Stampin Blog