Showing posts with label Christmas Planner. Show all posts

Tuesday, 3 September 2013

My Christmas Planner


Good morning crafters.

As promised, today I will be sharing the inside of my Christmas Planner. Please see yesterdays post for how to create your own base mini album.

Here are the envelope inserts. Each one has a Christmas-y related theme: Shopping, To Do, Menu & Christmas Cards.


The first two pages feature a calendar and to do list for November and December.


The reverse of the envelope is stamped with the beautiful Calm Christmas stamp from the Autumn Winter catalogue (Page 26). I stamped it in Night of Navy ink.


The next page is stamped with Ornament Keepsakes in Cherry Cobbler & Old Olive. Ornament Keepsakes was featured in last years festive catalogue and is still available to order via the Carry Over List.


I stamped this page using the Evergreen stamp set (also on the Carry Over List) and a snowflake from Snowflake Soiree.


This page is stamped in Cherry Cobbler and Night of Navy using the new Wishing You stamp set (Page 23 of Autumn Winter catalogue).


The final page is stamped in Gold (using the new Metallic Encore Pad, Page 28, AW Catalogue) and Night of Navy using Snowflake Soiree.

Thank you for stopping by to look at my Christmas planner creation today. I'm more than happy to help with any questions about this project. Please get in touch on poulton_sarah@yahoo.co.uk.

Also, if you'd like to have your own copy of the Autumn Winter catalogue, please drop me a line on the above email address and I'll pop one in the post to you.

Happy Crafting ;0)
-X-

Monday, 2 September 2013

Christmas Planner Envelope Mini Album Tutorial


Good morning and welcome to another crafty week here on the Isle of Wight.

Today I am sharing the final Christmas project we created on my Christmas Craft Days last month. This was our 'showstopper' (for those that watch Bake Off) project that was central to the day. I had been planning this for months and searched through lots of different mini album ideas to find the perfect style.

I won't be sharing the completed pages with you today.  I will share those another day this week. Instead today I will be giving you a quick and easy run down on how to create your own lovely mini album (you can modify the papers used or contents for any occasion). This is a quick and affordable planner or memory-keeper and could also make a perfect Christmas pressie too.

For this project you will need:

5 Stampin' Up! C6 envelopes (I used Very Vanilla)
A sheet of A4 cardstock for the cover (I used Cherry Cobbler)
A length of ribbon to hold the album together (I used Cherry Cobbler 3/4" Chevron)
Matching cardstock for inserts
DSP for decoration


The first step is to create your insert pages. I started with 5 C6 Very Vanilla Envelopes.


 I then cut off the envelope flaps as below.


Score the envelopes at 1/2" to create your hinge.


Please note, that while I have shown the envelopes with the scallop shaped edge forward in these photographs (it made it easier to differentiate the steps for the tutorial), these will actually be turned over in the finished product and form the back side of each page (giving you a full rectangle of page to cover and decorate facing forward).

The next step is to create your cover. I cut a piece of Cherry Cobbler cardstock 6 1/2" by 10", scoring at 4 1/4" and 5".


The larger section forms the back of the cover with the hinge making the pages fold easier from the front.

The final stage before decorating and tying together is to punch your holes.

I sandwiched my 5 envelopes and the cover together and measured 2" from either end (marking with a small pen mark). I then punched holes through all layers together using my Crop-A-Dile.


 This is the basis for your mini-album / planner. I would recommend decorating your inserts prior to tying your ribbon for ease of stamping. Once all your layers are decorated you can then just thread your ribbon through and tie in a bow to hold it all together.

To decorate your planner:

I used a stack of DSP in all different Christmas-y colours and patterns. I cut each piece at 3 3/4" by 6 1/4" to stick to the front of each envelope. I then cut pieces slightly bigger for the front and back covers. I also stamped the reverse of each of the envelopes for a bit of a festive flourish.

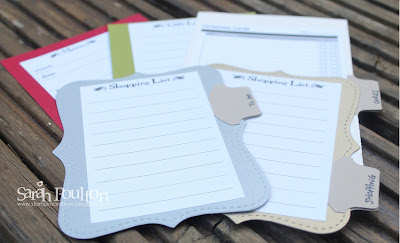
I also created matching inserts using free printables from this website. I created three rectangular inserts (3 3/4" x 6") and two die cut Top Notes cut from Brushed Gold and Silver cardstock. I created tabs using a shaped punch, you could also use ribbon to create these tabs.


Thanks for popping by today. I'll be sharing my decorated pages tomorrow so hop back then for some Christmas Planner inspiration. Please do get in touch with any questions or to place an order for essential supplies to create your own Christmas Album planner: poulton_sarah@yahoo.co.uk or 01983 609249.

I'd love to see your creations so please leave a comment to direct me to your creations if you have a go. It was fantastic to see all the different versions of this album that my ladies created at our Christmas crafty days.

And don't forget to check out the promotions page above for all the latest fantastic offers from Stampin' Up! Especially the lovely Best Of Christmas stamp set.

Happy Crafting ;0)
-X-

Tuesday, 20 August 2013

Christmas comes (very) early to the Isle of Wight


Good morning and welcome to a Christmas-y crafty week here at Stampin' Sarah.

This weekend saw the first of my Christmas Craft Days (the second starts today at 10.30am). I had a lovely group of crafty ladies come along on Saturday and we spent the day making a whole series of festive items from a Christmas planner to a stamped candle holder along with cards and gift wrapping too. I took the picture above to show the projects we'd be making over on my Facebook page (www.facebook.com/stampinupiow). It gives a little sneak peak of the projects and techniques I will be sharing with you over the next week. Its never too early to get thinking about Christmas crafting ;0)

The first project I am sharing with you is this foil cardstock embossed poinsettia card which uses lots of fab new product from the Autumn Winter catalogue launching on August 29th.

The silver layer is the fab new Foil Sheets (Gold and Silver - Page 28 of the Autumn Winter Catalogue- £3.75) embossed with the new Pretty Print Textured Impressions Embossing Folder (Page 24 A/W Catalogue).

We then stamped the Poinsettia image from the new Joyful Christmas stamp set (Page 27 A/W Catalogue) on to Bermuda Bay cardstock using the new Silver Metallic Encore Pad (Page 28- gives a beautiful shiny stamped result and is quicker than heat embossing). We cut the centre leaves from one image and layered these with dimensionals on to the other. We then finished with a fabulous Frosted Finishes Embellishment (Page 28 A/W Catalogue- I have already used an entire pack of these in my Christmas crafting so far!! Lots more will be purchased in the next couple of months I am sure).

To finish this card we stamped the Joyful Christmas Wishes sentiment from the same stamp set on to the cardbase.

I love the colour scheme of this card. Not traditionally festive but Christmas-y feeling all the same. This was inspired by a lovely card I had seen on a US Demonstrators blog as part of a Christmas-y blog hop. As soon as I saw all the lovely layers to the card I knew I'd have to give it a go.

If you'd like me to send you a copy of the new Autumn Winter catalogue please drop me a line on poulton_sarah@yahoo.co.uk and I'll happily pop one in the post to you. So many lovely ideas launching with this new catalogue on August 29th. I am counting down the days to the catalogue release so I can start using all the new products in my upcoming crafty parties. Please get in touch if you'd like to find out more about booking a crafty party in your home. I'd love to help you get your hands on lots of lovely hostess freebie products to say thank you for hosting.

To find out more or to have a Stampin' Up! chat please get in touch on poulton_sarah@yahoo.co.uk or 01983 609249.

I'll be back tomorrow to share another Christmasy project with you.

Happy Crafting
-X-