Showing posts with label Stampin Up Blog. Show all posts

Thursday, 22 May 2014

Serene Silhouettes Art Gallery Card using Stampin' Up! products

A very Happy Thursday to you all. 

I'm a bit late in posting today. It has been a crazy busy week one way or another what with baby jabs (*big sad face*) and appointments and a bit of crafting too. Oh and I am up to my ears in card class preparation too. So please accept my apologies for a late in the day crafty post this afternoon.

If you have 'liked' my Facebook page (www.facebook.com/stampinupiow) you will have been following the pictures I have been sharing of all my lovely Telford swaps. Pop over and click like if you'd like a little swappy inspiration. Demonstrators are a truly creative bunch of crafters.

I was blog surfing a few weeks ago and came across a beautiful card that had taken an art gallery as its inspiration for a card layout. I just loved the simple idea and decided to have a go with my daubers and the Serene Silhouettes stamp set.


I used a simple Basic Black cardstock base (21cm x 14.8cm scored at 10.5cm) and then created three 1.5" squares for the mini artworks. I sponge these with my daubers in Old Olive, Crushed Curry and Pool Party to create the grass, sunset and sky.

I then stamped the silhouettes (the bottom silhouette is taken from the Wetlands stamp set) in Basic Black over the top. I finished with two tiny butterflies cut using my Beautiful Wings Embosslits (they were cut using the Quatrefancy Speciality Paper) and the greeting from Wetlands stamped in Encore Silver ink.


You can order all Stampin' Up! products through my online store by clicking here or by clicking on any of the product links above. I will also happily order any products for you. Just drop me a line on poulton_sarah@yahoo.co.uk or 01983 609249 and I'll happily assist.


And don't forget to check out this weeks Weekly Deals below to see what fab items are discounted for a limited time only (until Tuesday). Click on the picture to click to the weekly deals on my online store.


Happy Crafting

-XXX-
Friday, 14 March 2014

Happy News


Well what a lovely week. Hope you've enjoyed my scheduled crafty project posts. I have been somewhat tied up with my lovely news. I am so excited to have the time to sit down and share some pics of my lovely new arrival with you all.


Sam and I were happy to welcome our new little girl, Sylvie Grace, in to the world on Tuesday. She was 1oz shy of her sisters birth weight at 9lb but a lot bigger than the 7lb something they'd predicted at my growth scan (I just had to look at my belly to know she was never going to be a tiddler!)


 As you can see from these family pictures, Summer is loving her big sister hugs and is taking her new role as protector (and Sylvie kisser!) very seriously. It has been an absolutely lovely week and Sylvie and I are both doing really well (I was very relieved to only be kept in for one night- my recovery is being greatly aided by being at home with endless cups of tea and Sky+).


Thank you for stopping by today. I have lots more craftiness to share with you over the upcoming weeks. Lots of chocolatey Easter inspiration. But please bear with me if I don't get them posted in a timely manner!

And if you wondered how I put together the birth announcement at the top of this post, I used a fab (and super quick and easy) Designer Template within My Digital Studio. This download is the Nursery Additions Designer Template Pack (127342, £1.50). I dragged and dropped my photo in to the template and voila, a perfect MDS birth announcement.

Don't forget, if you are unsure about digital scrapbooking or cardmaking, Stampin' Up! offer a free 30 day trial of My Digital Studio. Just click this link to be taken to my online store where you can download your free trial today.

Please get in touch with any crafty questions. I'm always happy to help:

poulton_sarah@yahoo.co.uk 

or

01983 609249.

Happy Crafting 
-X-


Monday, 10 February 2014

Envelope Punch Board Party Gifts


Good morning and a very Happy Monday to you! Hope the weekend weather hasn't been too bad wherever you are. It has certainly been a wet and windy one here on the Isle of Wight. We've been tucked up warm, mainly watching Peppa Pig. Summer was certainly happy.

I thought I would share two Envelope Punch Board projects with you today. The Punch Board is still very much my favourite tool of the moment. It is never more than an arms reach away when I am crafting.

Today's projects are the two gifts I made for my Stampin' Up! crafty party on Friday. The envelope above was made from a full sheet of 12"x12" Watercolor Wonder Designer Series Paper and inside I had included lots of lovely handmade goodies for my hostess. To find out more about my hostess gifts, please get in touch to find out about booking a Stampin' Up! party. Every new hostess receives a party booking gift as well as a handmade crafty gift on the night (these are on top of the fantastic freebies you can earn with qualifying party sales of £150+).


This second envelope for my party Door Prize was made slightly smaller and decorated using the FAB Spiral Flower Die and Pansy Punch. Inside the envelope I included a handmade keyring, notebook and the package of Sale-A-Bration items below.


I made these little Sale-A-Bration samplers for my hostess club last month and made an extra one as a door prize for Friday. This includes some retired buttons as well as samples of the gorgeous twine included in the Sweet Sorbet Accessories Pack which you can receive for free with an order for £45 during Sale-A-Bration.

We had a lovely time crafting on Friday evening. I am very appreciative to each and every one of my hostesses and would love to chat to you more about hosting your own crafty party or ordering Stampin' Up! products. Please get in touch on poulton_sarah@yahoo.co.uk or 01983 609249.

Thank you for joining me today and very Happy Crafting to you.

-X-

Monday, 2 December 2013

Stampin' Up! UK A Whole Lot Of Love Promotion


Hello to a new festive week here at Stampin' Sarah HQ.

I thought I would pop online and share the latest promotion from Stampin' Up! with you. This one is all about Love, A Whole Lot Of Love in fact.

The Annual Catalogue is a little bit light on Valentines stamps this year. And that was a deliberate move from Stampin' Up! so they could launch this special range of stamps and accessories for a limited time only (products available until January 27th).

We were shown a lot of these exclusive products at Convention. My absolute favourite of all of them is the little Monster Hugs treat boxes. They come in both boys and girls and would make perfect little Valentines treats for school friends of youngsters. I am investing in both sets to tuck away for Summer when she is a bit older.

Have a look at the flyers below for more information on the lovely products available including stamps, treat bags & notecard sets


Thanks for popping by today. Please say hello and leave a comment. I have set myself a target to find new blogs to read throughout December with some creative makings, so leave me a comment and I'd love to stop by and say hello.

And if you'd like to find out more about any of the Stampin' Up! products used for today's creation please drop me a line on poulton_sarah@yahoo.co.uk or 01983 609249. Or alternatively pop by my online store which you can find here:


Happy Crafting ;0)
-X-

Tuesday, 19 November 2013

Stampin' Up! UK 3D Christmas Star Card


Morning all and welcome to day two of my festive makes week. I have so many projects waiting to be shared with you that it is lovely to be back blogging daily on the lead up to the crafty highlight of my year, Stampin' Up! Convention. An event for Stampin' Up! Demonstrators from around Europe to gather, share and create. It is always incredibly inspiring and we are only two days away from the fun in Manchester kicking off.

So today's project uses the fab new single stamp from Stampin' Up!, the Christmas Star. I taught this card as the final quick make in my October card class. I wanted to illustrate how quick and easy it is to make a card with a bit of 3D dimension using this lovely (and economical!) single stamp. We inked the stamp in Real Red and stamped the image. After cutting around the star image I showed my ladies how to score along the white lines on the star image and then fold the star to create 3D popped up image. To maintain this dimension on the card front we stacked up 5 Dimensionals on top of one another and mounted these on the back of the star image (centrally).


This picture gives a bit better perspective on how the star stands up from the card.

To finish the card we used a strip of Season of Style Designer Series Paper coupled with a fine strip of Red Glimmer Paper. The greeting is from the Wishing You stamp set.


I have included links to the products used for today's project either by clicking on the photos or the direct links above. If you place an online order for any Stampin' Up! products through my online store remember to add the code below and I will add your name to the draw to win the hostess benefits for the month's combined orders (with a minimum of £25 in hostess freebies):

V99TUSS2

Please get in touch if you have any questions about today's project or about placing an order or about Stampin' Up! in general. You can contact me on poulton_sarah@yahoo.co.uk or 01983 609249.

Happy Crafting & pop back tomorrow for more festive makings.

-X-

Tuesday, 15 October 2013

Stampin' Up! UK A Happy Day at the Beach Scrapbook Page


Good morning all.

Lovely to be back blogging. I have a whole file on my computer of edited and ready to go project pictures and I just haven't had any free time to write the necessary blog posts for you. I will ensure I get back on track this week to share lots of lovely crafting.

By way of apology I will share a couple of crafty projects today to get the crafty week started.

The above project was a page from last month's scrapbooking class. I was asked to think along the lines of cruising and holiday scrapbooking. So this was the page I came up with inspired by the Stampin' Up! By The Seashore stamp set and Soho Subway Designer Series Paper (mixed with matching sheets of blue DSP from other sets including the Epic Day This and That DSP and DSP Paper Stacks).

I loved the beach embellishment created with a length of the new Burlap Ribbon in the Autumn Winter catalogue. So simple yet perfect for any seaside or beachy themed page.  The '2013' was stamped with the Memorable Moments stamp set in the main catalogue.


And as a Tuesday bonus here is a Christmas card I created for my card class last month. I absolutely adore the Calm Christmas stamp set and love how it matches the Bird Builder Punch (I used this punch to create the leafy branch in the birds mouth). The bird image was stamped in Versamark and heat embossed with silver powder. I love the intricate details on the bird and Stampin' Up!'s powder is so fine that all these details are kept when you heat emboss.

The image was then layered on to ovals cut with my Ovals Collections Framelits. I embossed the top layer with the Pretty Print Textured Impressions Embossing Folder and layered this over a Silver Foil Oval. The final detail is the greeting which is from the Stampin' Up! More Merry Messages stamp set and stamped using my Silver Metallic Encore Pad. To find out more about the More Merry Messages set and other carry over sets from last years Autumn Winter catalogue please see this post.

Thank you for joining me today and my apologies again for the lack of creativity recently. I have been snowed under at work and with growing another baby and looking after Summer. It has all got a bit too busy. But I will ensure I share some of my lovely festive projects and I also have some smashing cards to share from my team shoebox swap last night too.


And one quick reminder that if you are placing an online order through my online store during October, don't forget to add the hostess code below for your chance to win the combined hostess freebies for the month:

ZACT2S6B

Happy Tuesday Craftiness to you all and please get in touch with any questions or queries about the projects or about the products I have used. I'd love to help.

-X-

Tuesday, 3 September 2013

My Christmas Planner


Good morning crafters.

As promised, today I will be sharing the inside of my Christmas Planner. Please see yesterdays post for how to create your own base mini album.

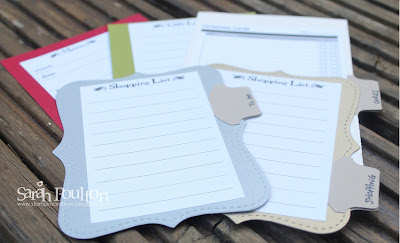
Here are the envelope inserts. Each one has a Christmas-y related theme: Shopping, To Do, Menu & Christmas Cards.


The first two pages feature a calendar and to do list for November and December.


The reverse of the envelope is stamped with the beautiful Calm Christmas stamp from the Autumn Winter catalogue (Page 26). I stamped it in Night of Navy ink.


The next page is stamped with Ornament Keepsakes in Cherry Cobbler & Old Olive. Ornament Keepsakes was featured in last years festive catalogue and is still available to order via the Carry Over List.


I stamped this page using the Evergreen stamp set (also on the Carry Over List) and a snowflake from Snowflake Soiree.


This page is stamped in Cherry Cobbler and Night of Navy using the new Wishing You stamp set (Page 23 of Autumn Winter catalogue).


The final page is stamped in Gold (using the new Metallic Encore Pad, Page 28, AW Catalogue) and Night of Navy using Snowflake Soiree.

Thank you for stopping by to look at my Christmas planner creation today. I'm more than happy to help with any questions about this project. Please get in touch on poulton_sarah@yahoo.co.uk.

Also, if you'd like to have your own copy of the Autumn Winter catalogue, please drop me a line on the above email address and I'll pop one in the post to you.

Happy Crafting ;0)
-X-

Monday, 2 September 2013

Christmas Planner Envelope Mini Album Tutorial


Good morning and welcome to another crafty week here on the Isle of Wight.

Today I am sharing the final Christmas project we created on my Christmas Craft Days last month. This was our 'showstopper' (for those that watch Bake Off) project that was central to the day. I had been planning this for months and searched through lots of different mini album ideas to find the perfect style.

I won't be sharing the completed pages with you today.  I will share those another day this week. Instead today I will be giving you a quick and easy run down on how to create your own lovely mini album (you can modify the papers used or contents for any occasion). This is a quick and affordable planner or memory-keeper and could also make a perfect Christmas pressie too.

For this project you will need:

5 Stampin' Up! C6 envelopes (I used Very Vanilla)
A sheet of A4 cardstock for the cover (I used Cherry Cobbler)
A length of ribbon to hold the album together (I used Cherry Cobbler 3/4" Chevron)
Matching cardstock for inserts
DSP for decoration


The first step is to create your insert pages. I started with 5 C6 Very Vanilla Envelopes.


 I then cut off the envelope flaps as below.


Score the envelopes at 1/2" to create your hinge.


Please note, that while I have shown the envelopes with the scallop shaped edge forward in these photographs (it made it easier to differentiate the steps for the tutorial), these will actually be turned over in the finished product and form the back side of each page (giving you a full rectangle of page to cover and decorate facing forward).

The next step is to create your cover. I cut a piece of Cherry Cobbler cardstock 6 1/2" by 10", scoring at 4 1/4" and 5".


The larger section forms the back of the cover with the hinge making the pages fold easier from the front.

The final stage before decorating and tying together is to punch your holes.

I sandwiched my 5 envelopes and the cover together and measured 2" from either end (marking with a small pen mark). I then punched holes through all layers together using my Crop-A-Dile.


 This is the basis for your mini-album / planner. I would recommend decorating your inserts prior to tying your ribbon for ease of stamping. Once all your layers are decorated you can then just thread your ribbon through and tie in a bow to hold it all together.

To decorate your planner:

I used a stack of DSP in all different Christmas-y colours and patterns. I cut each piece at 3 3/4" by 6 1/4" to stick to the front of each envelope. I then cut pieces slightly bigger for the front and back covers. I also stamped the reverse of each of the envelopes for a bit of a festive flourish.

I also created matching inserts using free printables from this website. I created three rectangular inserts (3 3/4" x 6") and two die cut Top Notes cut from Brushed Gold and Silver cardstock. I created tabs using a shaped punch, you could also use ribbon to create these tabs.


Thanks for popping by today. I'll be sharing my decorated pages tomorrow so hop back then for some Christmas Planner inspiration. Please do get in touch with any questions or to place an order for essential supplies to create your own Christmas Album planner: poulton_sarah@yahoo.co.uk or 01983 609249.

I'd love to see your creations so please leave a comment to direct me to your creations if you have a go. It was fantastic to see all the different versions of this album that my ladies created at our Christmas crafty days.

And don't forget to check out the promotions page above for all the latest fantastic offers from Stampin' Up! Especially the lovely Best Of Christmas stamp set.

Happy Crafting ;0)
-X-

Friday, 23 August 2013

Quick and easy Christmas makes

Today's crafty shares are two quick and easy Christmas makes. Both would be perfect for a Christmas table decoration or place setting.

Here are the two projects together. A stamped muslin bag and a decorated Ferrero Rocher chocolate:


I stamped the fantastic new Mini Muslin Bag (Page 36 of the Autumn Winter Catalogue) using the frame from Morning Post Numbers and the sentiment and present image are taken from the Wishing You stamp set on Page 23. I stamped the images using Cherry Cobbler and Old Olive and then sewed matching Designer Buttons on to the bag using Stampin' Up!'s fabulous Linen Thread.


We created this pennant embellishment by adding lengths of Bakers Twine to the muslin bag tie and then wrapping lengths of Season of Style Designer Washi Tape around the Twine and then cutting the v-shapes into the sealed tape. It is a great way of adding an extra little detail and showcasing the different uses for our Washi Tapes.
This was my favourite project of the day, a wrapped Christmas pudding Ferrero Rocher chocolate. I had seen this idea on Pinterest and knew it would be perfect for my Christmas Craft Day.

To create this project I cut a lattice shape in Early Espresso using the Lattice Big Die. I then attached a small piece of Sticky Strip to the top of the chocolate and then stuck the four corners to the sticky strip. I then covered with a small scallop circle punched using the 3.2cm Scallop Circle Punch (punched from Very Vanilla and sponged around the edges using Baked Brown Sugar). To finish we glued a small length of Gumball Green Stitched Satin Ribbon to the scallop circle and punched an Itty Bitty Shape from Red Glimmer Paper.

Thank you for popping by today. I am going to be working on my project tutorials over the weekend to share the main projects from my craft day with you over the weekend and in to next week. Looking forward to sharing some new ideas and techniques with you then. In the mean time, a very happy weekend to you and, as always, happy crafting.

-X-

Wednesday, 21 August 2013

A little bit of festive sparkle


My share for today is this pop up card using a whole host of lovely Stampin' Up! products. It was inspired by a beautiful card I found on Pinterest created by a US Demo.

The card base is cut from Shimmery White cardstock which gives a lovely subtle sparkly effect to the snowflake themed card. I think this cardstock can often be overlooked in the catalogue but I love the subtle sparkliness (Page 156 of the main Catalogue). I used my Card Base Pop 'n Cuts die with the Label Pop 'n Cuts insert to create the overall card shape. 

The inspiration for the colours of the snowflakes (stamped and die cut using the Festive Flurry Framelits and stamp set available as a bundle in the Autumn Winter catalogue) is the beautiful Winter Frost Speciality Designer Series Paper. I cannot wait to share more projects created with this fantastic speciality paper as it features two beautiful foil accented sheets. These tones of blue, teal and turquoise are going to feature a lot in my Christmas crafting this year (or in Stampin' Up! speak thats Bermuda Bay, Coastal Cabana, Island Indigo, Pool Party, Smoky Slate and Whisper White).

The sparkly accents were added using the lovely Silver Glimmer Paper and punched with the Scallop Edge Punch. And the final detail was added using a Bright Candy Dot and Brad Base to secure the two snowflakes together for the top embellishment.

Thanks for stopping by today. I will have more to share from our crafty days tomorrow. Please get in touch with any questions about the products or techniques used. I'm only too happy to help: poulton_sarah@yahoo.co.uk or 01983 609249.

Happy Crafting ;0)
-X-


Friday, 12 July 2013

A bit of Mosaic Madness

Morning all and welcome to the nearly weekend (only a few hours to go.....)

I have a couple of crafty projects to share with you this morning. Both showcasing lovely new stamps and punches from the new annual catalogue.


The first card is our Make and Take project from last weekends Open House. I wanted to showcase the fantastic Mosaic Madness Bundle in all its coordinating glory.

This card uses the Modern Mosaic Embossing Folder, the fantastic Quatrefancy Speciality Designer Series Paper, the Mosaic Madness stamp set and coordinating Mosaic Punch. We also embellished with tiny flowers punches using the Itty Bitty Punches set. The colour scheme showcases the lovely new 2013-2015 In Colours, Crisp Cantaloupe, Strawberry Slush & Coastal Cabana.

A lovely quick and easy card to use lots of lovely new product and fun for us to create during my crafty Open House.


The picture below showcases all the fabulous Mosaic Products:
Mosaic Madness Bundle:
(Stamp set and Punch)

Clear-Mount:  £29.25 132733
Wood-Mount: £33.50 132734

Other coordinating products:

Quatrefancy Speciality DSP:              £11.50      130141
Modern Mosaic Embossing Folder:     £7.50      129984


The second project for today is this quick and simple Thank You notelet I created as my workshop thank you card for my lovely July customers.

It uses a Daffodil Delight card based coupled with Gingham Garden Designer Series Paper and then a label stamped and punched using the Label Love bundle of products. Thank you to all the lovely ladies who have ordered from me this month.
And for more handmade treats, I still have a couple of spaces available for my new Hostess Virtual Club (Stampers 10) club. I have an extra special handmade gift for anyone signing up and then you will receive all the perks of the club for the next 10 months. For more info please click here

Please get in touch on poulton_sarah@yahoo.co.uk or 01983 609249 if you'd like to book a spot in the hostess club or place a customer order.

Hope you have a lovely weekend ahead of you. I'm off to the beach in the motorhome today with Summer. We've discovered a lovely local splash park that she absolutely loves. And I'm thinking of braving it in to the water with her today too. Got to make the most of this sunshine before it disappears ;0)

Have a lovely crafty weekend all.
-X-

Thursday, 30 May 2013

Thursday Technique Tip- Stamping Block Backgrounds


Lots to share with you today. 

Its such an exciting time of the year to be a Stampin' Up! Demonstrator as we get our sneak peak at the new 2013-2014 catalogue tomorrow ready for the launch on July 2nd. It is going to be a late night for me tonight waiting for the sneak peaks to go live on the Demonstrator website. If you'd like to get sneaky peak access to new products as well as a fab discount on all crafty products in the catalogues, have you thought about signing up as a Stampin' Up! Demonstrator. You can find out more using the 'Join My Team' tab above. And today is the last day for signing up and getting an extra £25 in your Starter Kit (thats £155 for the bargain price of £99). I'd love to welcome you to the Wight Stampers.

Now, for a bit of craftiness. The card above is one of the technique based cards I taught at this month's crafty card class. It uses a technique I learned from a very talented Demo friend, Lynne, at our recent Stampin' Up! traning event in Telford.

You can create these lovely blended backgrounds using your acrylic stamping block, inks (pens, ink pads, ink refills) and a water spritzer. It is such a fab technique and it never looks the same twice ;0)  I created three blended blocks of colour and then stamped over using The Open Sea and By The Tide stamp sets.

Lynne has posted a technique video over on Youtube explaining this technique. You can find it here:

And while I am sharing videos. Here is another for you. This direct from Stampin' Up! UK showing what we all get up to at our Regional Events. Watch closely and you might even spot a familiar face ;0)


Thanks for stopping by today. Happy Crafting ;0)
-X-

Tuesday, 28 May 2013

More team makes for a Tuesday

There are just 3 more days to take advantage of Stampin' Up!'s fabulous Starter Kit offer. Until May 30th if you sign up to join Stampin' Up! as a Demonstrator you will receive an extra £25 in your Starter Kit. That is £155 of product for the bargain price of £99.

If you'd like to find out more info about joining Stampin' Up! you can see the
'Join My Team' tab at the top of the page.

I'd love to welcome you to my team and welcome you along to our monthly team training sessions. We all prepare a shoebox swap style make and take project and have a catch up over Haribo and a cuppa.
 
Here are two more of the beautiful projects we completed at this months get together.

This first card was demonstrated by the lovely Hayley. This uses the scoreboard to create the raised diamonds and then a dauber/sponge and Elegant Eggplant ink to create the suede effect (tone on tone inking over the whole surface of the card). I love the ruffled Organza ribbon too.
 
 This second card was demonstrated by Lorraine. I love The Open Sea stamp set. It makes such great masculine style cards. I love these colours together- Pool Party, Soft Suede, Very Vanilla and Chocolate Chip. Daubering has to be one of my all time favourite techniques. I love the ageing effect it has to create antique style images.
Thanks for popping by today and please get in touch with any crafty queries: poulton_sarah@yahoo.co.uk or 01983 609249.
 
-X-

Saturday, 23 March 2013

And the winner is......

 
I am excited to announce the winner of my Big Shot competition is..... Pat!!! And the runner up prize of a fab Stampin' Up! paper trimmer is Julie. Well done to you both and thank you to all my lovely customers for all their support, parties and orders throughout this years Sale-A-Bration. It is very much appreciated.
 
Hope you all have a very lovely and crafty weekend.
-X-

Tuesday, 26 February 2013

Try It Tuesday: Simple Squares

 
Here is this weeks Try It Tuesday layout. I found a page on Pinterest that I loved and decided to give it a Stampin' Up! makeover. The original page is here. I used this layout as the basic reference point for my 12"x12" page changing the details to fit my dimensions.
 
I cut 7cm squares from the beautiful Birds of a Feather Designer Series Papers which I then daubered with Primrose Petals ink around the edges. The base Whisper White cardstock I sprayed and splattered with pink ink and then glimmered with a spray of Vanilla Shimmer Smooch Spritz.
 
I created the circular embellishment with my Circles #2 Die and the large Scallop Circle Punch. I stamped the 'S' with my Notable Alphabet stamp set. The bunting I created with a length of Pool Party Bakers Twine and folded circles punched with my 1" punch.
 
I love the simplicity of this page and I love how the subtle colours pick up on the colours of the photo. This picture was taken when Summer was 6 days old, all tucked up asleep in my dressing gown. I only have a few photos of me and Summer from the first few days so I cherished the opportunity to scrapbook one of them.
 
Thank you for stopping by today. Please get in touch (poulton_sarah@yahoo.co.uk or 01983 609249) for any more information on Stampin' Up! and their products. Happy to help in any crafty way I can.
 
Happy Crafting
-X-