Showing posts with label Stampin Up Isle of Wight. Show all posts

Thursday, 26 June 2014

Cardmaking and craft class on the Isle of Wight: Stampin' Up!'s Simply Sketched Poppy


To celebrate the Retiring Lists I was looking through all my stamp sets that are retiring and decided to use my favourites for class projects for June. I found this beautiful card on Pinterest and decided I had to give it a go as it uses two of my favourite retiring stamp sets. Simply Sketched is my favourite hostess set of the past few years (such beautiful stamped images perfect for masking and layering) and En Francais is the most used stamp in my collection (I love creating swirly text backgrounds with this large background stamp).

To create this card I started with a standard half of A4 card base in Soft Suede. I then cut a layer from Baked Brown Sugar (10cm x 14.3cm). I used my Circle Framelits to cut the circle window in the Baked Brown Sugar layer. I then used my Essentials Paper Piercing Pack to edge the circle with my Piercing Tool. 

I created the stamped layer with a 9.5cm square of Very Vanilla cardstock. I inked the En Francais (which has subsequently now sold out from the Retiring List) stamp with Crumb Cake. To get a more subtle background effect I first stamped off on to a scrap piece of paper and then stamped my Very Vanilla piece. This lightened the background stamping.

We then stamped the greeting and poppy image in Soft Suede and then coloured using ink from the lid of the ink pad and a Blender Pen (we coloured the poppy with Tangerine Tango). To finish we stamped the leaf image from Simply Sketched in Soft Suede in the corners of the Baked Brown Sugar layer (which was secured to the Soft Suede base with Dimensionals).


So as you can see from above, items are selling out fast from the Retiring Lists. If you'd like to see the lists of items and what is now unavailable you can see this post pinned to the top of my page. Alternatively, click on the picture below to click through to my online store to browse items available until Monday only (June 30th).


Please get in touch with any questions or queries or please pop over to my Online Store for more information on all our products. Get in touch on poulton_sarah@yahoo.co.uk or 01983 609249.

Happy Crafting
-X-

Saturday, 17 May 2014

Telford Swap using Stampin' Up!'s My Digital Studio

Good morning and a very happy Saturday to you.

Now I don't normally post on a Saturday but I wanted to share a special project with you today. As you read this I will be swapping and sharing with fellow Demonstrators at our Regional Training Event in Telford.

I wanted to be able to participate in the swaps but have had very limited time recently with Sylvie arriving and Summer's birthday. So I decided to use My Digital Studio to design my 'Create' swap which I thought was perfect for a large group of creative Demonstrators.


For this swap I used two downloads:

I then used the core kit elements:
  • Top Note Die
  • Creative Elements Stamp Brush Set
I specifically searched my online stores for downloads with the word 'Create'. I wanted to combine the fancy handwriting style Create from the Walk in the Park II kit with the definition from Define Your Life. I love how the elements combined with birds, hearts and butterflies to create this lovely little 4" x 6" postcard for fellow creators to frame or put on their craft space walls.

Once I had completed my design I exported my finished image and uploaded to a printing website (I used Snapfish for this) where I had my image professionally printed on to matte cardstock. If you look around at various printing service websites you can complete trials where they will offer free prints. I signed up and received 50 free prints with Snapfish.

If you pop over to Martin Lewis's website there is a tool there for seeing which sites are offering the best deals:


Thank you for stopping by today. Please leave a comment to let me know if you swapped with me. I would love to hear from you.


You can order all Stampin' Up! products through my online store by click here or by clicking on any of the product links above. I will also happily order any products for you. Just drop me a line on poulton_sarah@yahoo.co.uk or 01983 609249 and I'll happily assist.

And don't forget to check out this weeks Weekly Deals to see what fab items are discounted for a limited time only (until Tuesday).


Happy Crafting
-XXX-

Monday, 24 March 2014

Easter Basket Surprise Gift Box


Good morning and a very Happy Monday to you all. How is the weather in your part of the world? We have lovely bright sunshine here on the Isle of Wight (interspersed over the weekend with some serious hail stones!) so have made the most of it by taking the girls out to the park and to the beach. Sylvie doesn't seem to appreciate it quite as much as Summer does just yet as she continues to mainly sleep her days away (but I am not taking this for granted! Sam and I are both enjoying this quiet phase before we have two loud littlies running around the house).

Today's crafty project is a lovely little surprise Easter Basket. The surprise comes when you take the lid off and open the basket to reveal the contents. I found the template for this basket over on Tanya Bell's blog, a very talented Australian Demo. I recommend checking out some of her fantastic tutorials as she has some great 3D item ideas.


Here is the lid off. The lid is decorated using the Floral Fusion Sizzlits Die which is one of my current favourites for Easter. I love how all the flowers fit together in lovely layers. I secured the handle with a Candy Dot Brad Base and a Subtles Candy Dot.


Here is the basket completely opened out. See what I mean by an Easter surprise? I absolutely love this project and the simplicity of creating a little garden within to hold a mini Lindt gold rabbit. I made this one and have tucked it away as an Easter gift for Summer.

To create the grass around the rabbit I used my fantastic new Fringe Scissors. I was a bit hesitant to invest in them to begin with but now I am hooked on using them to create grass borders, perfect for Easter and Spring projects.


A close up on my favourite detail, the choccie rabbit surrounded by daisies created using the Itty Bitty Punch Pack and the Heart/Beak from the Owl Punch. The stamping around the edges uses the Heart and Flower stamps within the Banner Blast stamp set (for 7 more days you can get this stamp set for FREE with an order of £45 or more as part of Sale-A-Bration!! Click here for more info).


The colours I have used for this project are:

Chocolate Chip
Crisp Cantaloupe
Crumb Cake
Melon Mambo
Pink Pirouette
Pistachio Pudding
So Saffron
Whisper White

Embellishments:

Subtles & Brights Candy Dots
Subtles & Brights Designer Buttons
Crisp Cantaloupe Ruffle Stretch Trim

Punches:

Itty Bitty Punch Pack
Scallop Ribbon Border Punch
Owl Builder Punch

Other:

Floral Fusions Sizzlits Die
Fringe Scissors
Perfect Polka Dots Embossing Folder
Banner Blast Stamp Set (free with an order of £45 placed before March 31st)


You can find all the products you need for this project through my online store.

If you click here or on the picture above you will be connected straight through to my store where you can browse all Stampin' Up!'s current products. It will take you to the Sale-A-Bration page for details of our current promotion (only one week left to take advantage!!!)

If you'd like to find out more about Sale-A-Bration, please pop by my 'Promotions' tab at the top or drop me a line on poulton_sarah@yahoo.co.uk or 01983 609249. Sale-A-Bration is the best time of the year for ordering Stampin' Up! products. Who doesn't love a good freebie? 

Happy Crafting
-X-

Thursday, 20 March 2014

My Digital Studio Special Delivery Scrapbooking


Morning crafters!

I'm a day later than anticipated with my My Digital Studio make today. I had an idea in my head of wanting to create a page with two newborn pictures of Summer and Sylvie to show how similar they are as littlies. So I set about creating a baby page within My Digital Studio. I found in my downloads that I had all the component parts of the Special Delivery Subtles Kit which is designed to be used for baby layouts. So it was perfect for the page I wanted to create.

I started with a two picture 12"x12" Photo Only Designer Template (a blank template with space to drag and drop your pictures in) and then built the details of the page around the photos. This is the first time I have played with the many punches within the MDS software. I used the Full Heart punch to create the photo filled heart and resized to fit my page. The more I play with the functions within MDS the more user friendly I realise it all is. I was a bit daunted to begin with but all the elements are so simple to use. And even better, there is a simple undo button, so any changes you make that you are not happy with can easily be undone.

Don't forget, if you are unsure about digital scrapbooking or cardmaking, Stampin' Up! offer a free 30 day trial of My Digital Studio. Just click this link to be taken to my online store where you can download your free trial today.

Please get in touch with any crafty questions. I'm always happy to help:

poulton_sarah@yahoo.co.uk or 01983 609249.

Happy Crafting -X-

Wednesday, 12 March 2014

Wild Wasabi Crocodile Gift Box


Hello and welcome to another crafty day at Stampin' Sarah. This is a scheduled post so no exciting news to share with you just yet. But rest assured I will be posting photos of our new little girl just as soon as I am home.

Today, as promised, I am sharing these fab little crocodile gift boxes. I'd seen this box on Nadine Weiner's blog (a German Demonstrator). However, I think the translation went slightly awry as I made some mistakes on putting the larger croc box together (it should have had slightly smaller front and edges to allow for the teeth when closing the box). So I decided to have a go at making a smaller baby croc box and correct the mistakes I'd made with my first attempt.

I also thought this little set would make a perfect gift for my cousin's little boy who has just welcomed a new baby brother to the world.


These boxes are incredibly simple to create as they are based on a simple mini pizza box design. 

To make the mini baby croc I started with a 10 x 16.5cm rectangle of Wild Wasabi cardstock. I scored along the 16.5cm side at 1.5cm, 6.5cm, 9cm and 14cm. I scored along the 10cm side at 1cm, 2.5cm, 7.5cm and 9cm. You then need to cut your score lines as below (the bold black lines) and also cut a 1cm strip off your two edge panels which will form the top lid of your box (shown below as the two stepped pieces cut on the left hand top and bottom edges). This 1cm strip cut out allows you to comfortably add teeth to your box and close it securely.


To finish the croc face I used a panel of Pistachio Pudding Coredinations cardstock which I ran through the Big Shot using my Decorative Dots Embossing Folders (yours free for a few more weeks with an order of £45 during Sale-A-Bration! Get your order to me before the end of March to qualify for the extra lovely freebies!). I sanded the panel with my Stampin' Sanding Block and then inked the edges with Old Olive ink using a sponge dauber. I layered this on to a panel of Old Olive Ink. I create the eyes with punched circles of Wild Wasabi which I cut a small slit in to which I shaped round to give the 3D effect. For the larger box I finished the eyes with smaller circles punched in Whisper White and Basic Black. For the baby box I used googly eyes from my retired Stampin' Up! stash.

The final detail to give the croc definition is to stamp a border using your Scallop Edge Border Punch and a 2cm strip of Whisper White. Once you have your scalloped strip using sticky strip or Tombow you can secure the right lengths to the top inside of your box to create the crocodile teeth.

If you'd like to have a go at the larger box also you can follow the translated instructions on Nadine's blog. She uses a 16cm x 29cm rectangle to begin with which then creates a 10cm square croc box.

If you'd like to find out more about Sale-A-Bration, please pop by my 'Promotions' tab at the top or drop me a line on poulton_sarah@yahoo.co.uk or 01983 609249. Sale-A-Bration is the best time of the year for ordering Stampin' Up! products. Who doesn't love a good freebie? 


Happy Crafting

-X-

Friday, 7 March 2014

Happy Watercolor Layered Card


Happy Friday Crafty Friends.

Here is a quick Happy Watercolor layered card I CASED from this one I found on Pinterest. I loved the layered stamped element (one of my favourite techniques- I'm always impressed with the simplicity of the technique but the 'Wow' impact of the stamping over the layers).

I used the floral stamp from the Happy Watercolor set stamped in Gold Encore Metallic Ink over the Crumb Cake and Very Vanilla layers. I then added the sentiment from the Simply Sketched Hostess stamp set  (stamped in Soft Suede) with a row of Basic Pearls to finish.

I love the simplicity of this card and the little but of glamour using the Gold ink pad. Quick and easy for a simple birthday greeting for a friend or loved one.

Thanks for popping by today. I really appreciate your visits. Things might be a little quieter on the blogging front over the next week or so. I have a couple of fab projects scheduled for you while I am in hospital next week. But please bear with me. Normal service will resume once I'm home and we've settled in to some kind of new routine (!!).

Happy Crafting ;0)

-X-

Thursday, 20 February 2014

Hardwood Background Petite Petals Birthday

Good morning crafty friends. How goes your week? It has been a busy one here preparing for our new little one. I sent Sam in to the loft to recover the moses basket and other baby essentials. So I have been busy washing and prepping things for our new arrival. It really does feel like everything is ready, I really just need the baby now ;0) Oh and a name might be helpful. Hopefully Sam and I will agree on something in the next two and a bit weeks.


On our recent Pinkies Blog Hop to celebrate the Spring Summer catalogue I fell in love with this card by a fellow Pinkie, Caro. I decided to create my own version of the card using Baked Brown Sugar textured Coredinations cardstock, Very Vanilla cardstock and Naturals Ivory cardstock.

I absolutely adore the Hardwood background stamp. It is just so perfect for masculine or nature themed cards and is just so effective. I think this might be a stamp easily overlooked in the catalogue but it stamps so beautifully. The Hardwood background worked so well with the Petite Petals stamp set and punch  (available as a bundle here) to create this wreath window effect.

The colour scheme used for this card: Coastal Cabana, Pool Party, Very Vanilla, Baked Brown Sugar and Naturals Ivory (for the stamped background). I also used Soft Suede ink for the sponge daubering of the edges.

I hope you enjoyed my crafty make for today. I'd be happy to help with any questions or queries about Stampin' Up! so please get in touch on poulton_sarah@yahoo.co.uk or 01983 609249. And don't forget I also have an online store that is open 24/7:


Happy Crafting
-X-

Wednesday, 12 February 2014

Gorgeous Grunge Valentines


Good morning crafters.

Here is another project from our monthly team shoebox swap. This fab Valentines inspired card was designed by Charlotte using the Gorgeous Grunge and Crazy, Mixed Up Love stamp sets.

I love the messy effect of the inky splodge stamps in Gorgeous Grunge. A great effect achieved with no mess or inky fuss. And Crazy, Mixed Up Love is a stamp set I must have overlooked in the catalogue but I just love all the images in the set now, especially the little Bee. To find out more click on the picture below and you will be connected straight through to my online store.


The final element of this card that I loved making are the little spiral flowers. These are more distressed and grungy than the larger Spiral Flower Die roses. We created these by punching a small circle from cardstock and DSP and then ripping a spiral in to the circle. In the exact same way as the Spiral Flower Die you just wrap the spiral around and then glue down with a glue dot or hot glue.


If you'd like any more info on Stampin' Up! or our current promotions, please get in touch on poulton_sarah@yahoo.co.uk or 01983 609249. I'd love to chat to you about our fantastic crafting products, or maybe you'd like to join my team too and purchase products with our Demonstrator discount (as well as potentially building a flexible crafty business). Just get in touch to find out more.

Happy Crafting
-X-

Wednesday, 5 February 2014

Scallop Tag Punch Fancy Fold Card


Good morning crafty friends.

I've had a few enquiries about this card I created a couple of weeks ago and how to create the Scallop Tag Punch closure for this card. I was looking for a project to prep for my Sale-A-Bration parties this week and came across this beautiful card on Pinterest. So I decided to multitask, I have prepped this project for my parties while simultaneously putting a few pictures together to help you to create your own Scallop Tag cards.

Before I get to the tutorial, here are a couple more close up pictures of this Crumb Cake, Very Vanilla, Gold and Crisp Cantaloupe creation.


I am so in love with the Happy Watercolour stamp set and this fab watercolour effect background stamp. I loved adding the gold dot background and the extra shimmer with gold Stampin' Up! glitter (applied with a two way glue pen).


And for extra pizzazz I removed 3 sequins from a length of gold sequin trim and attached with Tombow glue.


To create your own cards with this fancy fold Scallop Tag Punch closure you just need the following instructions:


Start with a standard piece of A4 cardstock and cut in half (standard UK measurement 14.8cm x 21cm). For this card I have started with a Crumb Cake cardbase.

Mark with a pencil on both the 14.8cm sides at the middle point (7.4cm)


Push the edge with the pencil mark face down in to the Tag Topper Punch. By carefully positioning the card you can push over the top of the grooves which are there to guide the normal width of a tag. You then need to line up your pencil mark with the centre of Tag topper and punch. Repeat this for the opposite side and pencil mark.


Line up this punched edge in your paper trimmer. Trim off the excess pieces above and below the Scallop Tag punched shape. You then need to score the Tag Topper piece in line with the edge of the card to allow you to fold the Tag over as part of the closure.


You then need to repeat the trimming for the other side. However do not score this Tag as this forms the foldover decorated section on the front of your card.

You need to score the centre fold of your card by measuring 10.5cm from the scored Tag edge. This will give you a 10.5cm x 14.8cm inner section and the foldover section for the front (ready to be decorated). The picture above is technically upside down as the flap will foldover from the other side.

To decorate and layer I used a Very Vanilla insert measuring 14.5cm x 10cm and for the front layer 14.5cm x 5.8cm.

I hope this all makes sense. Please let me know if I can help with anything further on how to create your own Scallop Tag closure card.

Thank you for stopping by today and get in touch with any Stampin' Up! questions: poulton_sarah@yahoo.co.uk or 01983 609249 / 07830 343830.

Happy Crafting
-XXX-


Monday, 3 February 2014

Watercolor Wonder Note Cards


Good morning crafters and a very Happy Monday to you.

I hosted an Open House this weekend to celebrate the launch of the new Spring Summer Catalogue and enjoyed sharing a selection of new products and crafty projects with the ladies that popped along during the day.

For our Make and Take project I designed several cards using the fabulous Watercolor Wonder Designer Series Note Cards and Envelopes coupled with the Happy Watercolor Stamp Set.


I love these preprinted watercolour effect notelets. They are perfect for adding layers and stamping to.

The colour scheme for our stamping was Daffodil Delight and Tangerine Tango. We added gold detail for the sentiments and dotted background with a Metallic Encore Gold Inkpad.

If you'd like to find out more about the products used for these cards you can clink on the links directly above or on the photos below which will connect you directly to my online store. Alternatively I will be more than happy to place an order on your behalf, just get in contact on poulton_sarah@yahoo.co.uk or 01983 609249.


Thank you for stopping by today and for joining me for a bit of Monday morning crafting. I had better publish this now and get on with getting Summer and I dressed ready for our Monday morning trip to playgroup. 

Please do not hesitate to get in contact with any Stampin' Up! enquiries or crafty question, I'm always happy to chat Stampin' Up! ;0)

Happy Crafting
-X-

Friday, 27 December 2013

Stampin' Up! UK Gift Packaging & Class Dates for 2014


Good morning crafty friends.

I hope you've had a lovely Christmas wherever you are or whoever you have been with. And I hope the weather hasn't wreaked too much havoc with you. We've had a lovely one here on the Isle of Wight visiting our families and spending time with one very excited Summer ;0)

I thought I would share a quick gift bag I created from a sheet of 12"x12" Designer Series Paper to wrap a gift for my lovely friend Hayley. I used a sheet of Cherry Cobbler patterned paper from the Season of Style DSP which I cut to create a 11"x12" base. I then used the principle of the 2,4,6,8 gift box/bag to create this tall gift bag (I have seen these bags used widely across the blogosphere). I scored at 2.5", 5", 7.5" and 10" along the 11" side (the remaining 1" becomes the fold around tag that you attach your sticky strip to). On the 12" side I scored at 2" and then cut along the score lines to the 2" mark to create the base flaps that you sticky strip and fold up to create a sturdy base (all four flaps layer on to each other to give a good strong base for your gift inside the bag).


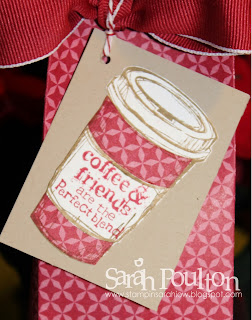
I punched holes through the top of the bag and secured with Cherry Cobbler Ribbon. I created this little gift tag using Crumb Cake Cardstock and I then paper pieced the coffee cup image from the Perfect Blend stamp set using the leftover scraps from the Cherry Cobbler DSP. I deliberately picked this image and the design of DSP to make the cup look like a festive Starbucks mug. Inside the gift bag I had included a bottle of Starbucks Gingerbread Syrup for festive coffees and treats. I was looking forward to treating Hayley to a Christmas coffee in our first Isle of Wight Starbucks. But it is now not due to open until the New Year. So our festive red cup treats will have to wait till next Christmas (hopefully the gingerbread will tide her over to 2014).

And while you are here today I wanted to announce my first two card class dates for 2014:

Saturday January 18th 1-4pm
Saturday February 15th 1-4pm

And I will also be hosting a new catalogue Open House on Saturday February 1st between 10.30 and 3pm. I will have samples of Sale-A-Bration and new cataogue products, as well as door prizes, on the day ordering incentives and a make and take project for all attendees. It would be lovely to see you then, so please pop along to pick up your copy of the new catalogue. Please drop me a line for more info and to let me know you might be popping along: poulton_sarah@yahoo.co.uk or 01983 609249.

And don't forget, for all those lovely crafty pennies you might have received for Christmas, my online store is open 24/7. You can visit my store here:


Or I am still placing orders so let me know if there is anything you'd like me to add to an order for you ;0)

Hope you've all had a good one and look forward to catching up with you all again soon. Pop back on Monday for a sneak peak look at some of the GORGEOUS new Sale-A-Bration products coming in January (and don't forget, these are products you will receive for free with a qualifying order from January 28th onwards!).

Happy Festive Crafting
-X-

Sunday, 22 December 2013

Stampin' Up! UK A Very Special Birthday

Happy Festive Sunday to you. Hope all your preparations are going well and you are all ready for the main event on Wednesday. I am about as ready as I will ever be. Just got the wrapping to do now.

I thought I would share a very special card I made this week for my good crafty friend and customer, Chris. She celebrated her 70th birthday on Friday and I wanted to create something super sparkly and special for her celebrations.


I had seen the multi colour embossing powder technique demonstrated on stage at Convention and decided to give it another dimension by using the beautiful Gold and Silver Glitters from the Autumn Winter catalogue (it gave it that super special extra something). To create this effect I stamped the whole Swallowtail image in Versamark on to Basic Black cardstock. I then poured Heat and Stick Powder onto the tips of the wings and the body. I quickly heated this and then covered with the silver and gold glitters. Once this element was completed, I quickly added the gold and silver embossing powders to the Versamark trying to create this striped effect. I think the key is to act quickly (while managing not to mix your powders and glitters!) so that the Versamark does not dry out. Overall, I was really pleased with result. I liked it better than the effect i was going for in my head (which rarely happens for me!).


To finish I Versamarked the 7 and 0 from the Memorable Moments stamp set (perfect for all Anniversaries and Birthdays) and used Heat and Stick with the Gold Glitter. I then carefully cut around the numbers and mounted with Dimensionals. I then stamped the Happy, 'th' and Birthday from the same stamp set using my Gold Metallic Encore ink pad.

I hope Chris had a lovely day and I look forward to catching up with her in the New Year to hear all about it.


Please get in touch if you have any questions or queries about Stampin' Up!, I'd be only too happy to help: poulton_sarah@yahoo.co.uk or 01983 609249. I have dates available in the New Year for fantastic Sale-A-Bration parties (lots of lovely extra freebies for hostesses as well as for customers) so drop me a line if you think you might be interested in finding out more.


Happy Festive Crafting ;0)
-X-

Tuesday, 12 November 2013

Stampin' Up! UK Festive Gift Card Holder


Evening all. Hope you're having a good week so far. Have you started on your Christmas preparations yet? I'm still in the midst of my shopping and card making at the moment. 


For my last card class I wanted to create a 3D project that would help along the way towards Christmas preparations and I came up with this gift card holder using the Envelope Punch Board. The beauty of the new Punch Board is that it comes with all the measurements pre-printed on the board and to create the little envelope inside I just made the smallest envelope listed on the measurement guide perfect for a gift card.


To create the gift card holder base itself I used the Pop' n Cuts Cardbase. I folded my card in half (using a full length of A4 cardstock) and ran that through my Big Shot to create a folded card with the lovely shaping provided by the Pop' n Cuts base. I then scored at half an inch either side of the centre fold mark to give the base for the holder to stand on. I used my large oval punch to create the handle.

To embellish the holder I used Gumball Green cardstock and stitched ribbon along with a slim strip of Season Of Style Designer Series Paper wrapped with Victoria Crochet Trim. The stamped banner is from the Perfectly You hostess stamp set embellished with Basic Rhinestones.


I have included links to the products used for today's project either by clicking on the photos or the direct links above. If you place an online order for any Stampin' Up! products through my online store remember to add the code below and I will add your name to the draw to win the hostess benefits for the month's combined orders (with a minimum of £25 in hostess freebies):

V99TUSS2

Please get in touch if you have any questions about today's project or about placing an order or about Stampin' Up! in general. You can contact me on poulton_sarah@yahoo.co.uk or 01983 609249.

Happy Crafting

-X-