Wednesday, 30 September 2015

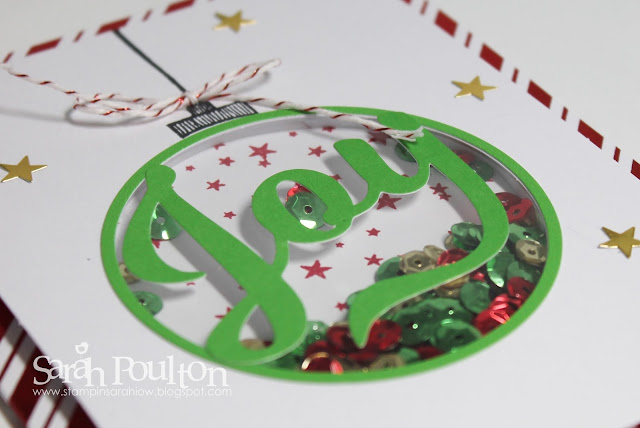
A To You and Yours Joyful Card from Stampin' Up! UK Demonstrator Sarah Poulton

Hello and welcome to another Wednesday's fantastic Weekly Deals. Hop on over to my Online Store to check out this week's discounted products.

Today I have a make that I'll be sharing with some lovely ladies tonight at a friend's crafty Stampin' Up! party.  The hostess asked me to Demo one of the kits as she has a mix of experienced and new stampers. And of course the theme had to be Christmas. So I picked the fantastic To You and Yours Shaker Frames Card Kit.

I love this kit as it makes Shaker Cards so simple to make and I love the mix of sequins and sparkles for inside your shaker too. The kit is £21.75 and makes 18 cards. In the kit you get the foiled card bases as well as cut to size window sheets and all the embellishments too. You can choose to use the matching To You and Yours stamp set or use your own stamps to accessorise your stars, trees and circles.

I chose to purchase the matching To You and Yours set which meant I could add the string and top to create the decoration for the front of my card.


I embellished with gold stars and then added sequins to the inside of my shaker. I love the die cut words in the kit which are perfect for adding a greeting without stamping. Very festive.


Thank you for popping by today. Please let me know if you have any questions about Stampin' Up! or our products. I would love to help. All items can be purchased online via my shop or get in touch directly and I can order them for you to be delivered direct to your door. I'd also love to Demo for you and your friends at your own crafty party. As the hostess you earn lots of lovely freebies and you all get to make a fun crafty project like this one too (no crafting experience necessary!)

 -XXX-
Built for Free Using: My Stampin Blog

Monday, 28 September 2015

A Happy Scenes Birthday Celebration from Stampin' Up! UK Demonstrator Sarah Poulton

Good morning crafty friends. How was your weekend? Yesterday was my middle sister's birthday so we celebrated with homemade cake and a trip to Tapnell Farm for everyone to have a go on the giant bouncing pillow.

I wanted to share one of the cards I made for my sister. She has two cats. Yes you guessed it, a black one and a ginger one (their names are Harry and Ron for all you HP fans). I knew the Hearth and Home Thinlits would be perfect coupled with the cat from the Festive Fireside Framelits. I wanted to create a birthday cake scene for Harry and Ron to be looking in on.


I stamped the cake from Endless Birthday Wishes and coloured with a Blender Pen. I hand cut the curtains from the Cherry on Top Designer Series Paper Stack. I wanted to have birthday themed curtains to suit the occasion.


Thank you for popping by today. Please let me know if you have any questions about Stampin' Up! or our products. I would love to help. All items can be purchased online via my shop or get in touch directly and I can order them for you to be delivered direct to your door. I'd also love to Demo for you and your friends at a crafty party. As the hostess you earn lots of lovely freebies and you all get to make a fun crafty project too (no crafting experience necessary!)

 -XXX-


Built for Free Using: My Stampin Blog

Friday, 25 September 2015

A Festive Flower Square Pillow Box from Stampin' Up! UK Demonstrator Sarah Poulton

Happy Friday crafters. What are your crafty plans for the weekend? I have lots of birthday bits to finish off for my sisters celebration on Sunday. I think there will be lots of baking and wrapping over the next day or so.

I turned to the Autumn Winter catalogue pages for my inspiration for today's project. There is a very similar Square Pillow Box project in one of the pictures in the catalogue and I knew I wanted to have a go at recreating it. I loved the layering of the strip of Home for the Holidays Designer Series Paper with the Gold Fancy Foil Vellum. 


I used a Crumb Cake cardstock base, layered the paper and vellum and then created a Festive Flower using the Reason for the Season bundle. This is one of the great things about Stampin' Up!- the bundles! Products that coordinate are bundled together and you get a discount if you purchase them together. In this case, you get the punch to create the flowers with the stamp set to create the leaf details on each part of the flower (plus some lovely sentiments too).

To finish my layered flower I punched the centre from Champagne Glimmer Paper to give a little festive shimmer.


Thank you for popping by today. Please let me know if you have any questions about Stampin' Up! or our products. I would love to help. All items can be purchased online via my shop or get in touch directly and I can order them for you to be delivered direct to your door. I'd also love to Demo for you and your friends at a crafty party. As the hostess you earn lots of lovely freebies and you all get to make a fun crafty project too (no crafting experience necessary!)

 -XXX-
Built for Free Using: My Stampin Blog

Wednesday, 23 September 2015

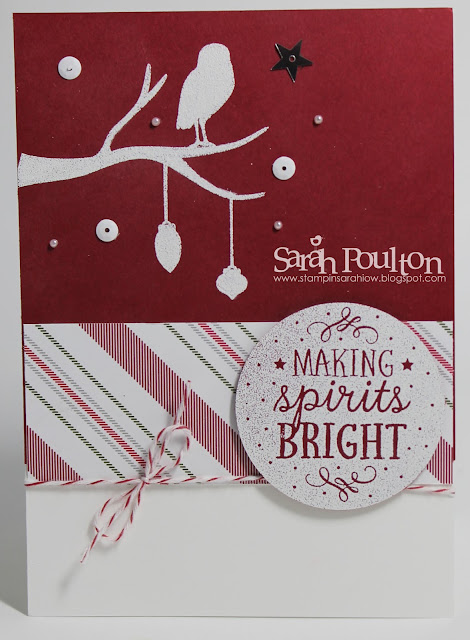
An Among the Branches Christmas Card from Stampin' Up! UK Demonstrator Sarah Poulton

Happy Weekly Deals Wednesday. New discounted products over on my web shop. I love the Into the Woods Elements and Ornate Tag Topper Punch. And I love discounts even more. Stampin' Up! have also updated the Clearance Rack with fantastic new bargains. Pop over to check out all the last chance items which are only available while stocks last.

Today I have another of our card class makes to share with you inspired by this creation I saw over on Stasia's blog. We used a Whisper White card base layered with Cherry Cobbler and a strip of Merry Moments Designer Series Paper.


I heat embossed the branch and details from the Among the Branches. I have found the key to a clean embossed card is to remember to brush your card base with the Embossing Buddy. Such a clever invention that stops all the loose bits of powder from sticking to your card and creating spots when you heat.

I added Metallics Sequins and the tiny Basic Pearls to create snow and sparkle. 


Thank you for popping by today. Please let me know if you have any questions about Stampin' Up! or our products. I would love to help. All items can be purchased online via my shop or get in touch directly and I can order them for you to be delivered direct to your door. I'd also love to Demo for you and your friends at a crafty party. As the hostess you earn lots of lovely freebies and you all get to make a fun crafty project too (no crafting experience necessary!)

 -XXX-


Built for Free Using: My Stampin Blog

Monday, 21 September 2015

A Happy Scenes Halloween Window Card from Stampin' Up! UK Demonstrator Sarah Poulton

Good morning and a very Happy Monday to you. How was your weekend? I hosted my monthly card class on Saturday which was lovely as always. I always enjoy catching up with my regular ladies and welcoming new crafters to the class. We celebrated Christmas Craft season with spiced biscuits and mince pies over a cuppa during our crafty break.

But before we go full Christmas every month I wanted to give the Autumn Winter catalogue Halloween products a bit of an outing. You'd be forgiven for thinking the catalogue only contained Christmas items as these are my favourites but there are also lovely other seasonal stamps and accessories too.

I created this Halloween/Autumn card using the Happy Scenes bundle.


I created the window scene using the Framelits and matching tree scene stamp set. I stamped my image in Soft Suede and coloured with my markers. I added a bit of colour to the sky and grass with Wild Wasabi and Soft Sky- coloured with a Blender Pen.


I cut the cat using the Framelit from Festive Fireplace bundle. I cut him from Basic Black cardstock to reflect the Halloween theme.

Thank you for popping by today. Please let me know if you have any questions about Stampin' Up! or our products. I would love to help. All items can be purchased online via my shop or get in touch directly and I can order them for you to be delivered direct to your door. I'd also love to Demo for you and your friends at a crafty party. As the hostess you earn lots of lovely freebies and you all get to make a fun crafty project too (no crafting experience necessary!)

 -XXX-

Built for Free Using: My Stampin Blog

Thursday, 17 September 2015

Watercolor Wishes Kit Makes from Stampin' Up! UK Demonstrator Sarah Poulton

Today I have some makes from my monthly craft group to share with you. We get together once a month at a friends house to chat, eat cake and do a little crafting. Some months we choose a kit and then create together. Last month we picked the Watercolor Wishes cardmaking kit for our evenings makings.

Here is what I came up with:


I love the Stampin' Up! kits. They contain everything you need to just sit down and create- stamps, ink, acrylic block, dimensionals, embellishments. Sometimes when I am in a crafty mood but lack time or mojo I sit down with one of the kits and just enjoy making with a set amount of stash in front of me.


The Watercolor Wishes Kit comes with a beautiful handwritten style sentiment stamp set (I love the kit for these stamps alone). 


The flowers and sequins are all part of the kit, along with labels and layers, and make matching up embellishments and colours so simple.


I'm a day late with this week's Weekly Deals. My favourites from this week's selection are the Fringe Scissors and the Brights Buttons.

Thank you for popping by today. Please let me know if you have any questions about Stampin' Up! or our products. I would love to help. All items can be purchased online via my shop or get in touch directly and I can order them for you to be delivered direct to your door. I'd also love to Demo for you and your friends at a crafty party. As the hostess you earn lots of lovely freebies and you all get to make a fun crafty project too (no crafting experience necessary!)

 -XXX-
Built for Free Using: My Stampin Blog

Monday, 14 September 2015

A Jingle All The Way layered Christmas Card from Stampin' Up! UK Demonstrator Sarah Poulton

Welcome to a new crafty week here at Stampin' Sarah! I have been busy over the weekend preparing for upcoming parties and classes. I've been having fun with my Reason for the Season stamps and the gorgeous Holidays Fancy Foil Designer Vellum (it makes beautiful gift bags and packaging!). And with the weather being so rainy and miserable here on the Isle of Wight I am hoping to sneak a few more minutes in my craft room for more festive crafting fun.

Today's share is a card I came up with to demonstrate the lovely layers of the Jingle All The Way bundle (comprised of the Jingle All The Way stamps and Sleigh Ride Edgelits). This is by far my stand out favourite product in the Autumn Winter catalogue. I adore the different layers and have been oohing and aahing over this style of card on Pinterest for a couple of Christmases. So happy Stampin' Up! have come up with their own version for me to use.


I used three layers of blue toned cardstock- Night of Navy, Island Indigo and Pool Party. The starry sky was a piece of the gorgeous Winter Wonderland Designer Vellum. The embellishment is one of the gorgeous Winter Wonderland snowflakes.

I love the simplicity of the layering and the minimal added detail and embellishment. There are so many possibilities and colour combinations for these Edgelits.


Thank you for popping by today. Please let me know if you have any questions about Stampin' Up! or our products. I would love to help. All items can be purchased online via my shop or get in touch directly and I can order them for you to be delivered direct to your door. I'd also love to Demo for you and your friends at a crafty party. As the hostess you earn lots of lovely freebies and you all get to make a fun crafty project too (no crafting experience necessary!)

 -XXX-
Built for Free Using: My Stampin Blog

Friday, 11 September 2015

Festive Flower Punch Christmas Card from Stampin' Up! UK Demonstrator Sarah Poulton

Good morning and a very Happy Friday. What are your plans for the weekend? I have a Tin of Cards Kit with my name on. I cannot wait to get started on the contents. I'm thinking it would make a perfect Christmas gift for someone. 

I have creation I came up with using the Festive Flower Builder Punch and matching Reason for the Season stamp set (available as a bundle together). I love the effect of the built up festive flower. I punched all the component parts in Cherry Cobbler and Wild Wasabi cardstock. I then used glue dots to layer my flower together. I love that the punch has different sized petals to give you this lovely layered effect. 

I also made sure to fold each petal slightly before adhering to give the flower added dimension.


I added the detailing to the leaves with the matching stamps (designed to fit each sized leaf/petal perfectly). The sentiment is also from the Reason for the Season stamp set.

The corner detailing was added using the Curvy Corner Trio Punch.


Thank you for popping by today. Please let me know if you have any questions about Stampin' Up! or our products. I would love to help. All items can be purchased online via my shop or get in touch directly and I can order them for you to be delivered direct to your door. I'd also love to Demo for you and your friends at a crafty party. As the hostess you earn lots of lovely freebies and you all get to make a fun crafty project too (no crafting experience necessary!)

 -XXX-

Built for Free Using: My Stampin Blog

Wednesday, 9 September 2015

A Reason for the Season Merry Christmas Card from Stampin' Up! UK Demonstrator Sarah Poulton

I just cannot stop Christmas crafting. I have a few non-festive makes to share with you but when it comes to choosing projects to share here I am definitely favouring all my lovely festive crafty projects.

This is the make and take I came up with for my Autumn Winter Open House event to celebrate all things Stampin' Up! and the upcoming festive season.

This card uses one of Stampin' Up!'s ready scored and cut Crumb Cake notelets. So they are super easy to mass produce and send for handmade Christmas greetings.


I used the Reason for the Season stamp set which comes in photopolymer to make lining up each layer so much easier. I chose to use only the coloured inside of the poinsettia to give more of a watercoloured softer feel to my card.

I stamped the flowers in Cherry Cobbler and the leaves in Garden Green.

I created a 1.5" banner using the Triple Banner Punch and then stamped the sentiment using Gold Encore ink.


It is Wednesday which can mean only one thing- new weekly deals. Click on the image below to check out what is on offer this week.


Thank you for popping by today. Please let me know if you have any questions about Stampin' Up! or our products. I would love to help. All items can be purchased online via my shop or get in touch directly and I can order them for you to be delivered direct to your door. I'd also love to Demo for you and your friends at a crafty party. As the hostess you earn lots of lovely freebies and you all get to make a fun crafty project too (no crafting experience necessary!)

 -XXX-

Built for Free Using: My Stampin Blog

Monday, 7 September 2015

An English Garden Scrapbook Celebration from Stampin' Up! UK Demonstrator Sarah Poulton

Morning crafty friends. I thought I would take a little break from festive makes this morning and share a scrapbook page I made a couple of months back. I came across it over the weekend and thought I'd take a couple of pictures to share.

This page uses the lovely English Garden Designer Series Paper paired with the three step stamping set Garden in Bloom (photopolymer- so super easy to line up).

I started with a Whisper White 12"x12" base and then punched patterned circles using my 2" Circle Punch to create the patterned background.


I stamped the butterflies using colours taken from the English Garden DSP- Hello Honey, Night of Navy and Mint Macaron.

I added Metallics Sequins and Tiny Pearls for a little shimmer and texture.


I cut my title using the super useful Little Letters Thinlits in coordinating DSP. 


I love creating scrapbook pages with lots of DSP and this was a perfect design for using up lots of little bits of English Garden paper that I had accumulated. I love the simplicity of adding a little bit of stamping detail too.

I hope you've had a lovely weekend. What beautiful weather we have been having. We ventured out for some fun in our campervan as well as visiting the Wolverton Garden Show. It is the last big event of the summer here on the Isle of Wight and we had a lovely time playing on games seeing all the beautiful hand made fair. It inspired me to create a lot of lovely bits and pieces that I look forward to sharing with you over the week. I've been having some festive fun and also creating with some of the lovely Stampin' Up! kits.

Thank you for popping by today. Please let me know if you have any questions about Stampin' Up! or our products. I would love to help. All items can be purchased online via my shop or get in touch directly and I can order them for you to be delivered direct to your door. I'd also love to Demo for you and your friends at a crafty party. As the hostess you earn lots of lovely freebies and you all get to make a fun crafty project too (no crafting experience necessary!)

 -XXX-

Built for Free Using: My Stampin Blog

Saturday, 5 September 2015

A Berry Merry Light Up Easel from Stampin' Up! UK Demonstrator Sarah Poulton


Thank you for joining us on another Pinkies Blog Hop! We're showcasing lots of gorgeous projects using products from the new Stampin' Up!® Autumn/Winter Seasonal Catalogue. Simply use the buttons at the end of each post to keep hopping! 

Hello and welcome to the Isle of Wight for my little contribution to today's Autumn Winter creativity. Thank you for joining me from Janneke's blog.

I was at a loss with where to start to create a project for today's hop. I love so much in this catalogue (my all time favourite catalogue in my 5 years with Stampin' Up!). But I settled on the gorgeous Berry Merry (anyone else think Bake Off when they hear this name?). I love all the little elements in this stamp set for embellishing your beautiful swirly script sentiments.

I wanted to make a piece of home decor to display in my home through December so I came up with this festive easel.


I purchased the little canvas and easel from my local Works. I stamped my elements in Cherry Cobbler, Old Olive, Garden Green, Soft Suede and Crumb Cake. I had a few left over light strings from my big Christmas Craft Days so I used one of these to light up my canvas. I simply poked a small hole through my canvas and then secured my LED lights behind each.

When I stamped my main image on to the canvas the stamping was patterned with the bobbles of the canvas. To get this softer watercolour effect for my completed project I used a blender pen over my ink to blend it seamlessly.


Thank you for joining my today. I hope you've enjoyed the hop so far. To continue please click onwards to Catherine's blog to see what she has been making.


Built for Free Using: My Stampin Blog

Friday, 4 September 2015

A White Christmas Star Album Card from Stampin' Up! UK Demonstrator Sarah Poulton

Happy Friday! Do you have anything exciting (and crafty) lined up for your weekend? I have my Autumn Winter catalogue Open House tomorrow between 10.30am and 2.30pm. If you would are on the Isle of Wight and would like to find out more about Stampin' Up! and have a go at a lovely festive make and take, please pop along. I'd love to see you.

Today I have another of my Christmas Craft Day makes to share with you. We all created one of these star album/cards. To create my sample I used this tutorial I found via Pinterest. The tutorial shows how to make a star shaped mini album. However, by adapting the tutorial and by cutting a rectangular window in the smallest layer, I was able to create a multi-scene card instead.


This project would have to be for extra special recipients though as it is fairly cardstock/DSP heavy. To create the whole star I needed 6 sheets of A4 coloured cardstock (I used Whisper White and Garden Green) and 2 complete sheets of Designer Series Paper (I used Merry Moments).


Within each section of the star I created a little Christmasy scene. I used the White Christmas stamp set for ease. I stamped each piece of Whisper White with the trees and then used different elements for each window scene.


I used my ink pads and blender pens to colour each scene. I love the subtle, almost watercoloured, effect of colouring with the blenders. It isn't as bold as colouring directly with markers. I embellished various scenes with glitter and/or sequins depending on the picture I was creating. 

Each star section frame was embellished with Metallics Sequins and other stickers from my retired Stampin' Up! stash.


The whole project folds flat and can be decorated as a traditional card. The reindeer clip is to hold the star open when fully folded for decorative purposes. I love that is a special card or gift that can also become a festive decoration too.


Thank you for popping by today. Please let me know if you have any questions about Stampin' Up! or our products. I would love to help. All items can be purchased online via my shop or get in touch directly and I can order them for you to be delivered direct to your door. I'd also love to Demo for you and your friends at a crafty party. As the hostess you earn lots of lovely freebies and you all get to make a fun crafty project too (no crafting experience necessary!)

 -XXX-
Built for Free Using: My Stampin Blog

Wednesday, 2 September 2015

Galaxy Print Effect Jingle All Way Card from Stampin' Up! UK Demonstrator Sarah Poulton

Good morning crafters. How are you enjoying the Autumn Winter catalogue so far? So many lovely things to look at and ideas to get your crafting mojo going.

I have another Autumn Winter inspired creation to share with you today. One of my sisters absolutely loves all things galaxy print. I have seen so many tutorials on Pinterest on how to create this effect for yourself on fabric and using various tie dye methods. So I decided to have a go at creating my own galaxy effect Christmas card.

And it was surprisingly easy to create.

I started by sponging my top layer of Whisper White all over in Tempting Turquoise. I then created contrast by sponging areas with Island Indigo. I then covered all the sponging with Blackberry Bliss being careful to leave some of the other colours showing through. I finished by sponging a small amount of Night of Navy around the edges.


To create the stars and galaxy movement I used an Aqua Painted. I lightly flicked water over my finished sponged layer and left to dry. This gave the effect of the stars in the background. Once dry I used my fine tip glue to add Metallic Sequins.

I cut my sleigh using the Jingle All The Way bundle of products. I cut my layer to size and adhered with Dimensionals over a layer cut from Gold Foil card. 


Thank you for popping by today. I hope you enjoyed this technique today. I love any technique where no two cards will look the same (and you can't really go wrong either!). I will be back on Friday with another festive fun creation. Please let me know if you have any questions about Stampin' Up! or our products. I would love to help. All items can be purchased online via my shop or get in touch directly and I can order them for you to be delivered direct to your door. I'd also love to Demo for you and your friends at a crafty party. As the hostess you earn lots of lovely freebies and you all get to make a fun crafty project too (no crafting experience necessary!)

 -XXX-

Built for Free Using: My Stampin Blog

Tuesday, 1 September 2015

The new Autumn Winter Catalogue is here

Good morning and what a happy day. The new Autumn Winter catalogue is live today. So many new ideas and lovely seasonal products for you to start planning all your Halloween/Autumn/Christmas/New Year projects. This catalogue has everything from embellishments and ribbons to stamps and framelits to great value bundles. 

You can find all the products from the catalogue in my online store by clicking here or click on the picture below to open the pdf version.


To give you a little preview of the products inside here are some of my favourites.

As you might have picked up already on my blog I absolutely love the Festive Fireplace Bundle. I love all the elements of this set and how they can come together to create a lovely festive scene.


I love the layered look of the Jingle All The Way bundle. I've had so much fun creating layered scenes with the sleigh, trees and village Edgelits and matching stamp set.


Next on my shopping list is the lovely Square Pillow Box. This picture shows the box as well as the gorgeous Festive Flower Punch.


And a final mention has to go to all the lovely Project Life sets and embellishments. Perfect for journalling the changing of the seasons in to the festive period. I will definitely be investing in these gorgeous sets for my annual December album


So you can see all the products and ideas by clicking on the pdf here or by visiting my online store here. Or if you'd like your own paper copy in your hands, drop me a line on poulton_sarah@yahoo.co.uk and I'll happily pop one in the post to you. Who doesn't love crafty happy mail?

Thank you for popping by today. I will be back tomorrow with lots more festive fun to celebrate the launch of the new Autumn Winter catalogue. Please let me know if you have any questions about Stampin' Up! or our products. I would love to help. All items can be purchased online via my shop or get in touch directly and I can order them for you to be delivered direct to your door. I'd also love to Demo for you and your friends at a crafty party. As the hostess you earn lots of lovely freebies and you all get to make a fun crafty project too (no crafting experience necessary!)

 -XXX-