Monday, 30 December 2013

Stampin' Up! UK Sale-A-Bration Sneak Peak


With the New Year nearly upon us that can only mean one thing (aside from my birthday celebrations on the 1st that is!) Sale-A-Bration is nearly here. 

For those new to Stampin' Up! this is my absolute favourite time of the Stampin' Up! year. From January 28th through to 31st March for every £45 spent you can choose a Sale-A-Bration freebie from the exclusive Sale-A-Bration mini catalogue (drop me a line on poulton_sarah@yahoo.co.uk if you'd like a copy in advance of the promotion beginning. My delivery of brochures is due today!). There are also lovely extras for anyone choosing to join my team during Sale-A-Bration or hosting a party (£25 in extra hostess freebies!).

A lovely benefit of being a Stampin' Up! Demonstrator is that we can preorder new products before their official release date (we are all counting down the days to January 3rd when we can preorder from the new Spring Summer catalogue- lots and lots of lovely new things!). I have used some gorgeous new Sale-A-Bration sneak peak products to make the New Home card above.

I must apologise for the darkness of the photo. My sister and her other half bought her first home recently and got her keys just before Christmas. I was so excited about giving her a card and pressie that I couldn't wait to photo the cards in the day. So the only pics I have were taken at night I am afraid.

I absolutely adore the Sweet Sayings Card and Envelopes that are currently part of the Valentines promotion (only available to January 27th). I thought the lovely printed card base would be perfect for my New Home idea. I used the beautiful pastel inspired Sale-A-Bration Sweet Sorbet Designer Series Papers to create the little banners (that I punched with the new Sale-A-Bration Banner Punch). I also punched 2 squares using my 1" square punch from the DSP to create the house (I cut one square in half to make the roof). I also used the Tree from the Merry Minis Punch Pack to make the little tree with the house.

To create the words across the banner I punched the small circle from the Itty Bitty Punch Pack using the Crisp Cantaloupe paper. I then stamped the whole of the Simply Serif Mini Alphabet set  (I have not cut the individual letters. I use the whole alphabet as a sheet to make it easier to stamp and cut) in Baked Brown Sugar ink. I then cut the letters I needed to spell 'New Home'.

So as you can see, it was a fairly easy card using some of my lovely new Sale-A-Bration goodies! 


Here is a second card I created at the same time for my Mum and Dad to give my sister. This uses a similar technique combined with the gorgeous 2013-2014 In Color Designer Series Paper Stack to create the little houses. The sentiment is from the Itty Bitty Banners stamp set.

Please get in touch if you'd like a copy of the Sale-A-Bration brochure or to find out more about joining my team or hosting a fun crafting party anytime during Sale-A-Bration. You can get in touch with me on poulton_sarah@yahoo.co.uk or 01983 609249. Always happy to chat Stampin' Up! and craftiness ;0)

Happy Crafting ;0)
-X-


Friday, 27 December 2013

Stampin' Up! UK Gift Packaging & Class Dates for 2014


Good morning crafty friends.

I hope you've had a lovely Christmas wherever you are or whoever you have been with. And I hope the weather hasn't wreaked too much havoc with you. We've had a lovely one here on the Isle of Wight visiting our families and spending time with one very excited Summer ;0)

I thought I would share a quick gift bag I created from a sheet of 12"x12" Designer Series Paper to wrap a gift for my lovely friend Hayley. I used a sheet of Cherry Cobbler patterned paper from the Season of Style DSP which I cut to create a 11"x12" base. I then used the principle of the 2,4,6,8 gift box/bag to create this tall gift bag (I have seen these bags used widely across the blogosphere). I scored at 2.5", 5", 7.5" and 10" along the 11" side (the remaining 1" becomes the fold around tag that you attach your sticky strip to). On the 12" side I scored at 2" and then cut along the score lines to the 2" mark to create the base flaps that you sticky strip and fold up to create a sturdy base (all four flaps layer on to each other to give a good strong base for your gift inside the bag).


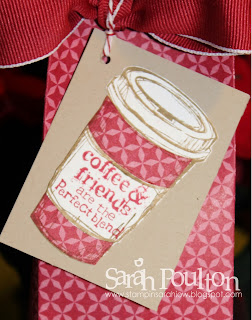
I punched holes through the top of the bag and secured with Cherry Cobbler Ribbon. I created this little gift tag using Crumb Cake Cardstock and I then paper pieced the coffee cup image from the Perfect Blend stamp set using the leftover scraps from the Cherry Cobbler DSP. I deliberately picked this image and the design of DSP to make the cup look like a festive Starbucks mug. Inside the gift bag I had included a bottle of Starbucks Gingerbread Syrup for festive coffees and treats. I was looking forward to treating Hayley to a Christmas coffee in our first Isle of Wight Starbucks. But it is now not due to open until the New Year. So our festive red cup treats will have to wait till next Christmas (hopefully the gingerbread will tide her over to 2014).

And while you are here today I wanted to announce my first two card class dates for 2014:

Saturday January 18th 1-4pm
Saturday February 15th 1-4pm

And I will also be hosting a new catalogue Open House on Saturday February 1st between 10.30 and 3pm. I will have samples of Sale-A-Bration and new cataogue products, as well as door prizes, on the day ordering incentives and a make and take project for all attendees. It would be lovely to see you then, so please pop along to pick up your copy of the new catalogue. Please drop me a line for more info and to let me know you might be popping along: poulton_sarah@yahoo.co.uk or 01983 609249.

And don't forget, for all those lovely crafty pennies you might have received for Christmas, my online store is open 24/7. You can visit my store here:


Or I am still placing orders so let me know if there is anything you'd like me to add to an order for you ;0)

Hope you've all had a good one and look forward to catching up with you all again soon. Pop back on Monday for a sneak peak look at some of the GORGEOUS new Sale-A-Bration products coming in January (and don't forget, these are products you will receive for free with a qualifying order from January 28th onwards!).

Happy Festive Crafting
-X-

Sunday, 22 December 2013

Stampin' Up! UK A Very Special Birthday

Happy Festive Sunday to you. Hope all your preparations are going well and you are all ready for the main event on Wednesday. I am about as ready as I will ever be. Just got the wrapping to do now.

I thought I would share a very special card I made this week for my good crafty friend and customer, Chris. She celebrated her 70th birthday on Friday and I wanted to create something super sparkly and special for her celebrations.


I had seen the multi colour embossing powder technique demonstrated on stage at Convention and decided to give it another dimension by using the beautiful Gold and Silver Glitters from the Autumn Winter catalogue (it gave it that super special extra something). To create this effect I stamped the whole Swallowtail image in Versamark on to Basic Black cardstock. I then poured Heat and Stick Powder onto the tips of the wings and the body. I quickly heated this and then covered with the silver and gold glitters. Once this element was completed, I quickly added the gold and silver embossing powders to the Versamark trying to create this striped effect. I think the key is to act quickly (while managing not to mix your powders and glitters!) so that the Versamark does not dry out. Overall, I was really pleased with result. I liked it better than the effect i was going for in my head (which rarely happens for me!).


To finish I Versamarked the 7 and 0 from the Memorable Moments stamp set (perfect for all Anniversaries and Birthdays) and used Heat and Stick with the Gold Glitter. I then carefully cut around the numbers and mounted with Dimensionals. I then stamped the Happy, 'th' and Birthday from the same stamp set using my Gold Metallic Encore ink pad.

I hope Chris had a lovely day and I look forward to catching up with her in the New Year to hear all about it.


Please get in touch if you have any questions or queries about Stampin' Up!, I'd be only too happy to help: poulton_sarah@yahoo.co.uk or 01983 609249. I have dates available in the New Year for fantastic Sale-A-Bration parties (lots of lovely extra freebies for hostesses as well as for customers) so drop me a line if you think you might be interested in finding out more.


Happy Festive Crafting ;0)
-X-

Thursday, 19 December 2013

Stampin' Up! UK Gold Glittery Joyful Christmas


Good morning all.

Today's crafty make is a card inspired by one I saw on the Convention inspiration boards, I just loved the Gold Stampin' Glitter, a product I had previously overlooked in the Autumn Winter catalogue. It is super sparkly (and so is my craft room and living room after the class).

I loved creating the layers for this card using Brushed Gold cardstock, Whisper White and Vellum. The Whisper White layer is stamped with Crumb Cake using the En Francais background stamp (a firm favourite in my household). The flowers from the Joyful Christmas stamp set were first stamped with Versamark (after thoroughly brushing the Vellum with my Embossing Buddy) and then covered with Heat and Stick Powder. I then blasted the powder with my heat tool and then poured the lovely sparkly glitter over the sticky outlines. I then gave a quick final blast to heat set the glitter. 

With a new seasonal catalogue just around the corner and Christmas less than a week away I might have to pack away my beloved Joyful Christmas stamp set. This must be one of my all time favourite stamp sets and I'm actually missing crafting with it already. But I am sure once I get my hands on the new seasonal products, festive crafting will be long forgotten ;0)

And look what just arrived through my post box. My beautiful cross stitched card from my partner in the Isle of Wight cross stitched card exchange. I shared my card here, U was delighted when this arrived. I loved that the cross stitch element can be detached and hung from the tree and kept as a keepsake (I love collecting Christmas tree decorations with a story and a bit of history).


And one last thing, look who is enjoying the festivities so far. Here is my (very grown up) little girl enjoying a day out at my grandparents house on the mainland. She definitely mastered the art of Christmas Crackers (and she is also a big fan of mince pie eating too- well the mincemeat at least!).


Please get in touch if you have any questions or queries about Stampin' Up!, I'd be only too happy to help: poulton_sarah@yahoo.co.uk or 01983 609249.

Happy Festive Crafting ;0)
-X-

Monday, 16 December 2013

Stampin' Up! UK Bow Die Angel Card


Good morning and a very Happy December 16th. Christmas is coming around so fast. I cannot believe its only next week now. I hope you had a lovely crafty weekend filled with lots of fun festive things.

This weekend I hosted my final card class for 2013. I had my regular ladies come along as well as welcoming a new face to my special Christmas-y class too. I designed 4 projects for us to make all with a special Christmas theme but would be fun to take away for last minute cards and gifts.

The photo above shows all the projects we made on Saturday but today I am going to focus on my favourite project of the afternoon in more detail, the Gift Bow Die Angel card.


I had seen lots of variations of this Angel on Pinterest and fell in love with the idea of using the Stampin' Up! Gift Bow Biqz L Die to create one of my own. The problem was I had already prepped the Christmas Cracker as our 3D item for the class. So I needed to find a way of making the Angel in to a card. The solution was to use the largest of the Ovals Framelits to create a window in a large card (one piece of A4 folded in half). I used a Very Vanilla cardstock base and then cut a slightly smaller (14.3cm x 20cm) piece of predominantly Cherry Cobbler coloured Season of Style DSP which I stuck to the front before sending through my Big Shot with the Oval Framelit sandwiched in the middle so it only cut through the front of the card).

To create the Angel herself I used: Brushed Gold Cardstock for the wings, Vellum Cardstock for the dress embossed with the Northern Flurry Embossing Folder. All of these elements were cut using the Stampin' Up! Gift Bow Bigz Die and positioned and stuck together to form the basic shape of the Angel. For her face I used a punched circle of Pink Pirouette Cardstock then created a halo using two circle punches and some beautiful sparkly Champagne Glimmer Paper. I finished by drawing eyelashes using a Black Stampin' Write marker and punching a small scallop circle from Glimmer Paper and fixing this to the body using an Antique Brad.

We then used some gold elastic from my stash to create a hanging loop which we attached inside the card using a small length of Season of Style Washi Tape. This allows the Angel to easily be removed to hang on the tree or use as a decoration around the home. I wanted the Angel to be a detachable part of the card so that she has multiple uses (not just as a card feature).

The final element was the greeting which was stamped from More Merry Messages stamp set and layered using the Apothecary Accents Framelits.

Please get in touch if there is any other info I can offer to assist in creating these lovely Angel decorations. I am only too happy to help. I have created links to my online store where you see the products highlighted above. You can link through to my store for further info on each of the products I have used or to purchase these directly for your own festive creations. And remember, today is the last day for guaranteed pre-Christmas delivery of all Stampin' Up! Products.

Any questions, you can contact me on: poulton_sarah@yahoo.co.uk or 01983 609249.

Thanks for stopping by today and happy festive crafting.
-X-

Friday, 13 December 2013

Stampin' Up! UK Cross Stitch Christmas Hybrid Card


Good morning all. Welcome to Friday and *hooray* its nearly the weekend.

I thought I would share a different card project today. This year I took part in a cross stitch card exchange with a group of local Isle of Wight crafters. We were all given a crafty partner to exchange with. I cross stitched a few card designs with an idea in my head of creating these hanging bauble windows. However, it all looked a bit too busy. So I downsized and created just the one bauble with this owl stitching design. I then redesigned the card to include stamping using the Ornament Keepsakes stamp set and my Gold Metallic Encore stamp pad. I finished with embellishments including Basic Rhinestones and Silver 1/8" Ribbon

The layers of the cards were created with Night of Navy and Brushed Gold card stock. 

Inside the card I created this little festive owl using the Builder Owl Punch and silver and red glimmer paper. I thought he added a nice extra layer of festive creativity ;0)

I really enjoyed the creative challenge of blending traditional cross stitch with Stampin' Up! and stamping. I love using the embellishments, stamps and punches to make a hybrid crafty card.


The card was posted yesterday and will be winging its way to my crafty partner as you read. Now to await my return card and see what crafty loveliness arrives through the door.


Please get in touch if you have any questions or queries about Stampin' Up! or My Digital Studio, I'd be only too happy to help: poulton_sarah@yahoo.co.uk or 01983 609249.

Happy Festive Crafting ;0)
-X-


Tuesday, 10 December 2013

Stampin' Up! UK Clearance Rack Updates


Evening crafty friends.

Well this is a lot later than planned again! I seem to be on an impossible blogging schedule at the moment.

Well lets start with the exciting news first. Stampin' Up! have updated the Clearance Rack for the Blitz event. Lots of fantastic new additions with up to 80% off the catalogue price. What a bargain. If you click on the Clearance Rack image above it'll link you straight through to my Online Store where you can see all the fantastic savings.

Now on to some craftiness.

I hosted my last team shoebox swap of the year last week. We had a fun evening packed with snacks and chat and just a bit of craftiness too.

I thought I would share one of our festive crafty makes with you today. Charlotte designed this lovely layered festive card. I photographed it against my December Journal as I used it as a journaling card in my album. I thought the colour scheme fitted perfectly with my album so far ;0)


This card uses the Season of Style Paper Stack paired with the Season of Style Washi Tape and the stamping is from the Occasions Alphabet stamp set.


Please get in touch if you have any questions or queries about Stampin' Up! or My Digital Studio, I'd be only too happy to help: poulton_sarah@yahoo.co.uk or 01983 609249.

Happy Festive Crafting ;0)
-X-


Sunday, 8 December 2013

Journal Your Christmas Week 1

Good evening all.

A bit of a late one from me today. And not entirely Stampin' Up! either. For those that have been regular followers of my blog you will know I take part in an annual scrapbooking class called Journal Your Christmas. Each day I get sent prompts to reflect on for the days journaling or photo taking. Normally I stick quick strictly to the prompts. But this year I have decided to make a guilt free, no pressure December journal without the frills and over the top embellishments. I am just going with the flow and enjoying the prompts for a creative kick start but doing my own thing with my pictures and pages.

This year I have simplified. I purchased an album kit which I had shipped over from the US complete with album, inserts, embellishments and divided page protectors. I decided that not every day in December will be entirely journal worthy so I'll make the most of the days I do have things to share and just capture the fun of the festivities. I wanted to keep my supplies very limited so I didn't get overwhelmed with pretty sparkly things. I have been beating myself up about the simplicity a bit. But actually I am enjoying the process and know i will love the result in years to come when I reflect back on it.

So here is the album cover. I couldn't resist a bit of extra sparkle in the form of some lovely gold sequin trim. To be seen in a Stampin' Up! catalogue near you very soon!


Each December diary starts with a Day 1 Manifesto. This year I didn't really write a manifesto just more of a reflection on what I hope to achieve through the creative process. I used My Digital Studio to create my opening 8"x8" mini scrapbook page. I loved the ease of using the digital design software to put this together and get such a professional result. I simply saved it to a SD card and printed it off an instant printing machine in Boots to include in my journal on the same day!


Page 1: A simple calendar intro to my journal ;0)


Day 1:

Quick and simple pages capturing a walk on the beach last weekend to welcome in December on an unseasonably warm December 1st. I love the happy pictures we captured of Summer enjoying running around picking up stones and chasing the tide.


 Day 2:

Capturing my handmade Advent Calendar (hopefully I can add to this year on year to show my calendars development).


 Simple page to include the years postage stamps. It is a bit of a tradition now to pop along to the Post Office to buy some single stamps to include in my journal. I also included a handmade card between these two pages to journal about my week as I didn't have too many photos to share. The second page captures Summer enjoying a trip to Mothercare (her own personal playground it seems).


Day 7:

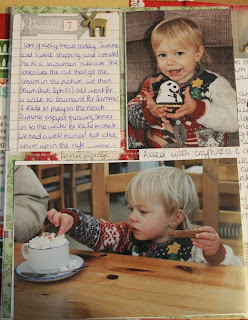
Festive treats and another walk on the beach.

I love the simplicity of the divided page protectors and how easily I can put my very simple pages together. Summer doesn't allow me much free time for scrapbooking on a daily basis so its lovely still being able to produce my pages in a time efficient way.


 Thank you for popping by today and visiting Stampin' Sarah. Normal Stampin' Up! service will resume tomorrow ;0)

Please get in touch if you have any questions or queries about Stampin' Up! or My Digital Studio, I'd be only too happy to help: poulton_sarah@yahoo.co.uk or 01983 609249.

Happy Festive Crafting ;0)
-X-

Friday, 6 December 2013

Stampin' Up! UK Mini Christmas Table Favour Treat Bag Tutorial


Good morning crafters. How is your December going so far? I am up super early this morning for a little bit of a crafty catch up. I have a weeks worth of December scrapbooking to catch up on and a small window of opportunity before Summer wakes up for the day.

I thought I would share this little table favour treat bag today. I created this project for my November Hostess Club get together. I run a regular monthly crafty get together for all the ladies who have a place in my Hostess Club. We create a small crafty project as well as chat over a cuppa and cake. 

I love the simplicity of this little 2"x2" favour bag created from a 6" square piece of Designer Series Paper (I used the Season of Style DSP from Stampin' Up!). This is the bag laid flat to show you the basic template (and show you how I have scored and folded the two edge pieces).


Here are the measurements for scoring the 6" square. It needs to be scored at 2" and 4" along both sides. You can then remove the 4 corner pieces. You then need to measure and mark 1" (the centre) on two opposite sides (these will form the triangle folded sides of your bag). 


 You can then score from the 1" mark to the opposite corner (I have marked in pen on the template below where to score if you look closely. It was very difficult to make the pen show against the patterned papers). The picture above shows on the left hand side the result you are looking to achieve with your scoring. Both sides of the bag will form this triangular shape.

To create the method for closing the bag you will need to punch 4 small holes (two on each opposite piece). You need to punch the holes in the two squares which haven't been scored. You can then fold the bag up and thread fine ribbon or bakers twine through the holes and tie shut. You can then decorate to fit your occasion (I have used the Stampin' Up! Wishing You stamp set for mine paired with my scallop circle and circle punches).


So that's really it. A 6" square scored at 2" and 4" on either side. Remove the 4 corners. Score two opposite sides from the 1" mark on the outside edge to the inner corner to create a triangle. Punch holes in the two remaining squares to form your closure. Fold up in to shape and decorate.

And just before I disappear for my scrapbooky catch up I thought I would share this amazing swap I received at Convention. Over upcoming posts I am going to share a few of the amazing creations I received from fellow Demonstrators. This just stood out for me as I love the Fishin' Around stamp. I have never been brave enough to try this hair gel pocket technique. But I just love the overall effect. This was made by a lovely German Demonstrator called Angela.


Thanks for popping by today. Please say hello and leave a comment. I have set myself a target to find new blogs to read throughout December, so leave me a comment and I'd love to stop by and say hello.

And if you'd like to find out more about any of the Stampin' Up! products used for today's creations please drop me a line on poulton_sarah@yahoo.co.uk or 01983 609249. Or alternatively pop by my online store which you can find here:


Happy Crafting ;0)
-X-

Tuesday, 3 December 2013

Stampin' Up! UK Envelope Punch Board Christmas Creations


Hello and welcome to another Christmas crafty day here at Stampin' Sarah ;0)

I thought I would welcome you with a picture of the 2, 3 and 4 tins from Summer's handmade Advent Calendar. She is loving discovering her chocolates each day. And the lucky little thing also has a whole other calendar with treats at Nana's (as well as a Christmas tree decorated in Love Hearts! I notice the sweetie treats are being moved further and further up the tree each time I visit. Clearly Summer is becoming more inventive in the ways she tries to get at the treats!).

Today''s crafty makes are from a party I planned for the weekend just gone for my lovely friend Wendy. Would you believe I got struck down with a nasty 24 hour bug on Thursday and wasn't able to Demo for the ladies?! But I sent the projects round for them to create themselves (which I am very thankful for as I didn't like having to let them down at late notice!) and from what I hear they did a stirling job of creating these Punch Board creations.


Both the tag and cracker are created using the fabulous Envelope Punch Board. I found this brilliant video on Youtube that gave lots of fabulous ideas on making tags with the Board. My ladies at parties have all been impressed that all parts of the tag can be made with the Punch Board alone. 

Here is the tag and little holder to keep it in:


The tag was stamped using the Joyful Christmas stamp set and embellished with the Frosted Finishes Embellishments.

Here is a close up of the cracker. This again was a Youtube video tutorial that inspired this make. I had seen so many of these Punch Board crackers at Convention and wanted to have a go. They really are incredibly simple to make and come together so quickly.  


For more information on my favourite Stampin' Up! tool, the Envelope Punch Board, click on the picture below to be linked to my online store to read all about this incredible little board of creativity.


Thanks for popping by today. Please say hello and leave a comment. I have set myself a target to find new blogs to read throughout December, so leave me a comment and I'd love to stop by and say hello.

And if you'd like to find out more about any of the Stampin' Up! products used for today's creations please drop me a line on poulton_sarah@yahoo.co.uk or 01983 609249. Or alternatively pop by my online store which you can find here:


Happy Crafting ;0)
-X-

Monday, 2 December 2013

Stampin' Up! UK A Whole Lot Of Love Promotion


Hello to a new festive week here at Stampin' Sarah HQ.

I thought I would pop online and share the latest promotion from Stampin' Up! with you. This one is all about Love, A Whole Lot Of Love in fact.

The Annual Catalogue is a little bit light on Valentines stamps this year. And that was a deliberate move from Stampin' Up! so they could launch this special range of stamps and accessories for a limited time only (products available until January 27th).

We were shown a lot of these exclusive products at Convention. My absolute favourite of all of them is the little Monster Hugs treat boxes. They come in both boys and girls and would make perfect little Valentines treats for school friends of youngsters. I am investing in both sets to tuck away for Summer when she is a bit older.

Have a look at the flyers below for more information on the lovely products available including stamps, treat bags & notecard sets


Thanks for popping by today. Please say hello and leave a comment. I have set myself a target to find new blogs to read throughout December with some creative makings, so leave me a comment and I'd love to stop by and say hello.

And if you'd like to find out more about any of the Stampin' Up! products used for today's creation please drop me a line on poulton_sarah@yahoo.co.uk or 01983 609249. Or alternatively pop by my online store which you can find here:


Happy Crafting ;0)
-X-

Sunday, 1 December 2013

Stampin' Up! UK Favour Tin Advent Calendar

Happy December 1st to all my lovely blog readers and followers!

Let the festivities begin. I love December 1st as it symbolizes the official beginning of my Christmas celebrations. I have refused to watch Christmas films or click on the Christmas CDs. But from today, it is all fair game. And I should probably warn you (and my neighbours!) I did find the Muppet Christmas Carol soundtrack on offer in Tesco yesterday. That will be my festivity music of choice for the foreseeable future I am sure.

So with December 1st brings lots of traditions including my annual Christmas scrapbook album which I complete with prompts and ideas from Shimelle's Journal Your Christmas class. This years album is suffering a slight delay due to a customs hold up. I purchased a lovely kit of bits from the US but it has yet to arrive so I'll probably have a mad catch up once everything arrives (I realise a kit is sort of cheating but with my time constraints with Summer and Bump, I tend to prefer stash restricted crafting for this annual project. It means I don't spend 3 hours deliberating over papers or embellishments and just get on and make something every day).

Anyways, enough of my chatter. I was talking about traditions and the date. Here is a new creation, and something I intend to make in to a new family tradition, my favour tin Advent Calendar. I have seen so many lovely examples of these on Pinterest and purchased all the tins in time for last Christmas. But I never actually had the time to sit down and create the bones of the calendar itself.

So yesterday, with a little help from my Mum, I actually set about creating:


 The calendar itself is made from a baking tray, some fancy Designer Series Paper (the spotty design is from Stampin' Up!'s Season of Style DSP) and 24 wedding favour tins (I found mine on Ebay). I punched circles in Gumball Green, Cherry Cobbler and Crumb Cake and layered these with slightly smaller circles punched from the Season of Style DSP. I then used glittery Mod Podge to seal these circles into the inside of the tin lids (which have a pre cut and fitted thick acetate window lid).

I then stamped all 24 images from the sadly now retired 25 and Counting stamp set and punched with my square punch to layer on to the top of each tin. Now, while the stamp set itself may be retired, it is still very much available to use within My Digital Studio. Another of the great perks of using our MDS software, stamp sets never retire! You can find more info on purchasing these images through MDS here. To finish I glue gunned magnets to the back of each tin to ensure the tins stay put against the baking tray.

 Here is today's tin filled with a little chocolate-y treat for Summer:


And here is the little girl herself (complete with fancy Christmas jumper) finding her way in to today's tin:


A closer look at some of the stamped number images:


I had such fun creating this project and I am glad I made the time to create my calendar in time for December 1st. I have plans to add details to this calendar year on year to make it a living activity as Summer grows. I have plans for added embellishments and Christmas activity inserts as well as sparkle and glitter. Hopefully along the way Summer will be interested in joining in and adding her own little touches too. 

So I say again, Happy December 1st to you all and I hope you liked today's creative share. I look forward to being able to share the calendars evolution year on year ;0)

Thanks for popping by today. Please say hello and leave a comment. I have set myself a target to find new blogs to read throughout December with some creative makings, so leave me a comment and I'd love to stop by and say hello.

And if you'd like to find out more about any of the Stampin' Up! products used for today's creation please drop me a line on poulton_sarah@yahoo.co.uk or 01983 609249. Or alternatively pop by my online store which you can find here:


Happy Crafting ;0)
-X-