Showing posts with label banner punch. Show all posts

Tuesday, 15 March 2016

A Happy Birthday Punch Art Mouse Card from Stampin' Up! UK Demonstrator Sarah Poulton

Good morning and a very Happy Tuesday to you. I am a bit later posting this week due to a crazy start to Monday. I was out super early walking yesterday getting in a bit of training for my Walk In Her Shoes challenge next week. Click on the link to find out more (or to sponsor me)- I'll be walking 10,000 steps every day for a week in solidarity with women and girls from the poorest countries around the world, who spend their days walking for water.  Yesterday I over did it a bit. I did 10 miles (and I forgot to wear my pedometer!). I am very achey today.

But back to crafting. Today I have a card I made with my Mum for her to give Sylvie for her birthday. I don't often sit down to play with my punches to create punch art. I really enjoyed creating this little mouse.

I used colours from the Subtles colour family for this card. I started with the stamped flowers in the background from the free Sale-A-Bration Botanicals For You stamp set. I used Wisteria Wonder, Blushing Bride and Pool Party for the stamping.

For the house I used a range of circle punches to create the ears and body.


I used the Word Window punch for the arms and legs. I added the banner punched using scraps of floral DSP. I used my Rotary Alphabet stamp to create the 'Happy' and the Birthday is taken from Endless Birthday Wishes stamp set. The mouse's face was created using elements from the Playful Pals Photopolymer Stamp Set.


Thank you for popping by today. Please let me know if you have any questions about Stampin' Up!, Sale-A-Bration or any of our new products. I would love to help. All items can be purchased online via my shop or get in touch directly and I can order them for you to be delivered direct to your door. I'd also love to Demo for you and your friends at a crafty party. As the hostess you earn lots of lovely freebies and you all get to make a fun crafty project too (no crafting experience necessary!).

-XXX-

Product List

Monday, 31 March 2014

Mothers Day Sunflower Celebration


Hello all and a very happy Monday to you all. I'm posting a lot later than originally planned today but my life seems to be a whirlwind of medical appointments at the moment and I haven't had a second to post all day. I hope you all had a lovely weekend and to all the Mums and Nanas, I hope you had a very relaxing Mothering Sunday.

Today I wanted to share with you the card I made for my sister to give my Mum for Mothers Day. I had seen variations of this Banner Punch flower all over Pinterest and wanted to give it a go and create a Designer  Series Paper sunflower. I looked through my stacks of different Designer Series Papers and settled on these lovely Daffodil Delight coloured papers from the Quatrefancy Speciality Designer Papers. I simply punched a big pile of Banners using the fabulous Sale-A-Bration freebie punch using two different Daffodil Delight designs. I layered the Banners up and attached them to a punched circle (punched from the Natural Composition Speciality Designer Papers).


I finished with a flower cut from the Natural Composition papers and layered with a Bright Designer Button.  The leaves were created by punching a Pansy in green patterned paper and cutting the flower to form leaf shapes. 

The 'Happy Mother's Day' sentiment was stamped using the Teeny Tiny Sentiments and punched with the Word Window Punch. I attached the sentiment to my Daffodil Delight 1/4" Stitched Grosgrain Ribbon bow using a tiny length of Bakers Twine.

I hope you enjoyed my crafty share today. I really enjoyed creating this punch sunflower and even more making it for my sister to give our Mum ;0)


The Banner Punch will be returning in the 2014-2014 Annual Catalogue. But today is your last chance to receive it for free as part of Sale-A-Bration. Simply visit my online store today by clicking here and spend £45 before 10pm tonight and you can choose the Banner Punch (or one of our other Sale-A-Bration exclusives) for free. 

If you have any questions or queries about my crafty project today or about placing a Stampin' Up! order please get in touch on poulton_sarah@yahoo.co.uk or 01983 609249.

Happy Crafting
-X-


Friday, 28 February 2014

All that glitters is.... Gold!


Wow! Who knew gold tones would be so difficult to photograph! This card was a real labour of love to get a picture of. I love how it turned out though. This is another version of the washi tape card I shared on Wednesday. I used an old star punch in my stash to create the windows through to the fabulous Watercolor Wonder Washi Tape.

All demonstrators who attended Convention last year received this fantastic gold patterned washi tape and matching Sequin Trim as part of an all attendee giveaway. I've absolutely loved creating with the gold patterns. For this card I used Whisper White for the base card and layered with a little Brushed Gold cardstock to highlight the gold theme. 

I stamped the sentiment from the Sketched Birthday stamp set using my Metallic Gold Encore ink pad (I hand cut and then layered with a scrap of Brushed Gold card which I then hand cut to form another gold accent). The final touch was the So Saffron button from my Subtles Designer Buttons pot which I tied with lovely Gold Bakers Twine from the Spring Summer Catalogue.

And as a crafty bonus I thought I would share a lovely thank you note I received from a Sale-A-Bration hostess over the weekend.  It really made me smile getting a fab handmade note in the post.

The outside of the card had the 'pssst' from Happy Watercolour stamped on it.


This was what was awaiting inside the card. A fantastic pop up banner using the Banner punch which is yours for free with a qualifying £45 order during Sale-A-Bration (which runs to the end of March so get your order in asap so you don't miss out!). I love everything about this card and just had to share with you all!


If you'd like to find out more about Sale-A-Bration, please pop by my 'Promotions' tab at the top or drop me a line on poulton_sarah@yahoo.co.uk or 01983 609249. Sale-A-Bration is the best time of the year for ordering Stampin' Up! products. Who doesn't love a good freebie? 


Happy Crafting

-X-

Tuesday, 18 February 2014

Vivid Vases Paper Piecing

Good morning and I hope your crafty week is going well so far. I am completely cream crackered after a busy weekend with my card class and family fun. Sam treated me to a lovely evening out for Valentines over in the West Wight at one of my new favourite places, The Freshwater Bay House. We had an absolutely lovely 3 course meal and a fun night out to boot.

 I have since been chilling with some cross stitch and lots of cups of tea to recover (my belly is now of such huge proportions that moving from the sofa is proving more challenging each day!). I haven't cross stitched in a long time so I am finding it very therapeutic. I am working on a blanket for my new little arrival (3 weeks today and counting!!). I'll try to get pictures to share in my next post.


Back to craftiness, today I wanted to share two of the projects we made at this month's card class. I absolutely love the Vivid Vases single stamp in the Spring Summer and had seen this fabulous card by Maria Theresa. I decided to give this a go for my class and teach how to use the fantastic Stamp-A-Ma-Jig for stamp positioning. As you can see from our version of the card we used just the Vases image from the stamp and repeated the stamped image (using Stazon Black ink) in rows, being sure to line up the images carefully with the Stamp A Ma Jig. The colours are taken from the Fresh Prints Designer Series Paper Stack (Real Red and Coastal Cabana).


We used the Fresh Prints papers to paper piece the vases together (stamping the image directly on to patterned papers and cutting the vases from the patterns and attaching to our stamped base). We then coloured with ink directly from the ink pad using blender pens to give detail to the flowers. The frame was cut using the fab On Film Framelits Dies. The little banner was stamped and punched using the brilliant Banner Blast and Punch from our current Sale-A-Bration promotion (choose one item for free with a purchase of £45).


Now, you may, like me, love a stamp but have less use for the attached sentiment. Just as a quick tip I will show you how I have mounted the Vivid Vases single stamp to show that you can separate the image from the sentiment. When it came to mount the rubber I simply snipped off the 'You're A Whole Lot of Wonderful' and mounted on the end of the wooden block. I then mounted the main image as usual. I also snipped the sentiment from the mounting sticker and mounted this at the opposite end of the wooden block. A quick and easy way to give you more uses from your stamps.

At Saturday's class we also created a matching Sweet Dispenser using Real Red, Coastal Cabana and the Fresh Prints Designer Series Paper Stack.


Here is the matching set together.


Thank you so much for popping by today and sharing in my crafty creations. Please get in touch directly if you have any questions about Stampin' Up!, placing an order, joining my team or hosting a party: poulton_sarah@yahoo.co.uk or 01983 609249. 

I am taking a short break from my classes till April to celebrate my new arrival next month (and recover from my Op). But if you'd like to find out more about joining a card class I will happily let you know when I have a date booked in for Easter craftiness. Just get in touch and let me know your contact details and I'll be in touch once a date is in the diary.

Happy Crafting 
-X-

Tuesday, 28 January 2014

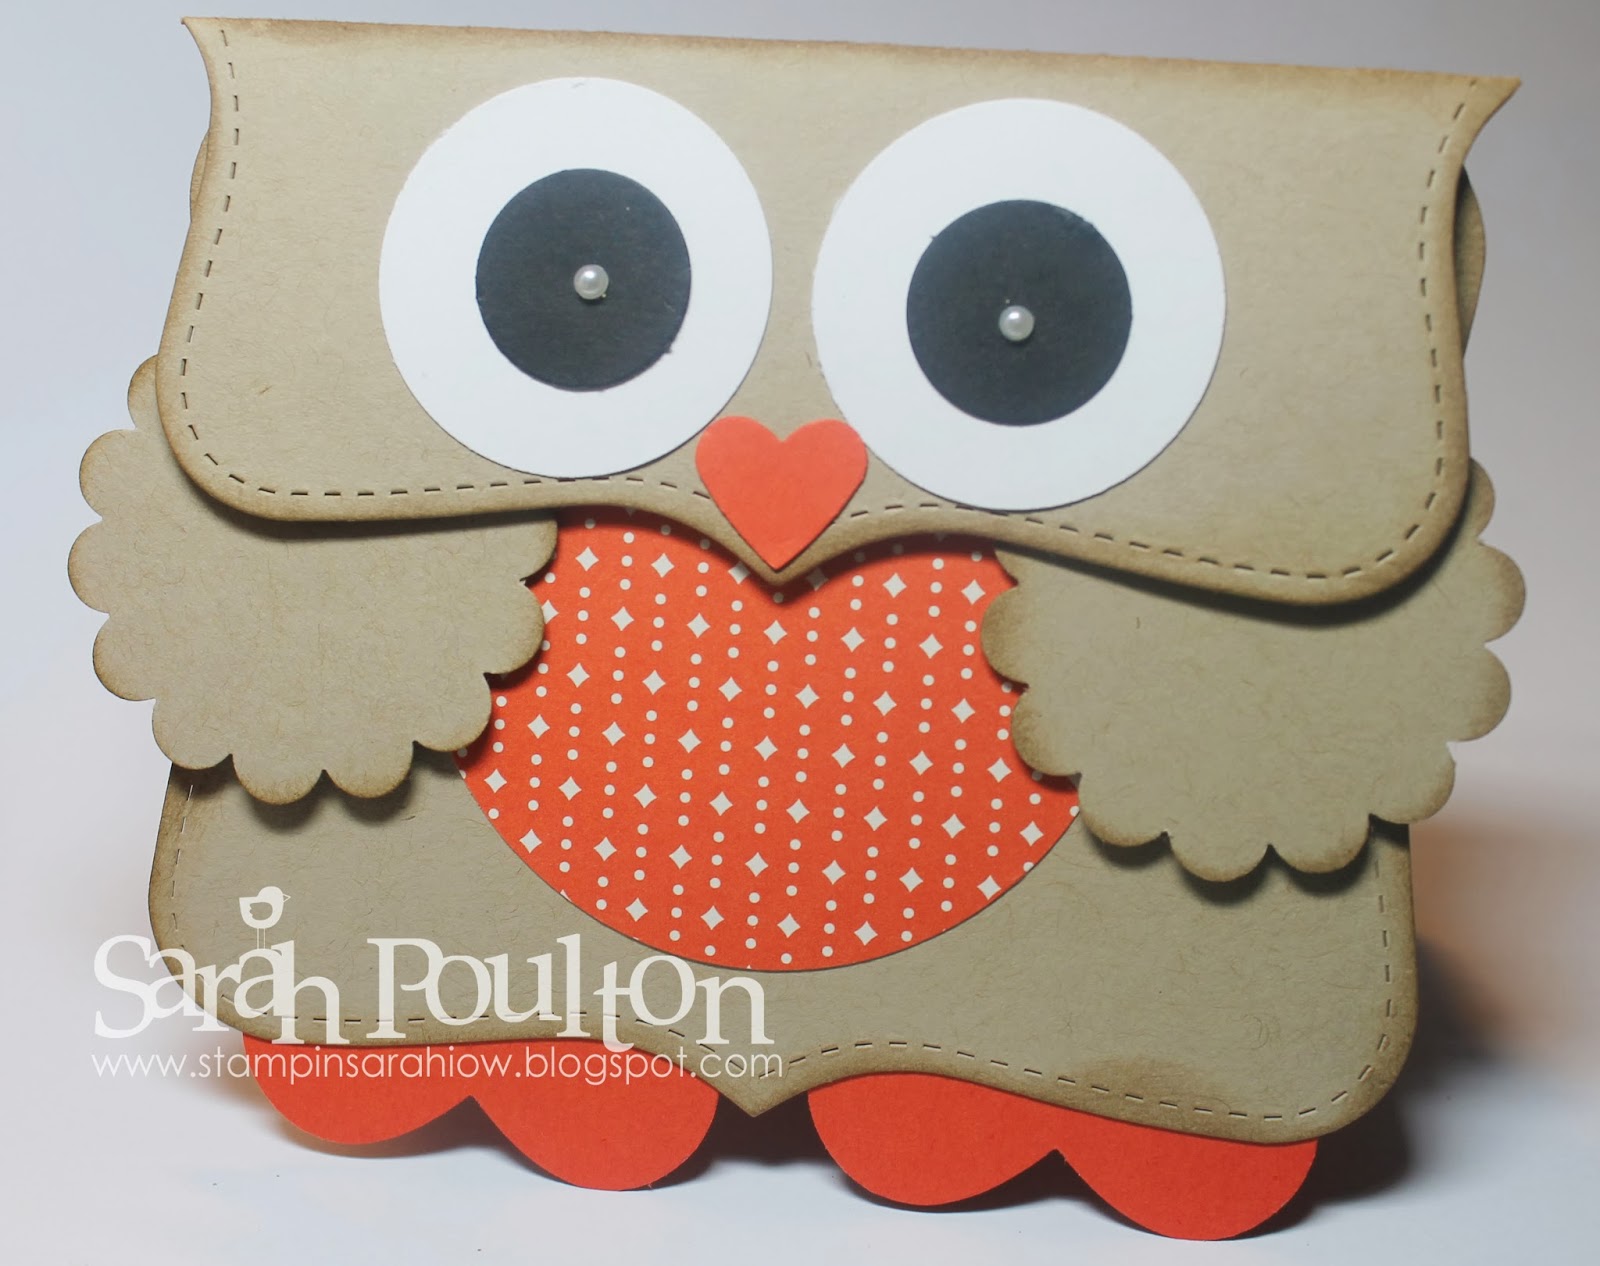
Top Note Owl Card Tutorial


To celebrate today's launch of Sale-A-Bration and the new Spring Summer catalogue I am sharing the instructions to create the little Top Note Owl I posted on Saturday for the Pinkies Blog Hop.

I had seen a few variations of this lovely little owl on Pinterest (this one is my favourite by Bronwyn Eastley) and on blogs so I decided to give him a go myself. By looking at various pictures I was able to break down the component parts. Sorry for the low-tech instructions, I haven't quite worked out how to do this next part using technology. But I thought my handwritten instructions might give you the idea. These are all the component parts you will need to create your owl.


For Saturday's gift bag I used 2 1/2" Circle punched from Sweet Sorbet DSP (free with a qualifying Sale-A-Bration order) with matching Crisp Cantaloupe Full Hearts for the feet. Today's card above uses the gorgeous Retro Fresh Designer Series Paper with Tangerine Tango punched Full Hearts. You can change the colour scheme and DSP to fit your occasion. 

I inked the edges of all Crumb Cake elements of the owl using Crumb Cake ink and a sponge dauber to give a bit of definition.

I then glued the elements together as below. The scored Top Note becomes the hinge to hold the card together. In the example above I used Dimensionals to secure the Top Note closed before I attached the face components. For Saturday's gift bag version I created one of these mini gift bags using the Envelope Punch Board (I had to slightly squish the gift bag to fit the inside of the Owl-  I gently folded the edges inwards to give an inward V. See Saturday's post for reference). I then secured the Owl face hinge using a velcro dot to keep the bag closed.


Once you have assembled your component parts as above you can then either form in to a gift box, bag or card and then finalise with the eyes and small heart for the beak. To create the little whites of the eyes i have used a medium sizes Basic Pearl.

You will then have the main body of your Owl and you are free to embellish as fitting for your occasion. I have kept the card above plain and will embellish when I need the card. However, my example of Saturday I added a Valentines 'I Love U' banner using the fabulous Sale-A-Bration Banner Blast stamp set and matching Banner punch.


I hope that has made this project a little simpler for you to recreate. Please leave me a comment or drop me a line on poulton_sarah@yahoo.co.uk if you have any questions. I'd be only too happy to help.

Happy Owl-y Crafting
-X-

Tuesday, 7 January 2014

Stampin' Up! UK Banner Blast Sneak Peak


Good morning all. I hope the weather hasn't been too bad where you are. So much flooding and wind here on the Isle of Wight. Still, I would rather this than a cold snap and it all turning to ice. I'm happy to batton down the hatches and watch Christmas TV I recorded and Sherlock on repeat.

I must begin with another apology for the poor lighting for today;s photos. I really must invest in a daylight lamp and pop up tent for picture taking. I am not doing the beautiful Stampin' Up! papers justice with these oddly coloured photos.

For Christmas I made my Mum a covered diary with photos and I also made them as Downline and Hostess Club gifts. Yesterday, I finally got around to covering my 2014 diary. I was carrying around far too many dates in my head and I am pretty sure a few have dropped out of my head before I had a chance to write them down. So enough was enough, I managed to get Summer in to bed early and spent an hour creating with lovely new papers and Sale-A-Bration & new catalogue sneaky peaks.


I covered my diary with a sheet of lovely papers from the new Spring Summer catalogue (please email me if you'd like a hardcopy sent to you : poulton_sarah@yahoo.co.uk. I cannot even begin to describe all the loveliness contained within the pages!), the Retro Fresh Designer Series Paper set. I love the combination of colours in these papers: Baked Brown Sugar, Coastal Cabana, So Saffron,Tangerine Tango and Very Vanilla.

I then created the banner with Crisp Cantaloupe Twine from the fab Sweet Sorbet Sale-A-Bration Accessory Pack and the Sale-A-Bration Banner Punch (the patterned papers are again, Retro Fresh, with Champage Glimmer Paper accents). I used number stickers from my stash for the date. I used glue dots and candy dots to stick the twine in the shape of the banner. 


I created this little accent with a strip of Coastal Cabana 3/8" Ruffle Stretch Trim and a stamped 'Love' banner from the Banner Blast Sale-A-Bration stamp set. The floral embellishments on the photo corner are from the Sweet Sorbet Accessory Kit (I love these printed adhesive-backed cork embellishments).


The strip of Washi Tape you can see in the main picture was placed to hide the join in the plastic cover. I bought the covers to fit my Mum's diary and had 1 left which I had to customise to fit my slightly larger diary. 

If you'd like to find out more about Sale-A-Bration or the new Spring Summer catalogue, please drop me a line on poulton_sarah@yahoo.co.uk. I'd be more than happy to pop a hardcopy of the catalogues in the post to you for you to peruse at your leisure.  And if you'd like to book a party and fill a date in my new diary, I'll happily find a space for you, email or give me a call on 01983 609249.

Happy Crafting
-x-

Monday, 30 December 2013

Stampin' Up! UK Sale-A-Bration Sneak Peak


With the New Year nearly upon us that can only mean one thing (aside from my birthday celebrations on the 1st that is!) Sale-A-Bration is nearly here. 

For those new to Stampin' Up! this is my absolute favourite time of the Stampin' Up! year. From January 28th through to 31st March for every £45 spent you can choose a Sale-A-Bration freebie from the exclusive Sale-A-Bration mini catalogue (drop me a line on poulton_sarah@yahoo.co.uk if you'd like a copy in advance of the promotion beginning. My delivery of brochures is due today!). There are also lovely extras for anyone choosing to join my team during Sale-A-Bration or hosting a party (£25 in extra hostess freebies!).

A lovely benefit of being a Stampin' Up! Demonstrator is that we can preorder new products before their official release date (we are all counting down the days to January 3rd when we can preorder from the new Spring Summer catalogue- lots and lots of lovely new things!). I have used some gorgeous new Sale-A-Bration sneak peak products to make the New Home card above.

I must apologise for the darkness of the photo. My sister and her other half bought her first home recently and got her keys just before Christmas. I was so excited about giving her a card and pressie that I couldn't wait to photo the cards in the day. So the only pics I have were taken at night I am afraid.

I absolutely adore the Sweet Sayings Card and Envelopes that are currently part of the Valentines promotion (only available to January 27th). I thought the lovely printed card base would be perfect for my New Home idea. I used the beautiful pastel inspired Sale-A-Bration Sweet Sorbet Designer Series Papers to create the little banners (that I punched with the new Sale-A-Bration Banner Punch). I also punched 2 squares using my 1" square punch from the DSP to create the house (I cut one square in half to make the roof). I also used the Tree from the Merry Minis Punch Pack to make the little tree with the house.

To create the words across the banner I punched the small circle from the Itty Bitty Punch Pack using the Crisp Cantaloupe paper. I then stamped the whole of the Simply Serif Mini Alphabet set  (I have not cut the individual letters. I use the whole alphabet as a sheet to make it easier to stamp and cut) in Baked Brown Sugar ink. I then cut the letters I needed to spell 'New Home'.

So as you can see, it was a fairly easy card using some of my lovely new Sale-A-Bration goodies! 


Here is a second card I created at the same time for my Mum and Dad to give my sister. This uses a similar technique combined with the gorgeous 2013-2014 In Color Designer Series Paper Stack to create the little houses. The sentiment is from the Itty Bitty Banners stamp set.

Please get in touch if you'd like a copy of the Sale-A-Bration brochure or to find out more about joining my team or hosting a fun crafting party anytime during Sale-A-Bration. You can get in touch with me on poulton_sarah@yahoo.co.uk or 01983 609249. Always happy to chat Stampin' Up! and craftiness ;0)

Happy Crafting ;0)
-X-