Monday, 30 September 2013

A Love-ly watercolour card


Good afternoon and a big welcome. Hope you all had a lovely (crafty!) weekend.

I thought I would post a quick crafty share this afternoon. This project was designed by my lovely downline Hayley for our team shoebox swap last week.

I love this trend for watercoloured backgrounds and was intrigued to know how she'd created this one. It had a lovely metallic sheen that the photos don't quite capture. Anyways, she introduced us to a new (sadly non SU) product called, Gelatos. These are watercolour crayons that give this fab blended background. They work perfectly with our beautiful Stampin' Up! colours and cardstock.

So we blended the Metallic Gelatos and then created matching embellishments using the Expressions Thinlits and the Bitty Butterfly Punch (I love this punched peek a boo feature of the card!). The Bermuda Bay background layer was embossed with the Pretty Print Textured Impressions Embossing Folder. To finish we tied a button with Linen Thread and glue dotted within the middle of the buttefly.

A really lovely new technique (although I'm sure this'll get expensive when I have to buy the whole collection of Gelatos!! *lol*) and a beautiful card too.

If you have any questions, please get in touch on poulton_sarah@yahoo.co.uk or 01983 609249. Or to browse my online store please click below and click the 'shop' button in the top right corner.


Pop back tomorrow for the hostess code for October and news on Stampin' Up! promotions for the month too.

-XXX-


Saturday, 28 September 2013

An Owl-y tissue holder make


Good morning and welcome to a bit of Isle of Wight rainy weekend craftiness here at Stampin' Sarah.

One of my regular card class ladies asked me to design a tissue holder box for our last class. So I set about having a look online for a suitable tutorial to modify to fit my tissue packets. I found this brilliant tutorial by Stephanie Stroud. It was exactly what I was looking for.

I used the basic template outlined in the tutorial (be aware if you are using this template using UK A4 cardstock one of your side tabs will be slightly smaller due to the width of the cardstock. This did not pose a problem for putting the box together. I adhered with red sticky strip and tucked the smaller tab inside. If you follow the tutorial, you will see what I mean. Please get in touch on poulton_sarah@yahoo.co.uk if you need any further guidance as to how I created this for UK measurements).

I then modified the design for my tissue packet. I didn't need the oval for the tissues to be removed as I just wanted a pull open bit at the top to remove the whole pack (see photo above). I then decorated my box with papers from the Season of Style DSP pack and created a little embellishment using my much loved Owl Builder Punch. I punched his chest in matching DSP to give him a festive feel. The greeting is from the More Merry Messages stamp set on the Autumn Winter Carryover List. Please see below for more information on these carry over sets from last years festive offerings.


The carryover list features a number of festive stamp sets that featured in last years Autumn Winter catalogue. These sets aren't pictured in any of our current catalogues. But are all products still available now for your festive creating.


If you would like to order any of these products you can do so direct through my online store below:


And just a quick reminder about the fab new Clearance Rack also available through my Online Store. Great products at even better prices. 

And for this weekend only use hostess code UXKXTMPU when you create your order for an extra little crafty freebie from me. Use the online shop link above and then click on 'shop' in the top right corner

Thank you for stopping by today. Hope you are having a lovely weekend whatever you are up to.

Happy Crafting
-X-

Tuesday, 24 September 2013

Stampin' Up! Clearance Rack is live


Good morning! Hope you've had a lovely weekend. It has been a super busy crafty one here on the Isle of Wight. I hosted my monthly card class, attended my lovely downline Lorraine's card class, made a mug for my sisters birthday at a local pottery, had my monthly scrapbook class and tonight I'll finish my crafty run with a team shoebox swap get together. I'll need a good long sleep to recover I think!

I have some exciting news to share with you today, the Stampin' Up! Clearance Rack is now live. 

If you visit my online store you will find lots of lovely items that are discontinued and discounted. They are available only through the Clearance Rack until stocks run out. This is a brilliant opportunity to get your hands on discounted crafty stash.


For an extra chance to win freebies, add the Hostess Code below to your order through my online store and at the end of the month I will be totaling the month's freebies and offering them to one lucky winner. 

QN7Y7WBX

Thank you for popping by today. I'll be back later today with some crafty makes from this weekend.

Please get in touch with any questions or queries: poulton_sarah@yahoo.co.uk or 01983 609249.

-X-

Thursday, 19 September 2013

An exciting announcement


So if you've been wondering why things have been a little quiet on the crafty front recently, here is the answer. I am expecting another little Poulton-Williams. I am currently just over 14 weeks so things are getting a little easier now and I'm not feeling as green all the time.  But trying to find time to craft during the first 3 months while balancing a 16 month old, nausea and exhaustion proved somewhat challenging.

But as you can see, expecting another little one is a perfect excuse to have another go with MDS (My Digital Studio). I never need much excuse to scrapbook and I found this template within MDS that was perfect for our 12 week scan photos. This is exactly why I love the software so much, it holds premade templates within it which you can insert your photos in to if you are pressed for time. Or you can create from scratch if you have a bit more time.

You can find out all about My Digital Studio and purchase the software to download through my online store. Click here for a direct link. It really is a bargain at £13.95 (or download the trial version free for 30 days!).

Please get in touch with any questions or queries about MDS or Stampin' Up! I'll try my best to answer (or find the answer for you). You can contact me on poulton_sarah@yahoo.co.uk or 01983 609249. 

And please bear with me if things are a little hectic here. Pregnancy is definitely a different experience second time around with a little one on the loose to chase about the place.

-X-

Tuesday, 17 September 2013

Christmas single stamps are here.......


Fab news from Stampin' Up! today. A limited time range of Christmas stamps are available exclusively until 31st January 2014. I love all of these stamps and will be placing my order asap. I cannot wait to create some beautiful 3D star cards with that lovely star image.

Please get in touch on poulton_sarah@yahoo.co.uk or 01983 609249 to place your order. Or alternatively visit my online store to place your order direct.


Just a quick reminder that if there are any crafty essentials or must-haves that you'd like to get your hands on, you can now shop online 24/7. All items ordered will be shipped directly to you and you can even earn hostess freebies if you spend £150+ (who doesn't love freebies?!) And I'll also be posting a little extra something to all people ordering through my Online Shop throughout September. 

For an extra chance to win freebies, add the Hostess Code below to your order and at the end of the month I will be totaling the month's freebies and offering them to one lucky winner. 

QN7Y7WBX

Thanks for popping by today and pop back on Thursday for an exciting announcement and a little MDS craftiness too ;0)

-X-

Saturday, 14 September 2013

Welcome to a little Autumn Winter inspiration from the Isle of Wight


Pinkies Stampin' Up! Autumn Winter Catalogue Blog Hop

Thank you for joining us on another Pinkies Blog Hop! We're showcasing lots of gorgeous projects using products from the new Stampin' Up!® Autumn/Winter Seasonal Catalogue. Simply use the buttons at the end of each post to keep hopping!

If you have arrived here from Sam's blog, hello and welcome to you. I hope you enjoyed Sam's crafty project.

My crafty share today is inspired by the lovely creative products for gift wrapping and packaging in the Autumn Winter Catalogue. As soon as I got a glimpse of this new catalogue I instantly fell in love with all the lovely tags, boxes, bags and embellishments and much of my preorder focused on these products as I couldn't wait to get started with them.

Today I have created a gift bottle bag embellished with the fabulous Christmas Banner Simply Created Accessory Kit and an embellished Decorative Window Gift Box.


 For regular readers of my blog you will recognise the black gift bag. My lovely Mum was given a huge bundle of these at work and they have featured a lot in my recent seasonal crafting. I think the lovely paper rosette from the Banner Kit is set off beautifully by the black background.


The Banner Kit contains: paper and centers for 4 rosettes, 3 glittered die-cut accents, 2 18"-pieces of Silver 1/8" Ribbon, 2 18"-pieces of Bermuda Bay/Pool Party 1-1/4" Two-Toned Ribbon, 36" Whisper White 3/8" Taffeta Ribbon, 5 Vintage Faceted Designer Buttons, 10 Large Rhinestone Jewels. And it can be used for a great deal more than simply creating a beautiful Christmas banner.


The second of my projects is this lovely Decorative Window Box which I have embellished with Season of Style Designer Series Paper and a Merry cut with my absolute favourite product from the new Autumn Winter catalogue, the Expressions Thinlits Dies. To keep the box closed I have wrapped a length of Cherry Cobbler Chevron Ribbon and closed with a Antique Brad.

The next stop on the hop today is Gill. Please hop on over to see what she has been creating with our fabulous new catalogue products.

Thank you for joining me today for my little part of the hop.


Friday, 13 September 2013

Party Door Prizes


We made it to Friday and my crafty weekend creation. Hope you've had a lovely crafty week and I hope you've enjoyed all my crafty shares (and not a bit of Christmas-y crafting which is most unlike me!).

Today's crafty make is a Door Prize gift bag I created for two of my recent Stampin' Up! parties. The door prize is one of my favourite parts of creating for a Stampin' Up! party. I always offer a little crafty prize for all attendees of my parties. Everyone enters their name in to the pot and at the end of the party somebody gets to take away a little crafty kit. 

These two gift bags were based on the lovely Afternoon Picnic Designer Series Papers. I contrasted the light pastel colours of the papers with the bright contrast of Strawberry Slush ink and cardstock. I used some ready made mini gift bags I had in my stash to hold the contents of the prize (mini notelets, some small pieces of matching DSP, In Colour Boutique Details, sentiment stamp and a Stampin' Write marker). These were a perfect prize for my lovely party customers.


If you'd like to book your own Stampin' Up! party I have dates available through October and November. I can customise the party to your crafty interests (cardmaking, scrapbooking, gift wrap adn boxes). I am finding my customised Christmas crafty parties are going down really well at the moment. I can demonstrate different cardmaking techniques and all guests get to make and take a Christmas card too. And by booking now you'll have plenty of time to create your own Christmas cards and gift tags before the big day comes around. I'd love to chat to you about a date and talk you through all the lovely freebies you can receive for hosting a party. Please get in touch on poulton_sarah@yahoo.co.uk or 01983 609249 (I will be back from my motorhoming adventure on Sunday so can return on calls first thing Monday! Please leave a message and I'll happily get back in touch).

Online Ordering

Oh and a quick reminder that if there are any crafty essentials or must-haves that you'd like to get your hands on, you can now shop online 24/7. All items ordered will be shipped directly to you and you can even earn hostess freebies if you spend £150+ (who doesn't love freebies?!) And I'll also be posting a little extra something to all people ordering through my Online Shop throughout September. 


For an extra chance to win freebies, add the Hostess Code below to your order and at the end of the month I will be totaling the month's freebies and offering them to one lucky winner.

QN7Y7WBX

Thanks for stopping by today. Pop back tomorrow for a very special Pinkies team blog hop.

Happy Crafting


-x-

Thursday, 12 September 2013

Scrapbooking Made Easy with My Digital Studio


Here is another quick and easy scrapbook page I created with the fantastic new software from Stampin' Up!, My Digital Studio.

For this I used a template within the programme and simply dragged and dropped my photos in to the template. It is as simple as that. The software is so easy to use and creates beautiful pages, cards, mini books, albums, tags... you name it, you can create it within My Digital Studio. Using all Stampin' Up! colours, papers, stamps, shapes, punches and embellishments.

The software is available through my store and costs ONLY £13.95 for the download (directly downloaded to your computer) or you can take advantage of the 30 day FREE trial. Again this is available through my online store.


And it doesn't end there, there are lots of additional affordable downloads available through my store to add to your MDS collection (the downloadable version comes with lots of usable kits, layouts, papers, stamps and punches). So if there is a must have stamp you need for a digital creation you can purchase it online and download it straight to your computer.

If you'd like to find out any more about MDS or Stampin' Up!, please get in touch directly on poulton_sarah@yahoo.co.uk or visit my online store to see more of the products available.

Happy Crafting
-X-

Tuesday, 10 September 2013

Quick and Easy Washi Thank Yous


Today's crafting share is a quick and easy thank you note I created to enclose with a recent workshop order. I always like to add a hand crafted note for my customers to let them know how much I appreciate their orders.

I like to come up with an easy to reproduce design that I can create on a 10.5cm x 9.9cm card base (this allows me to cut 3 notelet bases from one sheet of A4 cardstock).

This card uses Melon Mambo and Daffodil Delight inks to stamp the Six Sided Sampler hexagon and sentiment (I used the bundle of products featured on Page 125 of the main catalogue to stamp and punch these hexagons- this bundle has proved a firm favourite with all of party customers so far this Stampin' Up! year). I layered the hexagon on to a circle of Melon Mambo (cut using my 4.4cm circle).

I used Gingham Garden Washi Tape (Page 171) to create the striped coloured layers on the card base. The beauty of Washi Tape is that it doesn't have to be precise. Each card looked a little different. To finish I used a dimensional to layer the circle on to the washi tape stripes.


Don't forget if there are any crafty essentials or must-haves that you'd like to get your hands on, you can now shop online 24/7. All items ordered will be shipped directly to you and you can even earn hostess freebies if you spend £150+ (who doesn't love freebies?!) And I'll also be posting a little extra something to all people ordering through my Online Shop throughout September. 


For an extra chance to win freebies, add the Hostess Code below to your order and at the end of the month I will be totaling the month's freebies and offering them to one lucky winner.

QN7Y7WBX


Thanks for stopping by today. Pop back on Thursday for another quick crafty make created using the fabulous new design software, My Digital Studio.

Happy Crafting
-x-

Monday, 9 September 2013

A little bit of Label Love


Good morning and hello to all readers & crafters. I hope you've had a lovely weekend ;0)

Sam, Summer and I are off on a mini adventure at the moment with our motorhome so I have scheduled some craftiness for you this week.

My first crafty share of the week is this Very Vanilla & Basic Black Thank You card I made recently for a party hostess.

This uses the Deco Labels Collection Framelits (page 186 of the main catalogue) as a focal feature which I embossed with the Fancy Fan Embossing Folder (Page 191 of the main catalogue). I then cut three small pennnants using the lovely Modern Medley Designer Series Paper and wrapped a short length of Basic Black ribbon around the Label layer (this satin ribbon is now retired I have come to realise, however, there are other lovely Basic Black ribbons available on Page 173). To finish I stamped the Just For You label from the Label Love stamp set and added a little bit of rhinestone bling.

This is a simple but effective card as a quick and easy thank you note. I loved trying the monotone effect on this card as I usually prefer to craft with all the brightest colours of the rainbow.

Don't forget if there are any crafty essentials or must-haves that you'd like to get your hands on, you can now shop online 24/7. All items ordered will be shipped directly to you and you can even earn hostess freebies if you spend £150+ (who doesn't love freebies?!) And I'll also be posting a little extra something to all people ordering through my Online Shop throughout September. 


For an extra chance to win freebies, add the Hostess Code below to your order and at the end of the month I will be totaling the month's freebies and offering them to one lucky winner.

QN7Y7WBX

Thanks for stopping by today. Pop back tomorrow for another quick crafty make.

Happy Crafting
-x-

Friday, 6 September 2013

My Digital Studio is here


Well it has certainly been an exciting week of updates from Stampin' Up! And they haven't finished just yet. One more announcement to go.... My Digital Studio is here!!!

My Digital Studio (MDS) is a fantastic and exciting new design software for all levels of crafty and computer skills. MDS is an easy to use design software that is compatible with PC and Mac operating systems. It allows designers and crafters of all skill levles to create their own digital projects or use hundreds of templates to make professionally designed cards, photobooks, calendars, and more.

I have been lucky enough to have downloaded the full version a few weeks ago and have loved playing with the software and creating lots of lovely scrapbook pages as well as postcards, cards, flyers and mini books. It really is a fantastic and diverse programme. And the best bit is, it uses all Stampin' Up! colours, stamps, papers and embellishments. So you can create digital art to match your Stampin' Up! crafty stash.

The software is available through my store and costs ONLY £13.95 for the download (directly downloaded to your computer) or you can take advantage of the 30 day FREE trial. Again this is available through my online store.


And it doesn't end there, there are lots of additional affordable downloads available through my store to add to your MDS collection (the downloadable version comes with lots of usable kits, layouts, papers, stamps and punches). So if there is a must have stamp you need for a digital creation you can purchase it online and download it straight to your computer.

If you'd like to find out any more about MDS or Stampin' Up!, please get in touch directly on poulton_sarah@yahoo.co.uk or visit my online store to see more of the products available.

Happy Crafting
-X-


Wednesday, 4 September 2013

Online Ordering is Here

Hello and welcome to a very exciting day here at Stampin' Sarah!


My Online Ordering Stampin' Up! Website is now LIVE. You can use my new site as a one stop shop for my blog, current promotions, updates and of course, ordering your products direct online! The address for your favourites bar is:


And to celebrate the launch I am offering an exclusive free draw for all customers placing an order with me in September using the Hostess Code:

QN7Y7WBX

Enter the code above when placing your online order and qualify to win the total Hostess Pounds (a minimum £25 prize to spend on anything in our current catalogues!) for the combined September order. 

And as if that is not exciting enough, I will also be offering a small extra incentive gift direct from me plus a handmade thank you card to all customers ordering through my site in September.

For further information or to chat about Stampin' Up! please get in touch on poulton_sarah@yahoo.co.uk or 01983 609249.

Happy Crafting
-X-

Tuesday, 3 September 2013

My Christmas Planner


Good morning crafters.

As promised, today I will be sharing the inside of my Christmas Planner. Please see yesterdays post for how to create your own base mini album.

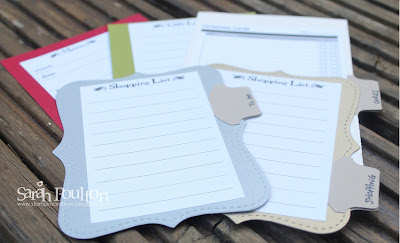
Here are the envelope inserts. Each one has a Christmas-y related theme: Shopping, To Do, Menu & Christmas Cards.


The first two pages feature a calendar and to do list for November and December.


The reverse of the envelope is stamped with the beautiful Calm Christmas stamp from the Autumn Winter catalogue (Page 26). I stamped it in Night of Navy ink.


The next page is stamped with Ornament Keepsakes in Cherry Cobbler & Old Olive. Ornament Keepsakes was featured in last years festive catalogue and is still available to order via the Carry Over List.


I stamped this page using the Evergreen stamp set (also on the Carry Over List) and a snowflake from Snowflake Soiree.


This page is stamped in Cherry Cobbler and Night of Navy using the new Wishing You stamp set (Page 23 of Autumn Winter catalogue).


The final page is stamped in Gold (using the new Metallic Encore Pad, Page 28, AW Catalogue) and Night of Navy using Snowflake Soiree.

Thank you for stopping by to look at my Christmas planner creation today. I'm more than happy to help with any questions about this project. Please get in touch on poulton_sarah@yahoo.co.uk.

Also, if you'd like to have your own copy of the Autumn Winter catalogue, please drop me a line on the above email address and I'll pop one in the post to you.

Happy Crafting ;0)
-X-

Monday, 2 September 2013

Christmas Planner Envelope Mini Album Tutorial


Good morning and welcome to another crafty week here on the Isle of Wight.

Today I am sharing the final Christmas project we created on my Christmas Craft Days last month. This was our 'showstopper' (for those that watch Bake Off) project that was central to the day. I had been planning this for months and searched through lots of different mini album ideas to find the perfect style.

I won't be sharing the completed pages with you today.  I will share those another day this week. Instead today I will be giving you a quick and easy run down on how to create your own lovely mini album (you can modify the papers used or contents for any occasion). This is a quick and affordable planner or memory-keeper and could also make a perfect Christmas pressie too.

For this project you will need:

5 Stampin' Up! C6 envelopes (I used Very Vanilla)
A sheet of A4 cardstock for the cover (I used Cherry Cobbler)
A length of ribbon to hold the album together (I used Cherry Cobbler 3/4" Chevron)
Matching cardstock for inserts
DSP for decoration


The first step is to create your insert pages. I started with 5 C6 Very Vanilla Envelopes.


 I then cut off the envelope flaps as below.


Score the envelopes at 1/2" to create your hinge.


Please note, that while I have shown the envelopes with the scallop shaped edge forward in these photographs (it made it easier to differentiate the steps for the tutorial), these will actually be turned over in the finished product and form the back side of each page (giving you a full rectangle of page to cover and decorate facing forward).

The next step is to create your cover. I cut a piece of Cherry Cobbler cardstock 6 1/2" by 10", scoring at 4 1/4" and 5".


The larger section forms the back of the cover with the hinge making the pages fold easier from the front.

The final stage before decorating and tying together is to punch your holes.

I sandwiched my 5 envelopes and the cover together and measured 2" from either end (marking with a small pen mark). I then punched holes through all layers together using my Crop-A-Dile.


 This is the basis for your mini-album / planner. I would recommend decorating your inserts prior to tying your ribbon for ease of stamping. Once all your layers are decorated you can then just thread your ribbon through and tie in a bow to hold it all together.

To decorate your planner:

I used a stack of DSP in all different Christmas-y colours and patterns. I cut each piece at 3 3/4" by 6 1/4" to stick to the front of each envelope. I then cut pieces slightly bigger for the front and back covers. I also stamped the reverse of each of the envelopes for a bit of a festive flourish.

I also created matching inserts using free printables from this website. I created three rectangular inserts (3 3/4" x 6") and two die cut Top Notes cut from Brushed Gold and Silver cardstock. I created tabs using a shaped punch, you could also use ribbon to create these tabs.


Thanks for popping by today. I'll be sharing my decorated pages tomorrow so hop back then for some Christmas Planner inspiration. Please do get in touch with any questions or to place an order for essential supplies to create your own Christmas Album planner: poulton_sarah@yahoo.co.uk or 01983 609249.

I'd love to see your creations so please leave a comment to direct me to your creations if you have a go. It was fantastic to see all the different versions of this album that my ladies created at our Christmas crafty days.

And don't forget to check out the promotions page above for all the latest fantastic offers from Stampin' Up! Especially the lovely Best Of Christmas stamp set.

Happy Crafting ;0)
-X-