Showing posts with label Serene Snowflakes. Show all posts

Thursday, 2 February 2012

Last month's card class makes

Apologies for my slack blogging recently ;0) I have been making lots of lovely things for classes and future workshops but seem to have run out of energy for sitting on the computer to update my blog. To make up for it I am sharing two cards today that I taught at January's card class (and i'll hopefully blog the other two tomorrow via the wonder of post scheduling!).

Here is the first of the cards we made (and my favourite of all my makes recently). I saw this card on the talented Jenny Moor's blog last week and knew my class ladies would love it. This was a last minute substitution for a card I had made but wasn't 100% happy with. This card is a Sale-a-Bration inspired wonder. It uses the exclusive (and free!) SAB set, Fresh Vintage and the strip of DSP is from the lovely free SAB papers Everyday Enchantment. The colour scheme is Peach Parfait, Calypso Coral, Pear Pizzazz, Very Vanilla and Pool Party. We used the fantastically versatile Stampin' Write markers to colour the stamp before stamping which gives this lovely detailed multicoloured effect.
 The second card I wanted to share with you today is another inspired by Peg. We have a whole series of family weddings this year and my Mum had seen this card and asked me to recreate it for the class. I created two versions of it, the second of which I was a lot happier with (my first attempt fell foul to an accident with a bottle of Tombow so I had to trim it to an odd shape and dimension).

I love this layered Whisper White look and the effect of using lots of different textures to create the layers. I used lots of different embossing folders, punches and Embosslits to create the textured layers and the stamping was done using a retired stamp set sadly (it was the only set I currently have featuring hearts). This will make a perfect wedding celebration card. And my class ladies were very keen to change it to an anniversary card by changing the tag greetings. It was finished perfectly with a glitter brad and three rhinestones.
 Here is my first version (the tombow spilt one) which I created from Peg's original, with a winter wedding in mind (hence the Serene Snowflakes).
Right, thats all from me today. Hope you enjoyed todays projects. Like i've said before, roll on lighter evenings so i can get some better quality photos again. I'll write another post now to share the other projects tomorrow.

Happy crafting ;0)
-X-

Monday, 16 January 2012

A new scrapbook class LO

My apologies for the somewhat haphazard photo of my latest scrapbook class layout (the red spots are my table cloth and not a part of the layout). I hadn't intended to post this picture. I had quickly snapped the LO to send a pic to my Mum so she knew which photos to bring for this Thursdays class. But then in a moment of inspiration (and in celebration of me finally getting a bit of papercrafting mojo back) I decided to quickly update my blog with a new photo.

Apologies it has taken me so long to update and resume normal Stampin' Up! service. I have been somewhat exhausted these first couple of New Year weeks. I think my little one has had a hefty growth spurt (and judging by the kicking she is going to be some kind of martial arts come kickboxing prodigy) which has taken it out of me a bit. But this evening I cleared a path into my craft room (I'd thrown all my Christmas journalling bits into the room and shut the door to deal with on another day!) and more specifically to my desk, I plugged in my computer and put on my new Big Bang Theory DVD boxset and I was away. And here is what I created:

My scrapbooking class ladies had asked for a winter theme so I flicked through a few scrapbooking books for inspiration and came across a LO that used the large scallop papers as a background. I loved the effect so set about using that as my inspiration. I drew myself a template onto Real Red cardstock and then a smaller one to use on the Patterned Designer Series Paper. I stamped the background with Serene Snowflakes (I'm so glad I've got to carry use of this stamp set over in to the New Year- it is still a much used favourite). I created the central dividing line using strips of paper from the Hostess Papers Cheerful Treat and Concord Crush Stitched Poly Ribbon. I then finished with the title stamped onto a top note and embellished with subtles buttons and glitter brads (and a few rhinestones for effect).

It may look simple yet this has taken me hours!! But hooray I finally got my papercrafting groove back. Check back tomorrow hopefully and I'll have the second LO for Thursdays class posted ;0)

Happy Crafting ;0)
-x-

Thursday, 17 November 2011

Off to Convention

If you are a Stampin' Up! regular, or you hop around a few Demo blogs, you won't have failed to notice that Convention fever is in the air. So as you read this,  I will be on my way to Paris for this years European Stampin' Up! Convention. Two days of Disneyland fun with fellow Demos from the UK, France and Germany. Stampin' Up! always know how to put on a good show and there is always a couple of fun crafting sessions too. But I'll share more on that on my return....

I've kept things a bit simpler on the swaps front this year and also had a great deal of assistance from my lovely Mum too. I just havent had the energy to do all the organised swaps like I did last year. I wanted to be involved in the swapping but also had to consider that I'll have to carry everything home on the plane ;0)  If you pop back tomorrow I'll share my Card Candy and general swaps. Todays project are the stamped candles I made for my two Convention roomies, Jenny and Anja. They havent turned out quite as perfect as I imagined (its been well over a year since i tried candle stamping) but I do love the embossed gold and silver against the red candle (which matches Stampin' Up!'s Cherry Cobbler ribbon and embossing powder perfectly).

So here are my Serene Snowflake candles.....


Thank you for stopping by today and come back tomorrow for more swapping and convention makes.

Happy Crafting ;0)
-X-

Thursday, 3 November 2011

Hostess Thank You

Thank you for all the lovely congratulatory messages. They are very much appreciated ;0)

Now on to some Christmas crafting. I must again apologise for the poor lighting of these two photos. I was taking these late last night so that I had something to post today and the result is slightly 'off colour'. Bring on the Spring and some nicer lighting conditions (although I must confess to actually really loving these damp days and dark nights- a good excuse to cosy up under the duvet with a good film or a book).

I demonstrated at my friend Hayley's annual birthday workshop last night. I designed two little make and takes for all the ladies to have a go at which didnt leave much time for a demonstration. So instead I made this little hostess thank you set in advance and just showed the ladies instead. I picked Pool Party & Night of Navy as my colour scheme to give an icy winter feel to the two projects.

The card was made using my favourite technique again. I created a Post It note mask with the Curly Label punch and then sponged Pool Party and Marina Mist onto Shimmery White cardstock (I love this C/S as it gives a nice icy feel to Christmas-y cards). I then stamped the largest snowflake from Serene Snowflakes in Night of Navy over the top. I then stamped the 3 smaller snowflakes as a background. The Thank You sentiment is taken from Curly Cute.
 The hostess gift element of the set was this luminaria. I followed an online template for the basic shape and then customised this to use my own colour scheme and stamps. I had previously bought two packs of the battery operated 'flickering candles' from Ebay but not gotten around to using them. Now I have seen the result I will most definitely be investing in some more I think.

I did try and get the luminaria lit up but I just couldnt get the lighting and settings on the camera quite right. I created it using Night of Navy as the base. I punched the holes using my largest circle punch. I then cut 4 pieces of vellum to fit and stamped with Serene Snowflakes in Night of Navy. For the trees around the bottom I used Not Quite Navy as the base card stock then stamped the multiple tree stamp from Lovely As A Tree along a strip of card (using Versamark). I then covered this strip (on which I stamped the image three times) with silver heat embossing powder and embossed for the icy finish. The last touch was to sponge dauber white craft ink along the base of the trees to give it a snowy look.

And just one final quick bit of info. Stampin' Up! have launched a Hostess incentive which runs through till December 15th. If you host a qualifying workshop (£300+ sales) anytime within this period you will receive extra product for free. The product bonus is the lovely Paisley Petals stampset and coordinating Paisley Petals Designer Series Paper. What a great way to celebrate hosting your own Christmas workshop!
If you have any questions on Stampin' Up! please let me know and I'll try to help as best I can (poulton_sarah@yahoo.co.uk or 609249).

In the mean time, happy crafting ;0)
-X-

Tuesday, 11 October 2011

Christmas Cards Day Two

Here is another recent Christmas Workshop Make and Take card. This time I went for a more unusual Christmas colour scheme: Chocolate Chip, Whisper White and Crumb Cake. I'd not thought to use shades of brown with Serene Snowflakes before and was really pleased with the effect.

This is a straightforward easel card with a mounted Chocolate Chip panel with the main Whisper White snowflake stamped on to it. This panel is edged with a generic gold calligraphy pen  (sadly not Stampin' Up!). The sentiment is from Contempo Christmas and was stamped onto one of the frames from the Four Frames stamp set (and punched with the Decorative Label punch). This was then mounted with dimensionals over a length of Whisper White organza ribbon.

I hope you're enjoying the Christmas cards so far and please come back tomorrow to see the next in the series, a creation with acetate and Stazon....

Happy Crafting ;0)
-X-

Monday, 10 October 2011

Serene Snowflakes Christmas

Here is the first in my week of Christmas cards series. This is a card we made at a recent Christmas themed workshop. I wanted to teach the sponging and masking technique and illustrate how quick and easy this effect was in creating a one layer card (simple and easy to post as a straight first class letter).

We first created a mask with a post it note and the Curly Label punch and then sponged the three Curly Label shapes with Baja Breeze and Marina Mist ink. Tbe various snowflakes were stamped in Pacific Point ink. The lighter colour small snowflakes are stamped on the background with Baja Breeze. The Curly Cute greeting was stamped with Night of Navy. We finished with several of the smallest Basic Pearls to embellish the snowflakes.

Thanks for stopping by. I'll have the second of my Christmas cards tomorrow. So please come back then ;0)

Happy crafting ;0)

Sunday, 5 December 2010

Journal Your Christmas Day 4

Apologies in advance, this is quite a picture heavy post. I have been slightly over exuberant in my Christmas journaling this weekend and the results are below (so much for only two pages per day!)


I’ll start my post today however, with a Christmas card. I made this early this morning (Sunday). I have my monthly card class at my home next Saturday and as its nearly Christmas I wanted to make it a special one with some alternative style Christmas cards. So I have been designing some lovely card ideas. Here is one of the projects I have decided upon for next Saturday; a gorgeous glittery heat embossed snowflake waterfall card. I have a couple of spaces available for this class, so if you would like to come along and learn how to make this card (plus two other cards and a 3D project, and refreshments) please get in touch (01983 609249 or poulton_sarah@yahoo.co.uk). The cost for the afternoon is £8.


 Right, back to what is taking over my life at the moment- Christmas journalling!!! I was a bit hesitant about signing up to follow a daily prompt as I wasnt sure I would be able to find enough to talk about. However, receiving Shimelle's daily emails (plus photography tips) is proving incredibly inspirational. And as you can see from the photos below. I certainly havent run out of things to talk about yet.

On Friday I bought the Daily Telegraph just for the satellite image on the front cover. This picture shows the whole of the UK from above covered in snow. I thought this was such a great image that I had to include it in the journal even though it doesnt entirely fit the two pages a day rule I imposed on myself ;0) Oh, and I appear to have become a bit fixated on acetate inserts you'll notice. For this double page I created an acetate overlay using Serene Snowflakes, Heat & Stick Powder & Dazzling Diamonds (I am so loving heat resistant acetate!!!). You cannot really see the acetate layer in the photo but it is lovely and glittery and effective in real life.

Yesterdays prompt was daydreaming of a perfect Christmas. We were supposed to let our minds wander to construct an ideal Christmas. I got completely carried away thinking about family holidays we have had abroad over the festive season and how lovely it was to be warm and sunny on Christmas day. So, while not completely fitting the festive theme I have created a couple of Hawaiian inspired Christmas LOs. I suddenly found a purpose for all the beautiful Hawaiian themed papers i have been collecting (including the lovely tropical [now retired] Stampin' Up! papers from the US). 


You'll note the token inclusion of my sister wearing a Christmas hat as we purchased our shaved ice on Christmas Day 2006 (the gentleman in the shaved ice van made her wear it for the photo!). While being sunny over Christmas isnt everyones cup of tea, as a family we've been away for 4 Christmases in sunnier climes and I've loved every minute of breaking up the winter blues with a burst of warm sun. I guess the moral really is (and this is included in my whole page of journalling) that its family and loved ones that make Christmas, not the location. But all the same in an ideal world, Hawaii would win every time!!! (Plus we always agree that there are no pressies if we go abroad- the holiday is our gift- so no horrible crowds and Christmas shopping!! Hooray for that too!!!)

Until tomorrow, happy festive crafting to all ;0)

-XXXX-

Sunday, 21 November 2010

Charity Craft Day for the Hospice

Well firstly, I just have to say a big thank you to all the lovely ladies who came along to my Christmas Craft Day yesterday. It was lovely to see familiar faces as well as welcome new crafters along too. It was a great day and I am glad all the projects were a success. I've got a couple of donations to add to the pot before I can give a proper tally of how much we raised. But its looking very good so far ;0)

I've got some photos from Mum's camera to get hold of from yesterday. But for today I'll post some photos of the projects we made.

Project One: Folded Diaper Pouch with matching notecard and sneaky Quality Street half inched from my Dads tin ;0)

I used Elegant Eggplant and Rose Red as my colour scheme (and yes I pinched matching Pink Quality Streets ;0) Season of Joy Stampset was used for the notelet.

 Project Two: Gift Card Pouch

This gift card was demo'd by the fabulous Julie Kettlewell at Convention. I was so enamoured with the colour scheme (Crumb Cake and Cherrry Cobbler) that I had to give it a go and then demo it myself at my event. This uses Contempo Christmas and the Ornament Punch with matching Very Vanilla Ribbon.

 Project 3: Sour Cream Container

I've demo'd Sour Cream Containers before. But for this we had a lovely little twist. My Mum had handmade earrings to donate for the Craft Day. They were beautiful (and I wanted to keep about 10 pairs but since I havent been able to wear earrings for years they wouldnt have been much use to me!) and we sealed them as an early Christmas gift within the container ;0) As the demo was more about the Sour Cream Container I prestamped and mounted the gift tags using the Gifted Stamp Set (Real Red and Old Olive).
 Project 4: Bird House Gift Box

This was based on a swap I received from the very talented Jo Dumbleton at the last Stampin' Up! training I attended. I'd had so many comments about it that I decided to give demo-ing it a bash. Its such a lovely idea and I give full credit to Jo for coming up with such a lovely Christmas demo. It uses: Garden Green, Crumb Cake, Real Red & Soft Suede. Along with the Serene Snowflakes stamp set and Bird Punch. The window is filled with a small piece of acetate and the project was finished off with silver elastic cord and a tiny amount of red glitter on the holly berries.
 Project 5: Christmas Gift Box
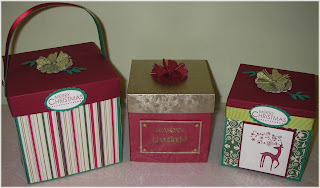
 I spent a fair few days perfecting the measurements for this box (hence so many demonstration versions for photographing). I'm really pleased with the final version and the beautiful scallop circle flower on top.
 Project 6: Dasher Embossed Jolly Holiday Card

We didn't get time to finish this card. So I each of the ladies took it home to complete from a kit version. Its a lovely quick but effective Dasher card. You'll notice that Cherry Cobbler is my favourite colour at the moment. I seem to be using it in most of my festive projects this year.
 And the final project of the day....

Project 7: Crimped Envelope Card
This used Serene Snowflakes and Dasher coupled with Tempting Turquoise and Pacific Point. This was a simple but effective card. You seal the envelope and then slice off the top. You then stamp the main envelope and run it through the crimper. The top of the envelope then forms a lid over the crimped section ;0)

As you can see from the photos, it was a very busy day! We also missed out Sandy's Cracker Dasher card which she did a quick run through of so the ladies could take it home to finish there. For future events I'll definitely be scaling back the number of projects we complete so that its a bit more relaxed. Still, we live and learn don't we? ;0)

For all those that asked about the DSP Christmas Tree I posted earlier in the week. I have another cone here that I will use to create a tutorial for you this afternoon. Check back later to see that.....

Thanks for stopping by.

-XXX-