Monday, 30 November 2015

A Fry Box Die Gift Bag from Stampin' Up! UK Demonstrator Sarah Poulton

Happy Monday Crafters ;0)

Hope you've had a lovely weekend. Things certainly feel festive here with Christmas lights and music. Shame about the weather though. Our local lights switch on was cancelled due to the crazy wind and rain. Hopefully things'll calm down this week and we can get involved with a few more festive activities. And tomorrow will mark the start of my Christmas journal which I look forward to sharing with you over the next few weeks.

Today's creative share is a project from my November card class and is made with the gorgeous Home for Christmas Designer Series Papers with the Fry Box Bigz Die.


To make this gift box you just have to cut two of the Fry Boxes from your chosen DSP and then cut the sides from one of the boxes and then stick the bottom panels together (one on top of the other).  To create the handles I used my Large Oval Punch on each panel front and back.

To create the label I used the Making Spirits Bright stamp from the Among the Branches stamp set. I stamped using my Gold Encore pad and then punched with my 2" circle punch. I hung this from my gift box with Cherry Cobbler Baker's Twine.


To finish we filled the gift bags with novelty Christmas choccies (not that all of them made it in to the bags). This would make a lovely little table favour or decoration to hang from the Christmas tree.

Thank you for popping by today. Please let me know if you have any questions about Stampin' Up! or our products. I would love to help. All items can be purchased online via my shop or get in touch directly and I can order them for you to be delivered direct to your door. I'd also love to Demo for you and your friends at a crafty party. As the hostess you earn lots of lovely freebies and you all get to make a fun crafty project too (no crafting experience necessary!)

 -XXX-

Built for Free Using: My Stampin Blog

Wednesday, 25 November 2015

A Cozy Christmas Quartet from Stampin' Up! UK Demonstrator Sarah Poulton

Earlier this month I hosted a Cozy Christmas product based class where I designed a series of projects to showcase this lovely Autumn Winter Catalogue stamp set.

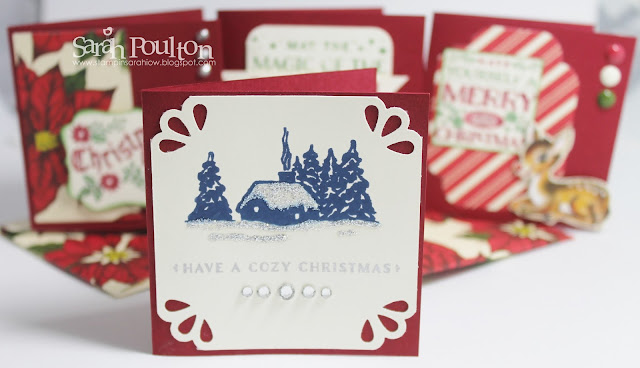
I wanted to create a little set of Christmas notecards and envelopes with a matching box to keep them in. This is what I came up with.


I started by designing the box which I made using my Gift Box Punch Board. I wanted the box to be 3.25" x 3.25"x 1.75" so I used an 8" x 8" square of Cherry Cobbler. I created the 3" square note card bases (uses 3"x6" piece of card scored at 3") with the offcuts of my 12"x12" cardstock used for the box.

I then used small pieces of the Home for Christmas Designer Series Papers and my Stampin' Write Markers (and with an extra little bit of help from my Paper Snip Scissors) to create 4 little differently designed notecards.


I loved using the designs of the paper too embellish my cards. These little deers are just too lovely not to make the focus of a card. For this card I used my Home for Christmas Enamel Dots and Corner Trio Punch.


This is my favourite of this set of cards. I love the little cottage image and with the added Dazzling Details it felt very festive when making it. This is again embellished with the Trio Corner Punch and Rhinestones.


And lastly, here is the box I made to keep the cards and envelopes in (envelopes made with the Envelope Punch Board and Home for Christmas DSP).


Thank you for popping by today. Please let me know if you have any questions about Stampin' Up! or our products. I would love to help. All items can be purchased online via my shop or get in touch directly and I can order them for you to be delivered direct to your door. I'd also love to Demo for you and your friends at a crafty party. As the hostess you earn lots of lovely freebies and you all get to make a fun crafty project too (no crafting experience necessary!)

 -XXX-

Built for Free Using: My Stampin Blog

Tuesday, 24 November 2015

Downline 5 Year Celebration Gift from Stampin' Up! UK Demonstrator Sarah Poulton

A very big Happy 5 Year Stampin' Up!-versary to my good friend and longest downline member Sandy. She joined this fab company a few months after I did back in 2010 and she has become a great friend during that time.

To celebrate I wanted to hand make her a little gift and, of course, a card too.

I came up with this Soft Suede and Marina Mist combo card with a little extra sparkle with my Champagne Glimmer Paper 5.


I used the Awesomely Artistic ink splatter stamp for the background and added the beautiful handwriting style sentiment from Cottage Greetings.

Detail and layering was added with the Chevron Ribbon, bakers twine, a punched Elegant Butterfly and bitty flowers with rhinestones.


And here is the gift I made for her. I bought this wooden drawer set from The Works with a view to either inking or wood burning. When I came to decorate I decided to cover with papers and add embellishments from my stash. I thought this little set of drawers would be perfect for storing embellishments or little crafting bits and bobs.


Thank you for popping by today. Please let me know if you have any questions about Stampin' Up! or our products. I would love to help. All items can be purchased online via my shop or get in touch directly and I can order them for you to be delivered direct to your door. I'd also love to Demo for you and your friends at a crafty party. As the hostess you earn lots of lovely freebies and you all get to make a fun crafty project too (no crafting experience necessary!)

 -XXX-

Built for Free Using: My Stampin Blog

Friday, 20 November 2015

A Cozy Christmas Hot Chocolate Gift Jar from Stampin' Up! UK Demonstrator Sarah Poulton

Good morning crafty friends. Happy rainy Friday. I am sat contemplating a very wet walk to pre-school this morning. I am delaying the inevitable by talking to you instead.

I have a project to share from my Cozy Christmas product class earlier in the month. All my projects showcased different elements of the stamp set. I found these lovely little jars in my local discount store and thought they would be perfect for filling with hot chocolate, treats and marshmallows and decorating as a simple little Christmas gift for a friend or neighbour.


I started by creating the jar's belly band with strips of Night of Navy, Pool Party and Home for Christmas Designer Series Paper. I then punched two Decorative Labels and stamped the Cozy Christmas cottage on the Pool Party label. I used this label to cover the join in my DSP.


I added a little Dazzling Details sparkle to my label for extra sparkle.

I stamped a To and From tag with the cuppa from the Project Life Hello December Christmas stamp set and my Note Tag Punch. I tied this with Bakers Twine and attached to my jar to finish the project.


Thank you for popping by today. Please let me know if you have any questions about Stampin' Up! or our products. I would love to help. All items can be purchased online via my shop or get in touch directly and I can order them for you to be delivered direct to your door. I'd also love to Demo for you and your friends at a crafty party. As the hostess you earn lots of lovely freebies and you all get to make a fun crafty project too (no crafting experience necessary!)

 -XXX-

Built for Free Using: My Stampin Blog

Wednesday, 18 November 2015

A New Baby Girl Butterfly Card from Stampin' Up! UK Demonstrator Sarah Poulton

Happy Weekly Deals Wednesday crafters. Hope you are having a productive week so far. We have a house full of colds here so not much but snuggling and keeping warm happening so far. But I have a lot of ideas awaiting translation to paper to share with you.

Today's project is a super special card I made for my friend who had a little girl last month. Natalie is a friend from Uni who I shared the ups and downs of singledom and longing for children with. We are both now in our 30s with two children a piece. I loved making this card to celebrate the arrival of little Laura-Mia.


My colour scheme for this card is So Saffron and Pink Pirouette.  I started by stamping the name and date with my rotary stamp in Pink Pirouette. I then punched the words centrally with my 2.5" Circle Punch. I used the Bitty Butterfly Punch to create my circle (I used the butterflies to cover the edges of my word circle raised with dimensionals).

To finish I added Subtles Candy Dots, a heart punched with my Bitty Accents Heart Punch and lots of basic pearls.


Inside I added butterflies stamped with the Perpetual Birthday Calendar Stamp Set and the sentiment is from Cottage Greetings (stamped in Rose Red).


Thank you for popping by today. Please let me know if you have any questions about Stampin' Up! or our products. I would love to help. All items can be purchased online via my shop or get in touch directly and I can order them for you to be delivered direct to your door. I'd also love to Demo for you and your friends at a crafty party. As the hostess you earn lots of lovely freebies and you all get to make a fun crafty project too (no crafting experience necessary!)

 -XXX-

Built for Free Using: My Stampin Blog

Monday, 16 November 2015

Save 20% on selected stamp sets for one week only!


Good morning crafters.

I am back from an amazing Stampin' Up! On Stage Live convention in Brussels. So many lovely new things coming up in the next few months and I have come home full of ideas and inspiration. I cannot wait to share some of the lovely projects and swaps I received with you.

But first I wanted to share this one week only promotion launched today. 20% off a fab selection of stamp sets. A great opportunity to pick up some favourite sets like Gorgeous Grunge or the Larger than Life alphabet set for a great reduced price. 

Here are all the sets and their lovely 20% off prices:


Click on the images above to click straight through to my Online Store to find out more. Or drop me an email on poulton_sarah@yahoo.co.uk with any questions (I can also be contacted on 01983 609249). I'd love to help. 

Thank you for popping by today. Please let me know if you have any questions about Stampin' Up! or our products. I would love to help. All items can be purchased online via my shop or get in touch directly and I can order them for you to be delivered direct to your door. I'd also love to Demo for you and your friends at a crafty party. As the hostess you earn lots of lovely freebies and you all get to make a fun crafty project too (no crafting experience necessary!)

 -XXX-

Friday, 13 November 2015

OnStage Event Swaps from Stampin' Up! UK Demonstrator Sarah Poulton

Happy Friday crafters.

Today I wanted to share the swaps I created for this years Stampin' Up! Convention called On Stage. I adapted one of the projects from my August Christmas Craft Day to create these altered stamped dominoes. I've hung them using Silver Corded trim so that they can be adapted for either a Christmas tree decoration or a necklace.


I used the White Christmas stamp set to create my embellished dominoes (matching the tree stamped label background).

I stamped my images in StazOn and coloured with alcohol permanent markers. Once I added Dazzling Details and embellishment I glazed with Crystal Effects.


Here are my swap instructions on the reverse.


Thank you for popping by today. Please let me know if you have any questions about Stampin' Up! or our products. I would love to help. All items can be purchased online via my shop or get in touch directly and I can order them for you to be delivered direct to your door. I'd also love to Demo for you and your friends at a crafty party. As the hostess you earn lots of lovely freebies and you all get to make a fun crafty project too (no crafting experience necessary!)

 -XXX-

Built for Free Using: My Stampin Blog

Wednesday, 11 November 2015

A Cozy Christmas Card from Stampin' Up! UK Demonstrator Sarah Poulton

I have another project to share today from my Cozy Christmas card class at the weekend. I saw a card very similar card on Pinterest and absolutely loved the use of the snowy chalet background paper (from the Home for Christmas DSP). Sometimes Stampin' Up!'s papers are too beautiful not to let be the focus of a project.

I used my Stampin' Write markers (Hello Honey, Real Red, Soft Sky & Garden Green) to colour the sentiment and then layer over Real Red & Pool Party cardstock.


I used a length of Jute Ribbon to wrap around my card and then finished with a Snowflake Element layered with an Iced Rhinestone.


Thank you for popping by today. Please let me know if you have any questions about Stampin' Up! or our products. I would love to help. All items can be purchased online via my shop or get in touch directly and I can order them for you to be delivered direct to your door. I'd also love to Demo for you and your friends at a crafty party. As the hostess you earn lots of lovely freebies and you all get to make a fun crafty project too (no crafting experience necessary!)

 -XXX-


Built for Free Using: My Stampin Blog

Monday, 9 November 2015

A Cozy Christmas Cottage Card from Stampin' Up! UK Demonstrator Sarah Poulton

Good morning crafty friends. Did you have a good weekend? I hosted my Cozy Christmas Class on Saturday. It was a rainy and miserable day so an afternoon with good company, crafting and a cuppa (and a few choccie biscuits too) was a perfect way to spend a Saturday.

This is one of the cards we made inspired by this card by a fab Dutch Demo Yvonne. I loved the idea of a window through to the inside of the card giving a bit of dimension to the card. I combined Cozy Christmas with Reason for the Season keeping the rest of the card simple and embellishment free.


I stamped the inside of the card with Memento Black ink and added snow with Encore Silver and coloured a little extra detail with my Crumb Cake Stampin' Write Marker.

To colour the poinsettia I used a Blender Pen and my Cherry Cobbler and Garden Green ink pads.


Thank you for popping by today. Please let me know if you have any questions about Stampin' Up! or our products. I would love to help. All items can be purchased online via my shop or get in touch directly and I can order them for you to be delivered direct to your door. I'd also love to Demo for you and your friends at your own crafty party. As the hostess you earn lots of lovely freebies and you all get to make a fun crafty project like this one too (no crafting experience necessary!)

 -XXX-
Built for Free Using: My Stampin Blog

Thursday, 5 November 2015

A Berry Merry Colourful Christmas Card from Stampin' Up! UK Demonstrator Sarah Poulton

Good morning crafters.

I have a colourful Christmas card to share this morning using the Berry Merry stamp set.  This is one of my 'fun to stamp' sets with lots of little elements to fill your card or image.

I started with the Whisper White banner cut using my framelits. I stamped the 'joy' with Encore Metallic Gold ink and then added the little details in Crushed Curry, Real Red and Pool Party.


To add a little extra texture and dimension I added a smaller banner cut from Champagne Glimmer Paper. I then layered a length of Real Red Pompom Trim over the top (I used my Stampin' Up! stapler to secure the layers together).  Finally I added the Snowflake Element with a Basic Rhinestone for sparkle.


Thank you for popping by today. Please let me know if you have any questions about Stampin' Up! or our products. I would love to help. All items can be purchased online via my shop or get in touch directly and I can order them for you to be delivered direct to your door. I'd also love to Demo for you and your friends at a crafty party. As the hostess you earn lots of lovely freebies and you all get to make a fun crafty project too (no crafting experience necessary!)

 -XXX-
Built for Free Using: My Stampin Blog

Tuesday, 3 November 2015

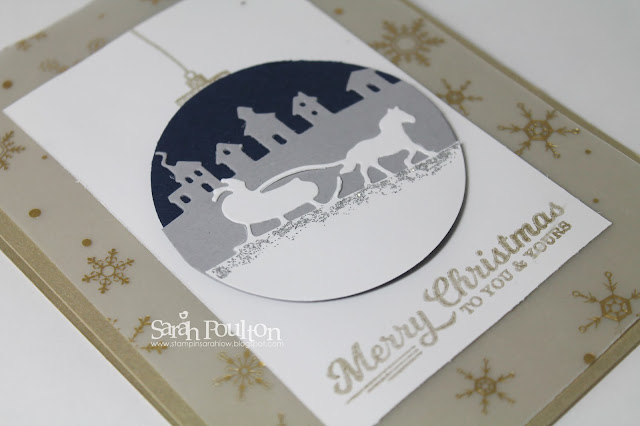
Sleigh Ride Bauble Card from Stampin' Up! UK Demonstrator Sarah Poulton

Good morning crafters. How was your weekend? The girls loved Halloween and getting dressed up. We enjoyed a local firework display on Saturday evening. Sylvie wasn't so sure to begin with but once she got used to the noise she was pretty intrigued by it all.

Today I have one of last month's card class makes to share with you. I'd seen similar ideas on Pinterest and loved the idea of creating a Christmas bauble from the Sleigh Ride Edgelits. I used my 2" Circle Punch to create a Night of Navy Base. I then layered the houses and the sleigh and punched again to create the bauble shape.


I added the bauble string & sentiment using the stamp from the To You & Yours stamp set. And to add a little sparkle I added Silver Dazzling Details to create snow. The background is a layer of Winter Wonderland Designer Vellum which I adhered with glue dots in each corner (not visible through the vellum).


Thank you for popping by today. Please let me know if you have any questions about Stampin' Up! or our products. I would love to help. All items can be purchased online via my shop or get in touch directly and I can order them for you to be delivered direct to your door. I'd also love to Demo for you and your friends at a crafty party. As the hostess you earn lots of lovely freebies and you all get to make a fun crafty project too (no crafting experience necessary!)

 -XXX-

Built for Free Using: My Stampin Blog