Monday, 24 October 2016

A Peace This Christmas stamped wreath from Stampin' Up! UK Demonstrator Sarah Poulton

Good morning crafty lovelies.


What have you been making? I've been busy with a super jam packed crafty weekend. Saturday was my monthly card class and we were joined by a lovely old school friend of mine (and her 15 week old little girl) and her Mum. Lots of cards, cakes and cuddles! Then yesterday I went to a local papercraft show with some fab crafty friends. I only went to buy adhesives and came back with a groaning bank account! Isn't that always the way?


So today I have a card I created for my September crafty parties. I like to show effective basic stamping techniques to interest new crafters and experienced crafters alike. For this card we used a plain Whisper White cardbase and added a light pencil circle drawn around a roll of washi tape (or anything roughly the size of the wreath you want to create).

Starting with the darkest shade of green we stamped the leafy image from Peace This Christmas around the circle covering the pencil line. We then layered up the wreath using two further shades of green to give added depth and dimension to the wreath.


Once we'd created the basic wreath shape the banner was stamped in Real Red and adhered to the bunch of berries which were colored with Stampin' Write markers and hand cut. The banner was adhered with Dimensionals. For the final embellishment sequins and jewels were added to the wreath for decoration.


I love showing the simplicity of layering and stamping. This card could easily be sparkled up with glitter ribbon or added wreath decoration. Or it could be created by stamping only on one layer for quick and easy posting. Every lady who stamped during my September parties created their own unique wreath with different decorations. 


Please let me know if you have any questions about Stampin' Up! and their products. I would be happy to help.  All items can be purchased online via my shop or get in touch directly and I can order them for you to be delivered direct to your door. I'd also love to Demo for you and your friends at a crafty party. As the hostess you earn lots of lovely freebies and you all get to make a fun crafty project too!

Product List

Tuesday, 18 October 2016

A Little Christmas Magic from Stampin' Up! UK Demonstrator Sarah Poulton

Hello lovelies. Its been a couple of weeks since I've been able to catch up with you all. It has been crazy and I've not had a chance to create new things for my blog. I grabbed some time over the weekend to do some prep for my upcoming class as well as create a few things to share with you all.

The first was inspired by a make I found on Pinterest by another Demo named Miranda Mols. I love the Christmas Magic stamp set but couldn't find a way to use the bell image that I was happy with. I adored the idea of using the bell for a background and layering the lovely little snowman over the top.

For this card I used Memento Black for stamping the bells and then coloured with my Real Red Stampin' Write Marker. I added a little Gold Wink of Stella sparkle to the middle band around the bell. The little bells are from the Jolly Friends stamp set, stamped in Daffodil Delight.


For the snowman I simply stamped and coloured and then punched with my 1 3/4" Circle Punch.  I then layered over a 2" Garden Green Circle. I finished by cutting a strip of Real Red and adding the greeting. I then hand cut the pennant shape and added Pearls.


Please let me know if you have any questions about Stampin' Up! and their products. I would be happy to help.  All items can be purchased online via my shop or get in touch directly and I can order them for you to be delivered direct to your door. I'd also love to Demo for you and your friends at a crafty party. As the hostess you earn lots of lovely freebies and you all get to make a fun crafty project too!

Product List
<!-------- TAMS End -----

Tuesday, 4 October 2016

A Detailed Santa Shaker Card from Stampin' Up! UK Demonstrator Sarah Poulton

A very happy new crafty week to you all. What fun did you get up to at the weekend? We had fun here with the Forever Evergreen Christmas Tree kit. The ladies spent a few hours stamping and putting together all the elements of their trees ready to assemble at home. We weren't sure how well the 3D trees would travel.

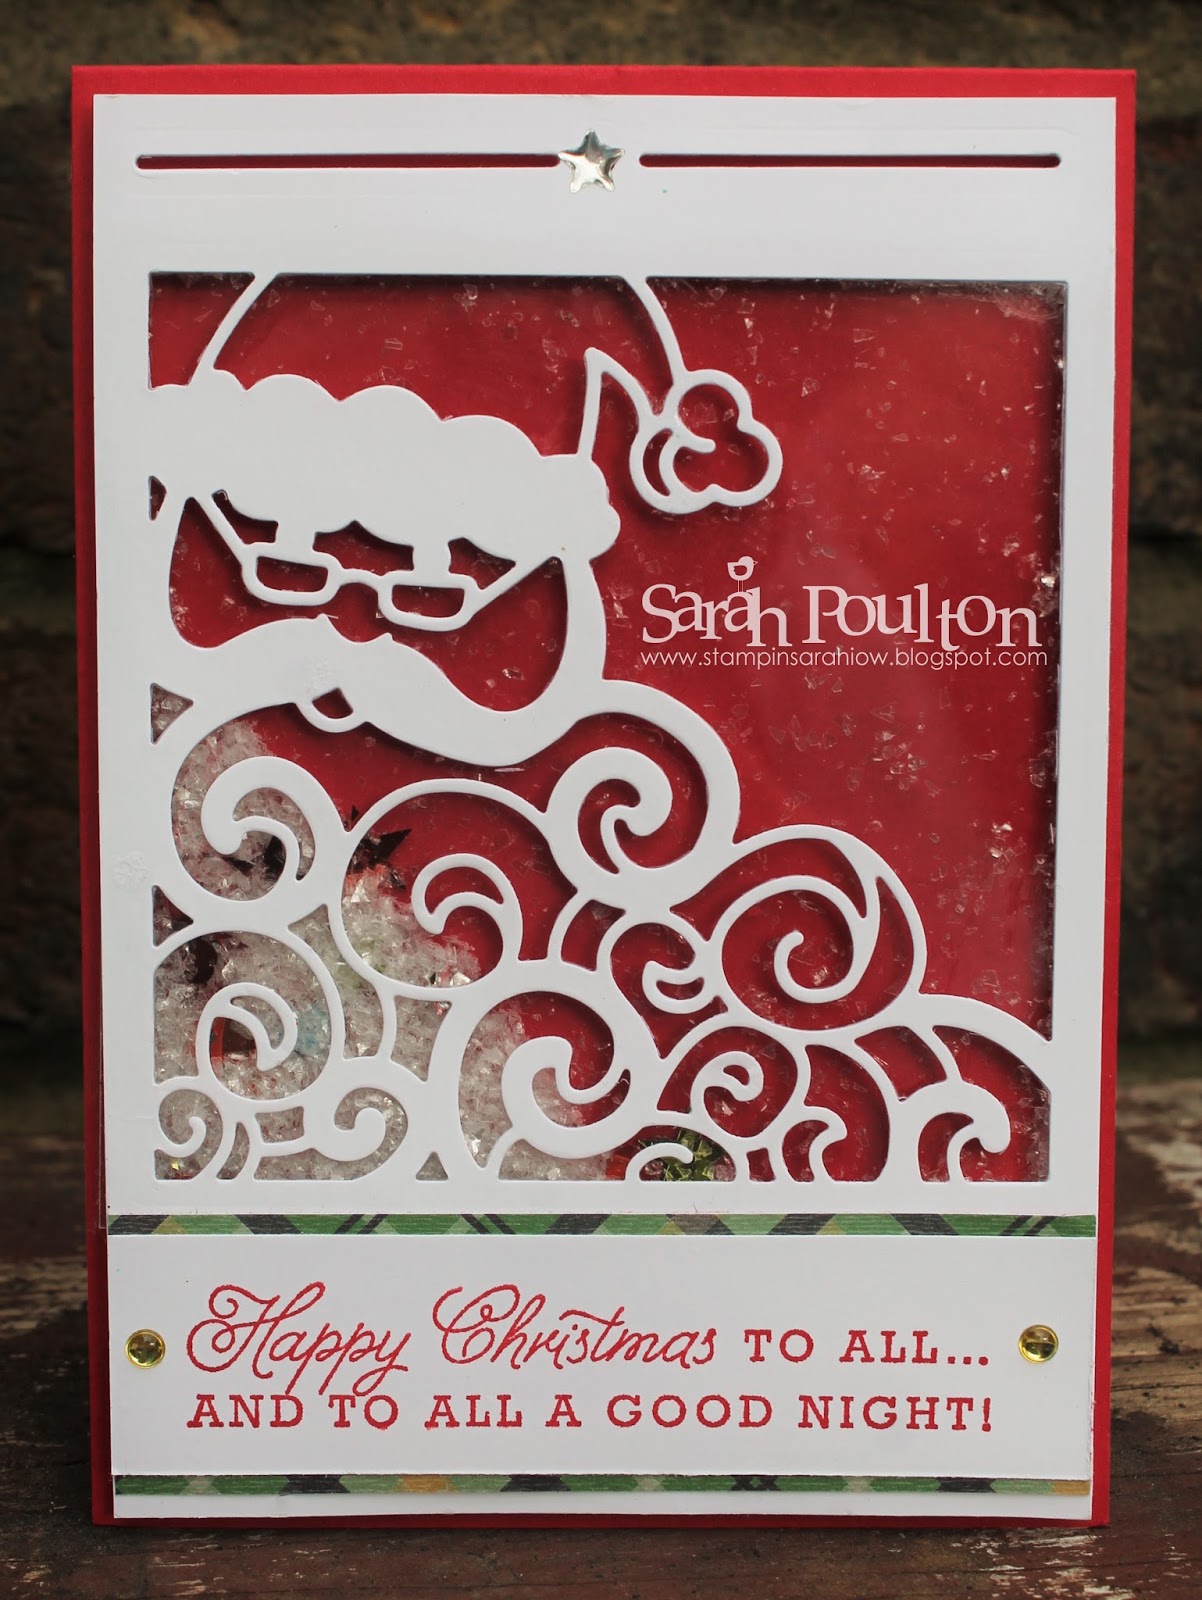
Today's share is a shaker card using the gorgeous Mica Flakes from the Autumn Winter catalogue combined with the Detailed Santa Thinlit.


I layered the Detailed Santa on to a ready cut piece of Window Sheet. I then used the fab Adhesive Foam Strips to create my raised window. I added sequins and mica flake to the centre of the card and adhered my window over the top. I love the effect of the mica flakes as it looks like Santa's sparkly beard.


Please let me know if you have any questions about Stampin' Up! and their products. I would be happy to help.  All items can be purchased online via my shop or get in touch directly and I can order them for you to be delivered direct to your door. I'd also love to Demo for you and your friends at a crafty party. As the hostess you earn lots of lovely freebies and you all get to make a fun crafty project too!

Product List

Friday, 30 September 2016

A Jolly Friends Foldover Christmas Card from Stampin' Up! UK Demonstrator Sarah Poulton

Hello Crafters and very Happy Friday. Welcome to the weekend. What is on your agenda? I have a lovely class lined up tomorrow using the Forever Evergreen Christmas Trees Kit from the Autumn Winter catalogue. Should be a fun few hours. 

To celebrate the weekend I have a fun foldover card to share today. This is inspired by a make and take project we completed at my upline Michelle's team get together earlier this month. I knew with a few tweaks it would be a perfect class project.

I used a Crumb Cake Card base with just one part embossed with the Cable Knit Embossing Folder.


The hole is punched with the 2" Circle Punch. A 2" Cherry Cobbler Circle was then adhered to the folded over flap to appear through the front hole. I added the little elf face and punched hat (with a jingle bell as a pom pom). The stamping was added using the Stitched With Cheer stamp set in Garden Green and Cherry Cobbler.


The inside of the card features the Stitched with Cheer banner and added stars and enamel shapes for colour and texture.


Thank you for popping by today. I'd love to see what you've been creating so please feel free to leave your blog details in the comments or drop me a line.

Please let me know if you have any questions about Stampin' Up! and their products. I would be happy to help.  All items can be purchased online via my shop or get in touch directly and I can order them for you to be delivered direct to your door. I'd also love to Demo for you and your friends at a crafty party. As the hostess you earn lots of lovely freebies and you all get to make a fun crafty project too!

Product List
Tuesday, 27 September 2016

Forever Evergreen Thank You from Stampin' Up! UK Demonstrator Sarah Poulton

Happy Tuesday Crafters. What are your crafty plans for the week? I have lots going on here. I've fallen behind with a Stitch Along so I'm playing catch up with them an I have a Forever Evergreen Christmas Tree class for some lovely ladies on Saturday to plan for too.


And on that note I wanted to share with you a Christmas Thank You card I made using the Forever Evergreen stamp set that accompanies the Christmas Tree kit. I wanted to make a card for a recent hostess and this is what I came up with.


I started with a Garden Green cardstock base and layered with Whisper White. I stamped the images in Memento Black Ink, Pear Pizzazz, Real Red and Daffodil Delight.


I coloured the bauble with my Gold Wink of Stella and added an enamel shape to my hanging baubles.


I added a little extra detail to the inside of my card.


Thank you for popping by today. Please let me know if you have any questions about Stampin' Up! or our products. I would love to help. All items can be purchased online via my shop or get in touch directly and I can order them for you to be delivered direct to your door. I'd also love to Demo for you and your friends at a crafty party. As the hostess you earn lots of lovely freebies and you all get to make a fun crafty project too!

Product List

Monday, 19 September 2016

A Home Sweet Home Card from Stampin' Up! UK Demonstrator Sarah Poulton

Morning lovelies. How was your weekend? Lots going on here with my monthly card class and a trip to the Handmade Fair at Hampton Court. This is one of my favourite shows as you get to try new and different crafts. I went with my Mum and sister and we had a go at folk art painting, crocheting a bracelet and made a felt flower brooch. There was also the obligatory shopping too. I came away with some little kits for crafting with my girls as well as a teddy angel kit to create at home for Christmas. If you love giving new crafts a go as I'd put the Handmade Fair 2017 in your diary.

Now back to Stampin' Up! One of my lovely card class friends recently moved house and I wanted to make a card for her to celebrate the move. I love these little punch art houses. I've used this theme before for new home cards. I cut a small square of Crumb Cake and then cut one the same size from a scrap of patterned DSP (retired) which I then cut in half to make the little roof.


I layered Very Vanilla over Blushing Bride to make the heart stand out (punched with a small heart punch in my stash). The Home Sweet Home and banner are from the fab Sweet Home stamp set (which coordinates with the matching Framelits for making little house boxes). To finish I added Brights Enamel Shapes.


Thank you for popping by today. Please let me know if you have any questions about Stampin' Up! or our products. I would love to help. All items can be purchased online via my shop or get in touch directly and I can order them for you to be delivered direct to your door. I'd also love to Demo for you and your friends at a crafty party. As the hostess you earn lots of lovely freebies and you all get to make a fun crafty project too!

Product List