Wednesday, 30 December 2015

Another Spring Summer Sneak Peek from Stampin' Up! UK Demonstrator Sarah Poulton

Good day lovelies. Happy week between Christmas and New Year. I love these days that don't quite make sense. A lot of family time and relaxing and confusion of what needs to be done when. I hope you are all having a lovely festive season. I haven't been up to much but have been enjoying lots of family silliness and a lot of stitchiness too (accompanied by family films on TV). 

My BIG crafty news is that I finally finished stitching Summer's Christmas stocking that I took in to hospital when I went in to have her. So I have been stitching it on and off for 3 (nearly 4) years. Just got to finish it off and back it ready for next year. Oh and make another stocking for Sylvie too as I cannot have one handmade and not the other. That is a project that can wait till 2016 now though! Picture to follow later in the week ;0)

Today I have another sneak peek project for you. I made this card for one of my lovely crafty friend's birthdays just before Christmas. This uses the lovely Birthday Blooms stamp set. I adore the lovely handwritten sentiments in this set.


For this card I heat embossed the flower image in Silver and coloured with my Blender Pens using Rich Razzleberry, Wisteria Wonder and Wild Wasabi ink pads. I love all the different colour tones you can get simply by colouring with the Blender Pens.

I added the sentiment and a sprinkling of sequins for sparkle and finished by mounting on to a layer of Silver Foil card and then on to a Whisper White base.


I am currently working on my events for 2016 list. I have some great ideas for upcoming classes so please check back later in the week where I will be releasing all the info for the year ahead. I also have my new Hostess Club starting in January. I have spaces available so if you'd like to benefit from monthly gifts, freebies and hostess rewards please get in touch to find out more: poulton_sarah@yahoo.co.uk.

To celebrate the last few days of 2015 why not treat yourself to something from the Weekly Deals.  Who doesn't love a bargain at this time of year? And don't forget there are still plenty of bargains to be hand on the Year End Sale list.
Thank you for popping by today. Please let me know if you have any questions about Stampin' Up! or our products. I would love to help. All items can be purchased online via my shop or get in touch directly and I can order them for you to be delivered direct to your door. I'd also love to Demo for you and your friends at a crafty party. As the hostess you earn lots of lovely freebies and you all get to make a fun crafty project too (no crafting experience necessary!)

 -XXX-


Built for Free Using: My Stampin Blog

Saturday, 26 December 2015

A Very Happy Christmas (and a Flowering Fields Sneak Peek) from Stampin' Up! UK Demonstrator Sarah Poulton

Good morning and a very Happy Boxing Day to you all.

I hope you had a lovely Christmas Day yesterday and that your stockings were stuffed with lots of lovely crafty goodies. I received a beautiful set of 4 cross stitch tree kits. Each tree represents Winter, Spring, Summer or Spring. I cannot wait to get started with them. I am just finishing off a pre-Christmas project then I will sit down and get started with my lovely new kits.

I am currently having some technical issues with my computer (one of my littlies sat on my laptop and has broken the screen). I can only use half of the screen so blogging and editing my pictures is proving a little challenging. It is my birthday on Friday so I might ask the birthday fairies if they can help with my technology situation. Keep your fingers crossed for me.

I thought as it is Boxing Day and Christmas has passed I would give you a little sneak peek of Sale-A-Bration and what will be coming to Stampin' Up! in the New Year (Sale-A-Bration launches on January 5th along with the gorgeous new Spring Summer catalogue).

This is a card I made for a friends birthday earlier in the month using one of the FAB freebie stamp sets called Flowering Fields.


To create this card I used a Whisper White note card base and used my Memento Black ink to stamp the component parts (each flower stem is a separate stamp with the added butterfly details too). I then coloured with my ink pads and blender pens.

For those eagle eyed amongst you you'll also notice the new gorgeous floral embellishment. You'll find these gorgeous Botanical Garden Jewels in the new Spring Summer catalogue (if you'd like your own copy to peruse drop me a line on poulton_sarah@yahoo.co.uk and I'll get one in the post to you). 

I'd like to take this opportunity to thank you for taking the time to read my blog throughout 2015. I've been blogging now for nearly 6 years. I cannot believe how much I have learned and how many friends I have made through Stampin' Up! and crafting. There are lots of exciting things coming up in 2016 and I look forward to sharing crafting and creativity with you. Thank you again for supporting Stampin' Sarah! and I'd like to wish you a very Happy New Year.

I'll be back in the week with a few more sneak peeks for you. But don't forget if there was anything you loved in the Autumn Winter Catalogue you've only got until January 4th to place your order before the products retire for good.


Thank you for popping by today. Please let me know if you have any questions about Stampin' Up! or our products. I would love to help. All items can be purchased online via my shop or get in touch directly and I can order them for you to be delivered direct to your door. I'd also love to Demo for you and your friends at a crafty party. As the hostess you earn lots of lovely freebies and you all get to make a fun crafty project too (no crafting experience necessary!)

 -XXX-

Monday, 21 December 2015

A Cozy Christmas Santa Flight from Stampin' Up! UK Demonstrator Sarah Poulton

Good morning and a very Happy Christmas Week to you all.

I hope you've had a lovely weekend. We took the girls to see one of the big Christmas light displays locally which was lovely and festive. I still haven't started my Christmas wrapping though which was number one on my list of things to do this weekend.

I have a quick Cozy Christmas card to share with you today. This uses a Real Red cardstock base embossed with the Boughs and Berries Embossing Folder. I then layered with Old Olive and Whisper White.


I stamped the Santa and sleigh in Night of Navy and embellished with pearls and rhinestones. I wrapped my Oval layers with Silver Thread and then adhered Home for Christmas Designer Buttons.


I love a simple card like this. It came together quickly. Although it would probably need substituted embellishments for cheaper posting.

Thank you for popping by today. Please let me know if you have any questions about Stampin' Up! or our products. I would love to help. All items can be purchased online via my shop or get in touch directly and I can order them for you to be delivered direct to your door. I'd also love to Demo for you and your friends at a crafty party. As the hostess you earn lots of lovely freebies and you all get to make a fun crafty project too (no crafting experience necessary!)
 -XXX-

Built for Free Using: My Stampin Blog

Friday, 18 December 2015

A Lovely As A Tree Christmas Card from Stampin' Up! UK Demonstrator Sarah Poulton

Happy Festive Friday.

I've been rushing round the shops this morning doing all my last minute finishing off bits and bobs. I am now fully stocked on wrapping paper and sellotape, stocking stuffer and treats. And this afternoon sees our big Christmas shop delivered with fun festive snacks for the next couple of weeks. I am now feeling more organised which is a relief. 

Today I have a cardmaking class make from last weekend to share. I love the simplicity of the gold tones in this card. It features a circle embellishment stamped with the tall tree from the Lovely As A Tree stamp set (a long stay stamp set from the catalogue and a firm favourite of mine). I layered my stamping with Memento Black ink and then highlights of gold embossing over the top.


I used Gold Foil to highlight the circle and a thin layer of foil around the Whisper White layer. The gold embossed sentiment is from the Reason for the Season stamp set.


Thank you for popping by today. Please let me know if you have any questions about Stampin' Up! or our products. I would love to help. All items can be purchased online via my shop or get in touch directly and I can order them for you to be delivered direct to your door. I'd also love to Demo for you and your friends at a crafty party. As the hostess you earn lots of lovely freebies and you all get to make a fun crafty project too (no crafting experience necessary!)
 -XXX-
Built for Free Using: My Stampin Blog

Wednesday, 16 December 2015

A simple Snow Place Christmas Card from Stampin' Up! UK Demonstrator Sarah Poulton

Happy Wednesday crafters.

I have a super simple Christmas card to share today. I only just invested in the Snow Place stamp set. I cannot believe I didn't purchase it earlier as it is so much fun to stamp with. I do love a stamp set I enjoy the actual stamping process with. 

I had seen various versions of this card on Pinterest and loved the use of the Real Red Pompom Trim for the earmuffs. So here is my take on the happy little Christmas penguin.


It really is as simple as just stamping your penguin, stamping your scarf on a scrap piece and either cutting with scissors or the matching Framelit and then adhering together with a matching sentiment.

And speaking of sentiments, don't you love the fun sayings in this set? I prefer more traditional greetings normally. But I love these funny little greetings and I especially love the font too.

Thank you for popping by today. Please let me know if you have any questions about Stampin' Up! or our products. I would love to help. All items can be purchased online via my shop or get in touch directly and I can order them for you to be delivered direct to your door. I'd also love to Demo for you and your friends at a crafty party. As the hostess you earn lots of lovely freebies and you all get to make a fun crafty project too (no crafting experience necessary!)
 -XXX-
Built for Free Using: My Stampin Blog

Monday, 14 December 2015

A wintery Home for Christmas Card from Stampin' Up! UK Demonstrator Sarah Poulton

Good morning crafters. How was your weekend?  Lots of festive-ness here with my December card class on Saturday. To celebrate I cracked open my pot of Waitrose Signature Spice and made a Spiced Orange and Almond Cake for my ladies. What a treat!

Today's festive card make is inspired by a lovely fellow Demo and team mate of mine Tracy May. I saw her version of this card on Pinterest and fell in love with it. I just adore these little deers. They remind me of being a child and of the images of Christmas we had on wrapping and paper and cards as children. I knew I had to have a go at making this card and putting the deer centre stage.


I started by punching the 2 1/2" Circle from the snow fall papers. I fussy cut my deer and adhered over the top. I added White Craft Ink with a sponge dauber across the bottom of the card (I also used my Chalk Marker to darken areas of the snow fall).

I stamped the Jingle All The Way sentiment in Real Red and added Rhinestones for sparkle.


This is an alternative version I created with a different deer and Silver Encore ink to give a little sparkle to the snow.


And here is a little peek of the cakes from Saturday's class. I had some issues slicing the clementines but it didn't stop it tasting lovely.


Thank you for popping by today. Please let me know if you have any questions about Stampin' Up! or our products. I would love to help. All items can be purchased online via my shop or get in touch directly and I can order them for you to be delivered direct to your door. I'd also love to Demo for you and your friends at a crafty party. As the hostess you earn lots of lovely freebies and you all get to make a fun crafty project too (no crafting experience necessary!)
 -XXX-

Built for Free Using: My Stampin Blog

Friday, 11 December 2015

A Joyous Little Letters Christmas Card from Stampin' Up! UK Demonstrator Sarah Poulton

A very happy Festive Friday crafters.

I love today's project. I cased this from Teneale Williams in Australia. I created my own version as I didn't have all the same elements. I love the effect and colours. 

I started with a Crumb Cake base and a layer of Very Vanilla. I stamped the Vanilla layer with the snowflakes from the Hello December stamp set (stamped in Crumb Cake). I then layered with Circles punched from Cherry Cobbler Cardstock and the music notes design from the Home for Christmas DSP.


I inked the edges of my DSP and then added my Little Letters cut from Cherry Cobbler. Once I layered and adhered all my pieces I used Crystal Effects over my letters to give them a glossy sheen. I also fussy cut holly leaves from one of the Home for Christmas DSP designs to add to my J and Y circles. To finish I added the tiny stars punched from Glimmer Paper using my Confetti Stars Punch.


Thank you for popping by today. Please let me know if you have any questions about Stampin' Up! or our products. I would love to help. All items can be purchased online via my shop or get in touch directly and I can order them for you to be delivered direct to your door. I'd also love to Demo for you and your friends at a crafty party. As the hostess you earn lots of lovely freebies and you all get to make a fun crafty project too (no crafting experience necessary!)
 -XXX-

Built for Free Using: My Stampin Blog

Thursday, 10 December 2015

Fantastic Stampin' Up! Year-End Sale


From now until January 4th you can get some AMAZING bargains on a selected range of Stampin' Up! products. These products are only available while stocks last so make the most of these bargains early before they sell out.

Check out all the products through my Online Store now.

There is no minimum purchase amount and you can add items from the catalogue or Weekly Deals too. Just to note, there are no refunds or exchanges on items purchased through the promotion.


I've picked out a few of my favourite Must-Haves in the showcase below. Check out the full range online.


Thank you for popping by today. Please let me know if you have any questions about Stampin' Up! or our products. I would love to help. All items can be purchased online via my shop or get in touch directly and I can order them for you to be delivered direct to your door. I'd also love to Demo for you and your friends at a crafty party. As the hostess you earn lots of lovely freebies and you all get to make a fun crafty project too (no crafting experience necessary!)

 -XXX-
Built for Free Using: My Stampin Blog

Tuesday, 8 December 2015

An inky Cozy Christmas from Stampin' Up! UK Demonstrator Sarah Poulton

Good morning crafters.

How was your weekend? I hope your festive preparations are going well. I was busy finishing off a few final handmade gifts and working on my Christmas journal. I look forward to sharing some pics later in the week. I have kept things quick and easy this year and I am enjoying my daily note taking and picture printing.

I have a card I designed for a recent Stampin' Up! party to share today. I have really been enjoying getting inky and messy with some masking and sponging recently. 

To create this card I punched a 2" circle from a Post It and positioned where I wanted the moon to go. I then stamped the tree and deer image from the To You & Yours stamp set at the base of the card. Then I sponged a mixture of Pool Party and Island Indigo to create the moody winter sky.


Once the sky was inked I removed the Post It and used a dauber to sponge So Saffron over the moon, I added the sleigh and silver stars. To finish I added the Cozy Christmas sentiment.


I designed this card to fit on a Stampin' Up! Whisper White Note Card. So it was super simple to create a pile of them in one go (with an envelope all ready to go). This is one of my favourite Christmas cards of the year so I have made a few to send to friends and family.

Thank you for popping by today. Please let me know if you have any questions about Stampin' Up! or our products. I would love to help. All items can be purchased online via my shop or get in touch directly and I can order them for you to be delivered direct to your door. I'd also love to Demo for you and your friends at a crafty party. As the hostess you earn lots of lovely freebies and you all get to make a fun crafty project too (no crafting experience necessary!)

 -XXX-
Built for Free Using: My Stampin Blog

Friday, 4 December 2015

A Wood Burnt Decoration from Stampin' Up! UK Demonstrator Sarah Poulton

Hello crafters. How goes your week? It has been a busy one here with work and festive preparations. I am going to be enjoying mooching today taking some festive pictures for my December album. More pictures of that to follow.


Today I have a little hostess club gift I made for all my lovely club members to celebrate the season to share with you. I received a pyrography tool for Christmas last year and have periodically made items through the year. I had seen a lot of these wood burnt slices on Pinterest and knew the snowflake from the Hello December would be a perfect wood burnt embellishment.


I bought my wood slices online and then began by stamping the snowflake in Crumb Cake. I then traced the design with my wood burning tool. It was as simple as that. 


I added a length of Linen Thread to hang the decoration. To package the decorations I cut pieces of Very Vanilla cardstock and stamped the matching Hello December snowflake with Crumb Cake ink. I cut a slit in the top of the Vanilla card and tucked my decoration through (securing on the back with washi tape). I then slipped the whole piece in to a 4"x6" Cello Bag.

To decorate my bag I added a little Old Olive stamped tree banner and a felt tree from my crafty stash (non-SU).


I hope you've liked something a little different today. I enjoy mixing Stampin' Up! with my other crafty loves. It goes to show how versatile Stampin' Up! really is.

Thank you for popping by today. Please let me know if you have any questions about Stampin' Up! or our products. I would love to help. All items can be purchased online via my shop or get in touch directly and I can order them for you to be delivered direct to your door. I'd also love to Demo for you and your friends at a crafty party. As the hostess you earn lots of lovely freebies and you all get to make a fun crafty project too (no crafting experience necessary!)

 -XXX-

Built for Free Using: My Stampin Blog

Wednesday, 2 December 2015

A little Hello December craftiness from Stampin' Up! Demonstrator Sarah Poulton

Good morning crafty crafters.

As it is now officially Christmas season I can share with you my Christmas journal for 2015. I follow several of the online classes for inspiration for my album. The main focus is Shimelle's Journal Your Christmas Class as I have been following this for 5 Christmas's previous. I adore scrapping all the little details of my December each year. This year I have a little shopper bag beside my Selphy photo printer filled with Project Life cards and embellishments and I am limiting myself to only these otherwise I will get too caught up in every page and fall behind (the voice of bitter experience here!)

I indulged in a little creativity over the weekend and designed a very simple golden detail front cover for my 6"x8" Kraft Album (my perfect Christmas album size). I started with my Embossing Buddy to take out the static and prime the surface for heat embossing. I used my Stars Mask to versamark the stars across the cover. I then covered with Gold Stampin' Emboss Powder and heated with my Heat Tool to create these lovely shimmery gold stars. I added my Dec 2015 die cut from the Hello December Embellishment Kit as an extra glittery focus.

Gold is my theme colour this year. I think it will run through all the pages of my album.


I love these little tabs on the spine of my Christmas albums. They give a little insight in to what can be found inside. I used my Embellishment Kit again for my spine title tab.


And here is my first quick and easy page. Not a lot to report on December 1st so I simply printed pictures from my day and then simply embellished. I love not putting pressure on myself to journal unnecessarily. Some days I have lots to say and others I just like to capture little details like winning £5 on a scratchcard. 


Over the next few weeks I will share more pictures from my journal and I'm also going to be showing a few little highlights of my 5 previous journals. I love how different each year ends up being. But lovely to look back on and see how things have changed.

Thank you for popping by today. Please let me know if you have any questions about Stampin' Up! or our products. I would love to help. All items can be purchased online via my shop or get in touch directly and I can order them for you to be delivered direct to your door. I'd also love to Demo for you and your friends at a crafty party. As the hostess you earn lots of lovely freebies and you all get to make a fun crafty project too (no crafting experience necessary!)

 -XXX-

Built for Free Using: My Stampin Blog

Monday, 30 November 2015

A Fry Box Die Gift Bag from Stampin' Up! UK Demonstrator Sarah Poulton

Happy Monday Crafters ;0)

Hope you've had a lovely weekend. Things certainly feel festive here with Christmas lights and music. Shame about the weather though. Our local lights switch on was cancelled due to the crazy wind and rain. Hopefully things'll calm down this week and we can get involved with a few more festive activities. And tomorrow will mark the start of my Christmas journal which I look forward to sharing with you over the next few weeks.

Today's creative share is a project from my November card class and is made with the gorgeous Home for Christmas Designer Series Papers with the Fry Box Bigz Die.


To make this gift box you just have to cut two of the Fry Boxes from your chosen DSP and then cut the sides from one of the boxes and then stick the bottom panels together (one on top of the other).  To create the handles I used my Large Oval Punch on each panel front and back.

To create the label I used the Making Spirits Bright stamp from the Among the Branches stamp set. I stamped using my Gold Encore pad and then punched with my 2" circle punch. I hung this from my gift box with Cherry Cobbler Baker's Twine.


To finish we filled the gift bags with novelty Christmas choccies (not that all of them made it in to the bags). This would make a lovely little table favour or decoration to hang from the Christmas tree.

Thank you for popping by today. Please let me know if you have any questions about Stampin' Up! or our products. I would love to help. All items can be purchased online via my shop or get in touch directly and I can order them for you to be delivered direct to your door. I'd also love to Demo for you and your friends at a crafty party. As the hostess you earn lots of lovely freebies and you all get to make a fun crafty project too (no crafting experience necessary!)

 -XXX-

Built for Free Using: My Stampin Blog

Wednesday, 25 November 2015

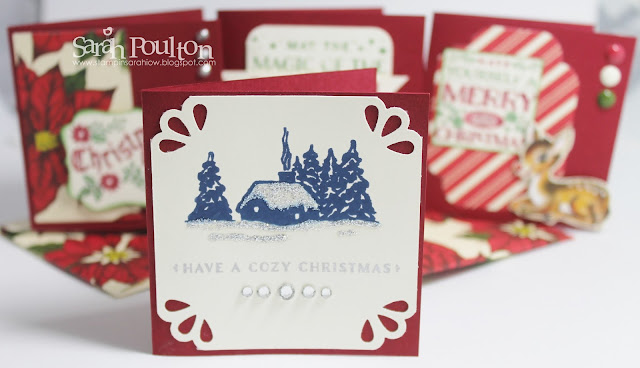
A Cozy Christmas Quartet from Stampin' Up! UK Demonstrator Sarah Poulton

Earlier this month I hosted a Cozy Christmas product based class where I designed a series of projects to showcase this lovely Autumn Winter Catalogue stamp set.

I wanted to create a little set of Christmas notecards and envelopes with a matching box to keep them in. This is what I came up with.


I started by designing the box which I made using my Gift Box Punch Board. I wanted the box to be 3.25" x 3.25"x 1.75" so I used an 8" x 8" square of Cherry Cobbler. I created the 3" square note card bases (uses 3"x6" piece of card scored at 3") with the offcuts of my 12"x12" cardstock used for the box.

I then used small pieces of the Home for Christmas Designer Series Papers and my Stampin' Write Markers (and with an extra little bit of help from my Paper Snip Scissors) to create 4 little differently designed notecards.


I loved using the designs of the paper too embellish my cards. These little deers are just too lovely not to make the focus of a card. For this card I used my Home for Christmas Enamel Dots and Corner Trio Punch.


This is my favourite of this set of cards. I love the little cottage image and with the added Dazzling Details it felt very festive when making it. This is again embellished with the Trio Corner Punch and Rhinestones.


And lastly, here is the box I made to keep the cards and envelopes in (envelopes made with the Envelope Punch Board and Home for Christmas DSP).


Thank you for popping by today. Please let me know if you have any questions about Stampin' Up! or our products. I would love to help. All items can be purchased online via my shop or get in touch directly and I can order them for you to be delivered direct to your door. I'd also love to Demo for you and your friends at a crafty party. As the hostess you earn lots of lovely freebies and you all get to make a fun crafty project too (no crafting experience necessary!)

 -XXX-

Built for Free Using: My Stampin Blog

Tuesday, 24 November 2015

Downline 5 Year Celebration Gift from Stampin' Up! UK Demonstrator Sarah Poulton

A very big Happy 5 Year Stampin' Up!-versary to my good friend and longest downline member Sandy. She joined this fab company a few months after I did back in 2010 and she has become a great friend during that time.

To celebrate I wanted to hand make her a little gift and, of course, a card too.

I came up with this Soft Suede and Marina Mist combo card with a little extra sparkle with my Champagne Glimmer Paper 5.


I used the Awesomely Artistic ink splatter stamp for the background and added the beautiful handwriting style sentiment from Cottage Greetings.

Detail and layering was added with the Chevron Ribbon, bakers twine, a punched Elegant Butterfly and bitty flowers with rhinestones.


And here is the gift I made for her. I bought this wooden drawer set from The Works with a view to either inking or wood burning. When I came to decorate I decided to cover with papers and add embellishments from my stash. I thought this little set of drawers would be perfect for storing embellishments or little crafting bits and bobs.


Thank you for popping by today. Please let me know if you have any questions about Stampin' Up! or our products. I would love to help. All items can be purchased online via my shop or get in touch directly and I can order them for you to be delivered direct to your door. I'd also love to Demo for you and your friends at a crafty party. As the hostess you earn lots of lovely freebies and you all get to make a fun crafty project too (no crafting experience necessary!)

 -XXX-

Built for Free Using: My Stampin Blog

Friday, 20 November 2015

A Cozy Christmas Hot Chocolate Gift Jar from Stampin' Up! UK Demonstrator Sarah Poulton

Good morning crafty friends. Happy rainy Friday. I am sat contemplating a very wet walk to pre-school this morning. I am delaying the inevitable by talking to you instead.

I have a project to share from my Cozy Christmas product class earlier in the month. All my projects showcased different elements of the stamp set. I found these lovely little jars in my local discount store and thought they would be perfect for filling with hot chocolate, treats and marshmallows and decorating as a simple little Christmas gift for a friend or neighbour.


I started by creating the jar's belly band with strips of Night of Navy, Pool Party and Home for Christmas Designer Series Paper. I then punched two Decorative Labels and stamped the Cozy Christmas cottage on the Pool Party label. I used this label to cover the join in my DSP.


I added a little Dazzling Details sparkle to my label for extra sparkle.

I stamped a To and From tag with the cuppa from the Project Life Hello December Christmas stamp set and my Note Tag Punch. I tied this with Bakers Twine and attached to my jar to finish the project.


Thank you for popping by today. Please let me know if you have any questions about Stampin' Up! or our products. I would love to help. All items can be purchased online via my shop or get in touch directly and I can order them for you to be delivered direct to your door. I'd also love to Demo for you and your friends at a crafty party. As the hostess you earn lots of lovely freebies and you all get to make a fun crafty project too (no crafting experience necessary!)

 -XXX-

Built for Free Using: My Stampin Blog

Wednesday, 18 November 2015

A New Baby Girl Butterfly Card from Stampin' Up! UK Demonstrator Sarah Poulton

Happy Weekly Deals Wednesday crafters. Hope you are having a productive week so far. We have a house full of colds here so not much but snuggling and keeping warm happening so far. But I have a lot of ideas awaiting translation to paper to share with you.

Today's project is a super special card I made for my friend who had a little girl last month. Natalie is a friend from Uni who I shared the ups and downs of singledom and longing for children with. We are both now in our 30s with two children a piece. I loved making this card to celebrate the arrival of little Laura-Mia.


My colour scheme for this card is So Saffron and Pink Pirouette.  I started by stamping the name and date with my rotary stamp in Pink Pirouette. I then punched the words centrally with my 2.5" Circle Punch. I used the Bitty Butterfly Punch to create my circle (I used the butterflies to cover the edges of my word circle raised with dimensionals).

To finish I added Subtles Candy Dots, a heart punched with my Bitty Accents Heart Punch and lots of basic pearls.


Inside I added butterflies stamped with the Perpetual Birthday Calendar Stamp Set and the sentiment is from Cottage Greetings (stamped in Rose Red).


Thank you for popping by today. Please let me know if you have any questions about Stampin' Up! or our products. I would love to help. All items can be purchased online via my shop or get in touch directly and I can order them for you to be delivered direct to your door. I'd also love to Demo for you and your friends at a crafty party. As the hostess you earn lots of lovely freebies and you all get to make a fun crafty project too (no crafting experience necessary!)

 -XXX-

Built for Free Using: My Stampin Blog