Thursday, 30 January 2014

Happy Watercolour Tag Card


Good morning crafty friends.

I have a lovely creation for you this morning designed by Hayley, one of my lovely team of Stampin' Up! Demonstrators. We had our monthly shoebox swap meet up last week and this was the gorgeous card Hayley brought along for us all to create.

This showcases so many of the beautiful products in the Spring Summer catalogue as well as the fabulous Decorative Dots Textured Impressions Embossing Folder which you can add to your order for free as part of Sale-A-Bration (when you spend £45).

The Happy Watercolor stamp set is my absolute favourite new set from the Spring Summer catalogue. I just love the effect of the graduated background stamp which gives the paintbrush swish effect. It makes creating a watercolour effect so simple.

This card uses Pear Pizzazz, Wisteria Wonder and Elegant Eggplant (used for highlighting the floral elements when colouring the stamped images). We coloured the flowers using Blender Pens and the three coloured ink pads.

And did you spot the tag? This was created using a great new punch in the catalogue, the Scalloped Tag Topper Punch. It makes creating matching DSP or cardstock tags so easy. All you need to do is cut your rectangle of paper to size and slot in the punch and voila you have a perfectly punched scallop tag!


Pop back tomorrow as I have some exciting news to share about a fantastic new embossing tool as well as another crafty project to share too.

Please get in touch if you have any questions about Stampin' Up! or if you would like to place an order. I'm always happy to have a crafty chat or help in any way I can: poulton_sarah@yahoo.co.uk or 01983 609249.

Happy Crafting
-X-


Tuesday, 28 January 2014

Top Note Owl Card Tutorial


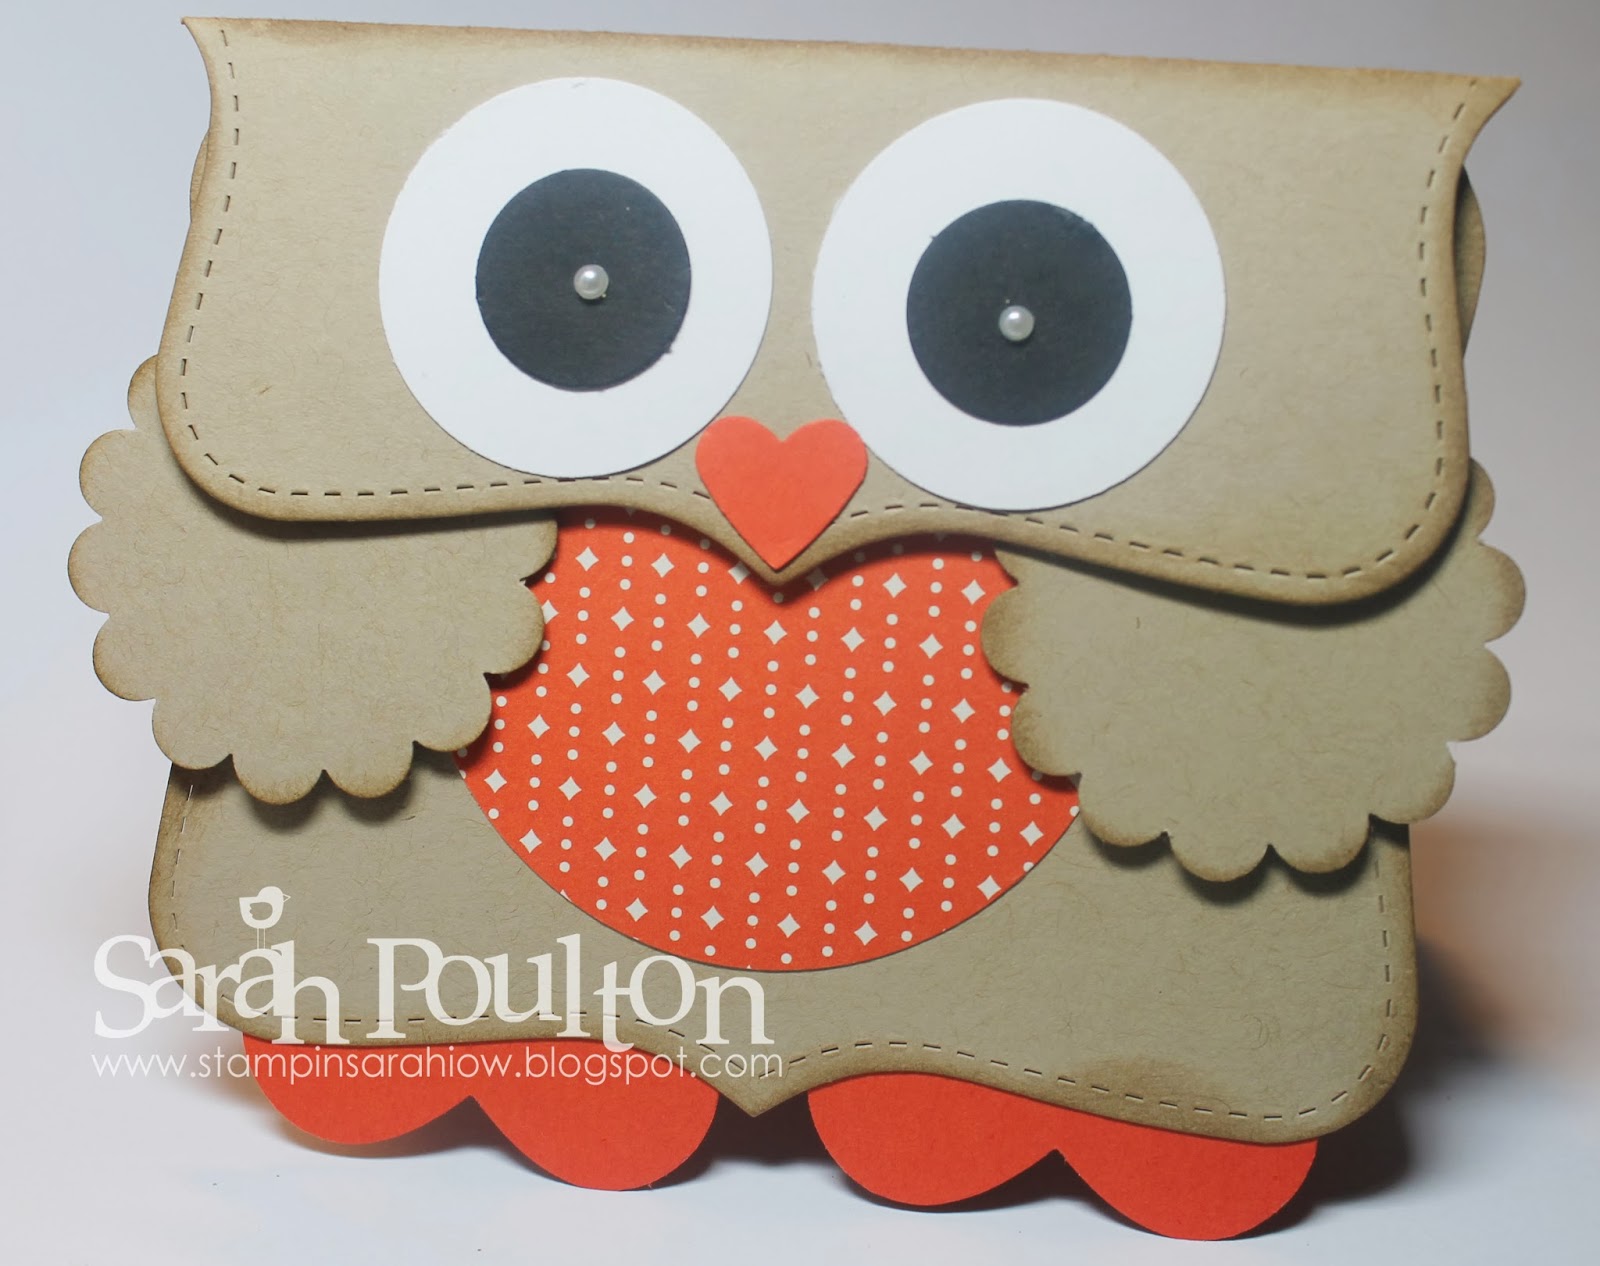
To celebrate today's launch of Sale-A-Bration and the new Spring Summer catalogue I am sharing the instructions to create the little Top Note Owl I posted on Saturday for the Pinkies Blog Hop.

I had seen a few variations of this lovely little owl on Pinterest (this one is my favourite by Bronwyn Eastley) and on blogs so I decided to give him a go myself. By looking at various pictures I was able to break down the component parts. Sorry for the low-tech instructions, I haven't quite worked out how to do this next part using technology. But I thought my handwritten instructions might give you the idea. These are all the component parts you will need to create your owl.


For Saturday's gift bag I used 2 1/2" Circle punched from Sweet Sorbet DSP (free with a qualifying Sale-A-Bration order) with matching Crisp Cantaloupe Full Hearts for the feet. Today's card above uses the gorgeous Retro Fresh Designer Series Paper with Tangerine Tango punched Full Hearts. You can change the colour scheme and DSP to fit your occasion. 

I inked the edges of all Crumb Cake elements of the owl using Crumb Cake ink and a sponge dauber to give a bit of definition.

I then glued the elements together as below. The scored Top Note becomes the hinge to hold the card together. In the example above I used Dimensionals to secure the Top Note closed before I attached the face components. For Saturday's gift bag version I created one of these mini gift bags using the Envelope Punch Board (I had to slightly squish the gift bag to fit the inside of the Owl-  I gently folded the edges inwards to give an inward V. See Saturday's post for reference). I then secured the Owl face hinge using a velcro dot to keep the bag closed.


Once you have assembled your component parts as above you can then either form in to a gift box, bag or card and then finalise with the eyes and small heart for the beak. To create the little whites of the eyes i have used a medium sizes Basic Pearl.

You will then have the main body of your Owl and you are free to embellish as fitting for your occasion. I have kept the card above plain and will embellish when I need the card. However, my example of Saturday I added a Valentines 'I Love U' banner using the fabulous Sale-A-Bration Banner Blast stamp set and matching Banner punch.


I hope that has made this project a little simpler for you to recreate. Please leave me a comment or drop me a line on poulton_sarah@yahoo.co.uk if you have any questions. I'd be only too happy to help.

Happy Owl-y Crafting
-X-

Monday, 27 January 2014

Card in a Box Birthday Celebration

 Good morning crafters and a big welcome to a new crafty week.

A HUGE thank you to all the visitors to my blog over the weekend for Pinkies Sale-A-Bration blog hop. I can see from my statistics that I had a lot of new visitors to Stampin' Sarah. I hope you liked my little Sale-A-Bration Owl. If you pop back tomorrow I will give you a break down of how I created the little chap.

Now on to the order of the day, a big Happy Birthday to my Mum! I spent several hours tucked away in my craft room this weekend while Summer was entertained downstairs with Daddy (I found them tucked up together eating blueberries and watching cartoons when I'd finished!) creating two birthday cards for Mum.

The first is this card in a box creation.


I've seen so many different versions of this style of card across the blogosphere and decided to give one a go. It took a bit of time to get my colour scheme sorted. But I'm really happy with the result. I found this fab tutorial over on The Serene Stamper's blog which explained how to go about creating one of these cards in a box. I used the video to gain my card base and I then decorated with my own floral theme using the Sale-A-Bration Sweet Sorbet Designer Series Paper and matching coloured cardstock (Crisp Cantaloupe, Pistachio Pudding, Summer Starfruit and Pool Party).


I created this Happy Birthday using the gorgeous Four Frames stamp set (and coordinating Decorative Label Punch) matched with the Sketched Birthday banner stamp. I finished with my favourite Basic Pearls.


Here is a closer view of the pop up element of the card using the Pansy Punch and the Petite Petal Punch which is launching Tuesday as part of the Spring Summer catalogue. I also created the rock n' roll butterfly using Papillon Potpourri and the matching Elegant Butterfly punch.


This is how the card folds down to fit in a standard C6 envelope.

The second card I created I designed specifically for Summer to give to Nana. I  had stitched the wooden heart keyring and wanted to create a Stampin' Up! card to match this piece of cross stitch (and also feature the gift). I chose the beautifully bright Gingham Garden Designer Series Papers to highlight my floral heart.


Here is a close up of my stitched keyring.


I have to confess to being a little addicted to creating these sunshine cards and scrapbook pages. I had seen so many and been so in awe of the technique. I never realised how quick and easy (and simple) it is to create this effect. All you need to create your own sunshine card or page is to measure the space you want to sunshine to fill and then cut a piece of scrap card to those measurements. All you then have to do is create a template for your pieces and use these to trace around and cut your Designer Series Papers. 

This is the template I created for the card above (a standard 14.8cm x 10.5cm card base). This measured 14.3cm x 10cm and I randomly cut the lines from my centre sunshine point to the edges. I marked each piece A-H to ensure I didn't mix up my pieces (the ticks were to remind me that I had already cut that piece from DSP).


Thank you for stopping by today. Today is the last day to order any of the exclusive Valentines products I have previously showcased. Please pop by my online store if you'd like to order any of these before they are gone for good.

And just another quick reminder that Sale-A-Bration and the Spring Summer catalogue launch tomorrow!! I am so excited to share all the fabulous products with you. Please pop back all week as I have a whole series of cards and projects to share, starting with instructions for my blog hop owl tomorrow.

Please get in touch with any questions or to find out more about placing an order, joining my team, or hosting a party: poulton_sarah@yahoo.co.uk or 01983 609249.

Happy Crafting ;0)
-X-

Saturday, 25 January 2014

Pinkies Stampin' Up! Sale-a-Bration Blog Hop: Banner Blast Valentine


Thank you for joining us on another Pinkies Blog Hop! We're showcasing lots of gorgeous projects using new Stampin' Up!® products that you can earn free during Sale-a-Bration. Simply use the buttons at the end of each post to keep hopping!

Thank you for joining me today from Michelle's blog and hopping to the Isle of Wight for a little bit of seaside Sale-A-Bration inspiration. For my project today I have taken inspiration from three of my favourite Sale-A-Bration products to create a lovely little owl gift box for Valentines Day.


 I created this little chap using the fabulous Sweet Sorbet Designer Series Paper (with a little bit of embellishment from the coordinating Sweet Sorbet Accessory Pack- the beautiful Twines are just too lovely!), the Banner Blast stamp set and matching Banner Punch. Any one of these lovely products can be ordered for FREE with a qualifying £45 spend from any of our current Stampin' Up! catalogues. No wonder, Sale-A-Bration is my absolute favourite time of the year.

I stamped the 'Love' banner by first stamping off my card stock to remove some of the excess ink and then stamping on my Whisper White. This created this lovely mottled stamped effect as well as highlighting the writing within the design. The 'I' and 'U' were stamped using my Simply Serif Mini Alphabet stamps which I stamped and then cut to fit my mini banner.


This Owl would work perfectly as a card (just by sealing the Top Note hinge at the top) but I decided to add a little miniature gift bag inside (that I created using the Envelope Punch Board) so that I could fill it with little chocolate hearts for my other half for Valentines. Now I just have to resist the urge to eat those chocolates before the 14th!! I have just secured the hinge at the top using a small velcro dot under the beak to keep the gift bag closed.


This really is a super easy project to make using the Top Note Die and a variety of punches too. Pop back later in the week and I'll be posting full instructions on how to create this lovely little gift box. Now to continue with today's hopping. Please hop on over to Nicole's blog for more creative inspiration.

Happy Crafting 
-x-


Friday, 24 January 2014

Stampin' Up! UK Happy Watercolor In Colour Crafting

Good morning crafters.

A very happy Friday to you. It is so nearly the weekend. I hope wherever you are you have lots of lovely crafty plans for the days ahead. We are celebrating my Mum's birthday this weekend so taking a trip to the 'big island' tomorrow for a Starbucks and a bit of crafty shopping. Might even sneak a quick trip to some baby shops to start preparing for my imminent arrival.

I have another sneak peak project card to share with you today. Only 4 days to wait till the launch of the new catalogue and Sale-A-Bration. I cannot wait! So many lovely new products to create with.


This project is a card we made in my class last weekend and uses the Happy Watercolour stamp set from the new Spring Summer catalogue. This is a super clever stamp set as it contains this background stamp set that is designed to give this graduated watercolour effect. I love the simplicity of this layered brushstroke effect and it creates such a striking background.

After creating the background watercolour effect using Pool Party, Strawberry Slush and Pistachio Pudding, we then stamped the two floral images using the Flower Shop stamps (and matching Pansy Punch) from the main 2013-2014 catalogue and the new Petite Petals stamps (and matching punch) from the Spring Summer catalogue. We layered these floral stamped images and finished with a large basic pearl.

And a quick reminder, you only have 3 days left to order any of the exclusive Valentines stamps and products in the 'Whole Lot of Love' promotion. Please see my 'Promotions' tab above or click on the picture below to be linked to my online store. I have stocked up on the gorgeous little Monster Hugs for crafting with Summer. I just adore their little chocolatey hugs (and cute little bottoms too. See this post for more info).


Thank you for stopping by this morning. Please pop back tomorrow to join me in a Pinkies team blog hop. It all starts at 8am so hop on over to see lots of lovely blog hop inspiration using upcoming Sale-A-Bration products.

If you have any Stampin' Up! questions or would like to find out more about hosting a party or placing an order please get in touch on poulton_sarah@yahoo.co.uk or 01983 609249. Or you can visit my online store using the following address:


Happy Crafting
-x-

Tuesday, 21 January 2014

Stampin' Up! UK Watercolor Wonder Sneak Peak


Good morning crafty friends.

Just a quick share with you this morning (as I write this before work at 6am!). Here is one of the cards we made at my monthly card class this weekend. This uses the colour scheme from the lovely new Watercolour Wonder Designer Series Papers which will be available to order from the new Spring Summer catalogue next week.

The colours are: Daffodil Delights, Island Indigo, Tangerine Tango and Gumball Green.

I've also used some other sneak peak products for the stamping. The little flowers are from a new set, Petite Petals, which also comes with a matching Petite Petals Punch. The main label stamp is an exclusive Sale-A-Bration set called, You're Lovely.


The other fab sneak peak is the Scalloped Tag Topper Punch which I have used to create the scalloped closure for this card. If you pop back next week once the catalogue is live, I will give you a quick tutorial to show you how to create this tag top closure for your cards.  It is really quick and simple and shows the versatility of the Tag Topper Punch too.

Thanks for popping by today. If you'd like a copy of the new Spring Summer catalogue to browse at your leisure, drop me a line on poulton_sarah@yahoo.co.uk or 01983 609249 and I'll happily pop one in the post for you.

Happy Crafting
-X-

Friday, 17 January 2014

Stampin' Up! UK Sweet Sayings & A Sneak Peak


Good afternoon lovely crafters. Hip hooray for Friday ;0)

I got a bit carried away last night while prepping for my card class tomorrow. I decided I wanted to create a card using the beautiful Sweet Sayings printed card bases currently part of the Whole Lot of Love promotion. But I also received my fab preorder goodies from the new Spring Summer catalogue this week and had fallen in love with the Spiral Flower Originalz Die and wanted to have a go at creating some fab flowers too. 

I thought I would share a set of three cards I made last night all using slightly different techniques to create these beautiful flowers. And with only 11 more days until the launch of the new catalogue I thought it would be a perfect time to give you a little sneak peak of this fab die (and a bargain at only £15.95!).


I am feeling hugely inspired by the In Colors at the moment and just love the combinations of Crisp Cantaloupe, Pistachio Pudding and Strawberry Slush (a combo you'll be seeing again in the next few days). I found in my stash a complete pack of In Color Coredinations cardstock which was perfect for creating these spiral flowers. This first card uses three of the spirals to create three tightly wound  flowers. I used the Coredinations card but didn't distress at all before winding my spirals. I used a length of Pistachio Pudding Ruffle Trim around the card as well as secured under the flowers to create a leaf effect. I finished the card with the sentiment stamped in Strawberry Slush using the greeting from the Simply Sketched hostess stamp set.


From the close up you can see I added sponged Strawberry Slush ink to the flowers once completed to give a tinted edge to my flowers.

For my second and third cards I was inspired by a vintage flower tutorial I had seen online by the fabulous Patty Bennett. 


 Patty's tutorial used two colours of Coredinations cardstock together to create a distressed layered floral feature for a card. I used Strawberry Slush and Coastal Cabana for the first and Strawberry Slush and Crisp Cantaloupe for the second. Before rolling the spirals I first distressed the edges of the Coredinations cardstock with my Stampin' Sanding Block and used my bone folder to break down the fibres in the card to make it easier to roll the flowers. Once spiralled you just need to loosen the spiral a bit to give this fuller flower which you can then flatten and shape to give this more distressed feeling. I finished my flowers with a Boutique Detail and a Large Basic Pearl.


I think I have found my new favourite product in the new catalogue. I had so much fun creating these flowers and the spiral die makes life so much easier as the spirals are already cut for you (i used to spend ages punching circles and hand cutting before). The Spiral Flower Originalz Die can be ordered from January 28th (and will qualify towards Sale-A-Bration orders and freebies too!) so please add it to your Wishlist and let me know if you'd like to order. I'd be more than happy to help you with your Stampin' Up! wishlist and help you get the most out of current promotions.

And if you love the Sweet Sayings notecards, just a quick reminder, these are only available until January 27th so you'll need to get your order in quick to catch these before they are no longer available. Pop by the Whole Lot of Love page of my online store to see all the other lovely Valentines exclusives only available until January 27th.

Thanks for stopping by today this fine Friday. I hope you have a lovely crafty weekend planned. I am looking forward to my first class of the New Year and seeing all my lovely card class ladies again (and of course my Mum's lovely homemade marmalade cake she has made for us too).

Please get in touch on poulton_sarah@yahoo.co.uk or 01983 609249 to find out more about placing an order, to get a copy of our current catalogues to browse at your leisure or to find out about hosting your own fun crafty party at home.

Happy Crafting 
-X-