Showing posts with label punch art. Show all posts

Wednesday, 13 July 2016

A Foxy Friends Congratulations Card from Stampin' Up! UK Demonstrator Sarah Poulton

Happy Wednesday Crafters!

What a crazy week it has been at Stampin' Sarah HQ. I've managed to fit in some craftiness and class preparation amid all the family chaos. I've been beavering away at my Christmas Craft Day preparations for August. I cannot wait to get Christmas-y. My craft organising brain is already thinking 5 months ahead and things to make before the big day.

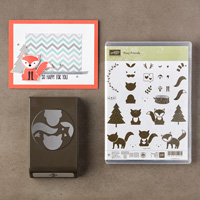
Today I have a card we made at my June card class to share. I fell in love with the Foxy Friends bundle when I saw them in Telford back in May. I've seen so many creations with this stamp and punch bundle from frogs to skunks to tigers. But for my first card with the set I stuck with the lovely little fox.


I combined the fox with the Flourish and Sunshine Wishes Thinlits. I added flowers stamped using the Swirly Bird stamp set layered over the leaves.


This is a really fun stamp set to play with and create little animals with. I love the simplicity of layering with photopolymer stamps. 

I have some lovely cards to share with you on Friday. Over the past weekend two of my lovely friends gave birth to daughters. So I had fun creating them new baby cards which are all ready to share later in the week.

Thank you for popping by today. Please let me know if you have any questions about Stampin' Up!, or any of our products. I would love to help. All items can be purchased online via my shop or get in touch directly and I can order them for you to be delivered direct to your door. I'd also love to Demo for you and your friends at a crafty party. As the hostess you earn lots of lovely freebies and you all get to make a fun crafty project too (no crafting experience necessary!).

-XXX-
Product List

Tuesday, 15 March 2016

A Happy Birthday Punch Art Mouse Card from Stampin' Up! UK Demonstrator Sarah Poulton

Good morning and a very Happy Tuesday to you. I am a bit later posting this week due to a crazy start to Monday. I was out super early walking yesterday getting in a bit of training for my Walk In Her Shoes challenge next week. Click on the link to find out more (or to sponsor me)- I'll be walking 10,000 steps every day for a week in solidarity with women and girls from the poorest countries around the world, who spend their days walking for water.  Yesterday I over did it a bit. I did 10 miles (and I forgot to wear my pedometer!). I am very achey today.

But back to crafting. Today I have a card I made with my Mum for her to give Sylvie for her birthday. I don't often sit down to play with my punches to create punch art. I really enjoyed creating this little mouse.

I used colours from the Subtles colour family for this card. I started with the stamped flowers in the background from the free Sale-A-Bration Botanicals For You stamp set. I used Wisteria Wonder, Blushing Bride and Pool Party for the stamping.

For the house I used a range of circle punches to create the ears and body.


I used the Word Window punch for the arms and legs. I added the banner punched using scraps of floral DSP. I used my Rotary Alphabet stamp to create the 'Happy' and the Birthday is taken from Endless Birthday Wishes stamp set. The mouse's face was created using elements from the Playful Pals Photopolymer Stamp Set.


Thank you for popping by today. Please let me know if you have any questions about Stampin' Up!, Sale-A-Bration or any of our new products. I would love to help. All items can be purchased online via my shop or get in touch directly and I can order them for you to be delivered direct to your door. I'd also love to Demo for you and your friends at a crafty party. As the hostess you earn lots of lovely freebies and you all get to make a fun crafty project too (no crafting experience necessary!).

-XXX-

Product List

Wednesday, 25 March 2015

Easter Bunny Chocolate Treat Box from Stampin' Up! UK Demonstrator Sarah Poulton

Good morning and a happy (if not a little chilly) Wednesday to you today.

So Wednesday brings new Weekly Deals. And what a fantastic week of specials we have this week. My favourite crafty tool, the Envelope Punch Board, is a bargain this week at just £13.46 and the Regals Paper Stack is £14.63. Combine these with some cardstock and you'll have reached your £45 spend for an extra Sale-A-Bration freebie. This is why I LOVE Stampin' Up! Not only are the products high quality and great value but you earn freebies for using and buying the products.

So on to today's crafty share. This is a project inspired by my upline Michelle who provides a great tutorial on her blog. I loved the simplicity of using the Scallop Tag Topper Punch to create the little bunny face.


I used scraps of patterned papers to punch the nose and the middle of the ears. I stamped the daffodil in Daffodil Delight using my Petite Petals stamp set and punched with the coordinating punch. This is a lovely sized little box for filling with Easter chocolate-y treats.


Thank you for popping by today. You can find out more about the new Spring Summer Catalogue and Sale-A-Bration promotion by clicking here or by using the navigation menu on the left. This really is the most exciting time of the year to shop. New products and fantastic freebie rewards too. 

Please let me know if you have any questions about Stampin' Up! or our products. I would love to help. All items can be purchased online via my shop (or click on the links above to find out more about specific products) or get in touch directly and I  can order them for you to be delivered direct to your door. 

-XXX-

Built for Free Using: My Stampin Blog

Monday, 1 December 2014

Virtual Hostess Club Mini Easel Gift from Stampin' Up! UK Demonstrator Sarah Poulton


Good morning and very warm welcome from the Isle of Wight on this fine and mild December 1st morning. Today signals the official start to the festive countdown. Already today I have hung my 12 Days of Christmas cross stitch and both the girls are in the first of several (many!) Christmas outfits. I'm also going to be starting my Project Life December album today (pictures to come- woohoo!)

I have a special project to share with you today. This was a bit of a labour of love as I made 10 of these little mini easels for my virtal hostess club ladies to go with their November orders. I wanted a little decorative gift (this was my inspiration). Something a bit different to contribute to their festive preparations. I picked up the mini easels from my local The Works store.

Then came the fun bit, decorating and designing. I used the Typeset Designer Series Speciality Paper as my base. I gave it this antique aged effect with Soft Suede ink and a Stamping Sponge. 


I then stamped the flourishes and leaves (both from retired Christmas stamp sets). 

To create my Punch Art Poinsettia I punched lots of Cherry Cobbler wings from the Bird Punch and glued together in a circle layering on top of one another using Glue Dots (I also lightly daubered the edges with Cherry Cobbler ink). I then punched a Cherry Cobbler flower using the Petite Petals Punch which I curved with my Bone Folder for the top layer. For the flower centre I used three tiny Basic Pearls which I coloured with my Daffodil Delight Blendabilities Markers.


The final detail was the 'Joy' which I punched in Cherry Cobbler on to Old Olive cardstock using my Epic Alphabet stamp set. I then cut this and glued to my canvas. I finished with a bit of doodling with my Basic Black Stampin' Write marker and a mini star punched from Champagne Glimmer Paper.

I sprayed the whole canvas with Smooch Spritz to give it a sparkly festive sheen. However, this has not come out in the photographs. You'll just have to take my word for it that these canvases are lovely and sparkly.

I hope you've enjoyed my festive share today. I am so excited to start my December album with you more in the week. Keep your fingers crossed I can get the girls to sleep early enough to crack on with Day 1.

If you have any questions about today's project or the products I have used, please get in touch on poulton_sarah@yahoo.co.uk or 01983 609249. You can order online direct through my store by clicking the product links above or the pictures below. I also have availability in the next few months for your very own crafty party so drop me a line to find out more and get your date in the diary.

Happy Crafting
-X-

Tuesday, 25 November 2014

Fun Sweety Elf Leg Hanger Decoration from Stampin' Up! UK Demonstrator Sarah Poulton


I love this quick and easy little Christmas make. The picture above makes me think of two cheeky elves leaning against a wall getting in to mischief.

I designed this project for our monthly card class this past Saturday and the ladies all enjoyed making these cheeky little chaps (or their legs at least).

This all came about when I was shopping in my local 99p shop and came across these sherbet and jelly sticks. I knew they would work perfectly as Elf Legs. I've placed the sweeties in to the Stampin' Up! 1"x8" Cello Bags (although these ready packaged sweets don't necessarily need them). So instead of these sticks you could use multicoloured choccies or jelly sweets.


To create the shorts I cut a Top Note from Old Olive and folded in half. I used my Chalk Marker to add the stitched detail. The shoes were cut from a Real Red Top Note shape. And to finish I added Gold Foil button details to the shorts and to the boots and Gold Ribbon around the ankles.

Today sees the launch of a fantastic recruiting promotion from Stampin' Up! You can join my team and get started with your Stampin' Up! business with a fantastic 25% off the £99 Starter Kit (for one week only!). What a great deal! I'd love to welcome you to my team of Inkin' Owls. You can find out more by clicking the 'Join my Team' tab above or get in touch with me directly for more information.

If you have any questions about today's project or the products I have used, please get in touch on poulton_sarah@yahoo.co.uk or 01983 609249. You can order online direct through my store by clicking the product links above or the pictures below. I also have availability in the next few months for your very own crafty party so drop me a line to find out more and get your date in the diary.

Happy Crafting
-X-

Monday, 24 November 2014

Pop Up Angels Box Card from Stampin' Up! UK Demonstrator Sarah Poulton

Good morning and a very Happy Monday to you.

I hope you have had a very crafty and productive weekend. I have been very busy with my monthly card class as well as making some lovely notes and pressies for my customers and virtual club members. I am particularly proud of my virtual club gifts this month. I will be sharing those little lovelies with you later in the  week.

To celebrate the upcoming festive season I have a whole week of lovely craftiness to share with you every morning this week. My first crafty share is this pop up Angel box card.


I am very partial to punch art and creating little characters using my punches. I had seen a few festive box cards across the blogosphere and I'd also seen a few variations of punch art Angels. I decided to have a go at combining the two.

I just love the festiveness of this little card (which folds down flat for easy posting- although with the pearl embellishments I think it'd be a large letter rate).

I started with a standard A4 base of Cherry Cobbler cardstock. I scored along the long side at 7cm, 14cm, 21cm and 28cm. I then turned and scored at 7cm (and then cut at 15cm). This gives you your basic box shape. You use the scrap piece of card to create the little Z shape tabs that stick inside your box for your pop ups to stick to. For more explanation I used this video by the lovely Monica to help put my base together.


For the decorative layers I used Brushed Gold cardstock and the Trim the Tree Designer Series Paper Stack.

My Angels were created using my 1 3/4" and 1 1/4" Circle Punches for the Champagne Glimmer halo (and for the face punched from Very Vanilla). I used the Decorative Label Punch for the body and a retired butterfly die for the Angel wings.

The one bit of stamping on this card was the sentiment taken from The Newborn King stamp set. I used this as the card looked overall like a choir of Angels singing. So I wanted the sentiment to reflect a Christmas carol.


Thank you for popping by today. I hope you enjoyed today's crafty festive project. I'll have projects to share every day this week so please come back to see what else I've been creating.

If you have any questions about today's project or the products I have used, please get in touch on poulton_sarah@yahoo.co.uk or 01983 609249. You can order online direct through my store by clicking the product links above or the pictures below. I also have availability in the next few months for your very own crafty party so drop me a line to find out more and get your date in the diary.

Happy Crafting
-X-

Friday, 18 April 2014

Good Friday Easter Punch Art Treats


Just a quick and easy Good Friday Easter share with you today. I made these simple punch art Easter Treats as a little extra gift for Summer to go with the Easter Basket I previously made her.

I had seen similar projects made on Pinterest but came across this lovely blog by a US Demonstrator, Jill Franchett. I loved her little punch art creations so set about making my own little treat holders.


The base is a piece of Daffodil Delight measuring 4cm x 14.5cm. I scored it along the long side at 6cm and 8.5cm and punched each end using my Scallop Tag Topper Punch (which I closed with a short length of Daffodil Delight Ribbon). I then mounted my two punch art creations to the front (and also secured some Easter chocolate treats to the inside. I glued two small wrapped choccie rabbitswith a glue dot).

Both punch art animals were created with my 1 3/4" Scallop Circle Punch (Daffodil Delight and Whisper White Cardstock). For the sheep I punched a flower using a retired floral punch (which I didn't realise was retired till I just tried to find it to link here!! DOH!!!!). For the chick I cut a small square from Tangerine Tango and folded in half for the beak (does not need to be perfect). I used my Small Heart Punch for the wings and feet. And I used the 1/2" Circle for the white part of the eyes and the small circle from the Itty Bitty Punch Pack for the Basic Black eye centres. Both characters were finished with a small Daffodil Delight bow made from Daffodil Delight 1/4" Stitched Grosgrain Ribbon.

Wishing you all a very lovely long Easter weekend. I'm keeping my fingers crossed for beautiful weather for barbecues and car boot sales. And here is to hoping we all get a bit of crafting time too. If you have any crafty questions or need any further information about Stampin' Up! please get in touch on poulton_sarah@yahoo.co.uk or 01983 609249 and I'll be happy to help.

Happy Crafting ;0)
-X-

Monday, 14 April 2014

Easter Bunny Punch Art Treats


Good morning all. And how was your weekend? What beautiful weather we had here on the Isle of WIght (and i hope wherever you are in the world too). We celebrated with our first barbecue of the year. I have been following the Slimming World diet and was amazed at how easy it was to eat at a barbecue within the plan. Lean meat and a big plate of salad. Perfect! And Summer enjoyed being outside too. She would much rather be in the sunshine than cooped up indoors.


So today's crafty Easter share is a punch art Easter Bunny using the Treat Cups. I had seen a few variations of this rabbit around the internet so set about creating my own happy little Easter treat bunny for a friend's little boy. I am packaging up his 1st birthday gifts today and wanted to include a little Easter-y treat for him too. I found these little Easter chocolate coins in Tesco and knew they would fit the Treat Cups perfectly ;0)

Here are all the components of the Easter Bunny:


For this Treat Bunny I used:


Embellishments: Treat Cups, googly eyes from my stash

After punching all the components of the Bunny I inked the edges of the main body with Blushing Bride ink and a sponge dauber (all parts but the 3/4" circle eyes). I then assembled the Bunny.

You can order any products through my online store by clicking here or by clicking any of the product links above. I will also happily order any products for you. Just drop me a line on poulton_sarah@yahoo.co.uk or 01983 609249 and I'll happily assist.

And don't forget Stampin' Up!'s Weekly Deals. This weeks FAB die cutting product deals are only available until tomorrow. So grab a bargain now by clicking the picture below.


Happy Crafting
-x-